Tuesday, December 29, 2020

Holiday lights in San Francisco's Golden Gate Park

Last week I was up in San Francisco with my son and his wife because we heard about some special holiday lights in Golden Gate Park to celebrate the park's 150th anniversary. As you may know, I love night photograph, so I was excited to see the display with them and also capture some images in the camera. 

(Canon R6Canon RF 24-105mm lens at 34mm, ISO 125, f/13, 8 second exposure)

Our first stop was in the main concourse of the park (where I thought the light display would be located). The newly remodeled Music Bandshell was lit, but not much else. 

(Canon R6Canon 100-400mm lens at 400mm, ISO 2000, f/15.6, 1/20 second exposure)

This was the same night as the conjunction of Jupiter and Saturn, but it was not a great shot with the Canon R6 and Canon 100-400mm lens. I needed a lot more reach!

(Canon R6Canon 100-400mm lens at 400mm, ISO 100, f/15.6, 1/400 second exposure)

But we did have a great view of the moon!

(Canon R6Canon RF 24-105mm lens at 32mm, ISO 640, f/9, 3 second exposure)

After a little searching on our phones, we found the location of the "Entwined" display which was a short walk away in Peacock Meadow. I used my Canon R6 camera with the Canon RF 24-105mm lens and mounted it to my Gitzo tripod and Acratech ballhead.

(Canon R6Canon RF 24-105mm lens at 32mm, ISO 640, f/4, 1/6 second exposure)

It was fun to capture the ever changing colors and brightness of the display.

(Canon R6Canon RF 24-105mm lens at 35mm, ISO 640, f/6.3, 2 second exposure)

The Conservatory of Flowers was lit with projectors, which was really pretty.

(Canon R6Canon RF 24-105mm lens at 24mm, ISO 640, f/10, 2 second exposure)


(Canon R6Canon RF 24-105mm lens at 24mm, ISO 640, f/14, 2.5 second exposure)

As the patterns changed, I would keep shooting images to see which scene I liked best.

(Canon R6Canon RF 24-105mm lens at 24mm, ISO 640, f/14, 2.5 second exposure)

This reminded me of my time in Sydney, Australia during their Vivid display (which you can see below).

(Canon 5D Mark IV, Canon 24-105mm lens at 59mm, ISO 160, f/4, 1.3 second exposure)

I had so much fun leading a photo tour in Sydney during the week of their light show. You can see those images here.

(Canon R6Canon RF 24-105mm lens at 35mm, ISO 640, f/8, 13 second exposure)

Before heading home, Emma wanted to see the Golden Gate Bridge at night for the first time. I drove us down to Fort Point, where we were lucky enough to have calm winds and a nice temperature. I took photos of the bridge, but knew that it needed something more. 

(Canon R6Canon RF 24-105mm lens at 31mm, ISO 640, f/8, 15 second exposure)

I lowered the tripod to include the chain in my photo, and lit the chain with the flashlight of my iPhone. That one added element made the photo so much more interesting. 

Even though I grew up in San Francisco, it just never gets old shooting there.

Oh...and not only did we have a great time in the city, but we also enjoyed an unbelievably good pizza from the world famous Tony's Pizza Napoletana!


__________________________________________________________________________
Subscribe to the Jeff Cable Photography Blog by clicking HERE!
__________________________________________________________________________
If you are interested in purchasing ANY equipment, please click here to go to B&H Photo, as I get a referral from them if you enter this way. It does not change the cost to you in any way, but it helps me keep this blog up and running.
__________________________________________________________________________
Check out my upcoming photo tours to amazing places around the world. I have photo tours to Africa, Costa Rica, Cuba, Europe, Asia, India and more. And Canon will loan you any gear you want for FREE for any of my tours. 

__________________________________________________________________________  

Monday, December 14, 2020

Holiday gift ideas - and some of my favorite products of 2020

I know this is a little late in the holiday shopping season, but some people have asked me to list out my favorite newer products and give them some suggestions to add to their gift list this year. The following list includes my favorite photography equipment which range from very inexpensive accessories to more expensive cameras and lenses. I have put shopping links for each item so that you can go right to B&H Photo to order if you want.

I hope this helps you find something good for family, friends or yourself.


Canon R5 and R6 Mirrorless Cameras

Price: Canon R5 ($3899) and Canon R6 ($2499)

I have reviewed both of these cameras in previous blog posts and have found them to be game changers. Even though I have the Canon 1Dx Mark III and Canon 5D Mark IV in my gear bags, I keep opting for the new mirrorless cameras to do my work. The Canon R5 has a massive 45MP resolution while the Canon R6 only has 20MP. But honestly, 20MP is more than enough for what I shoot (95% of the time) and so I have opted to use the Canon R6 for the bulk of my professional shooting. The Canon R6 is also much less expensive than the Canon R5. Either way, you won't go wrong with one of these amazing products.


Canon RF 100-500mm lens

Price: $2699

I returned from the rain forest of Costa Rica in the middle of November, where I used the Canon 100-500mm lens for the first time. This lens is not ideal for low light shooting, since the best aperture at 500mm is f/7.1, but for any situation with decent light, this lens is great.  It is super sharp all the way from 100mm to 500mm, with fast focusing and easy hand holding.


Thinktank Essentials Convertible Rolling Backpack

Price: $279

I love the camera bags from Thinktank and have been using them exclusively for many years. They are super rugged and I have never had any issues with them, even having taken them around the world countless times. My go-to bag for the last 5 years has been the Thinktank Streetwalker Rolling Bag, but their latest rolling backpack is even smaller and lighter. For those times when I want to travel light, I am now using the Thinktank Essentials Convertible Rolling Backpack which can be rolled or used as a backpack. For longer trips when I pack a lot of gear, I still opt for the Thinktank Streetwalker Rolling Bag, and for shorter trips or day trips from home, I am now using the Thinktank Essentials Convertible Rolling Backpack. Both are awesome!


MagMod Magbox and MagShoe

Price: MagBox ($179) and MagShoe ($59)

I am a simple guy who likes to go out and take nice photos without taking a truckload of equipment with me. When I go out to take portraits of people, I take the MagBox. I really like the light weight of this product, but the best part is the simple way in which it sets up and breaks down. And I mount this on the MagShoe, which is on top of every one of my light stands now. I know this sounds weird to say that a flash folder makes a huge difference to me, but this one does. It holds the flash better than any other product and even locks it in place. Both of these products are simple and work incredibly well.


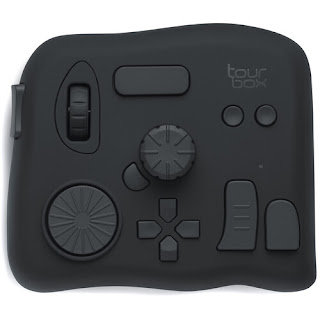
Tourbox
Price: $159

I recently reviewed the TourBox on the blog (which you can see here), and have fallen in love with this little accessory. You can read the review to learn more about this little known product. But trust me when I say that this little tool can really help you save time when editing.


Macbook Pro 16"
Price: Starting at $2099 (and up depending on configuration)

About a year ago I reviewed the new MacBook Pro 16" from Apple and was really impressed with the performance and usability of this laptop computer. It is so good that I have never traveled without it. When it came time to upgrade my desktop system, I actually researched different options and decided to purchase a second MacBook Pro 16" to act as my desktop workstation (connected to an external monitor and keyboard). I opted for the unit with a 2TB SSD (since most of my data is stored on the Drobo 8D RAID system) and 64GB of RAM (to make sure I got the best performance when using programs like Adobe Photoshop).

iPhone 12
Price: (Depends of carrier and capacity)

I was really happy with my iPhone 11 Pro that I had been using for more than a year, and even contemplated holding onto that phone and not upgrading to the iPhone 12. But with the new 5G network (providing super fast Internet access) I saw that as a reason to upgrade. Heck, the iPhone is my most used piece of technology and so it better be good. I decided not to go with the iPhone 12 Po since the main difference was in the camera lenses, and if I want a really good wide photo, I will grab my Canon R6.


ProGrade Digital V90 SD Cards

Price: From $84 (64GB) and up

Now that I am doing almost all of my professional photography using the Canon R6, I need to get a lot more SD memory cards. I love the V90 cards from Pro Grade Digital because they are fast and very reliable. The speeds are perfect for capturing RAW images and 4K video (which I am starting to shoot now).


Powerex Batteries and Chargers

Price: $12 and up

Things don't have to be expensive to be useful, and that is the case with the Powerex batteries. These are not really new, but the company has come out with some new chargers with which you can recharge the batteries. I have their D cells (for flashlights), AAA (for my wireless microphones), but mostly use their AA batteries for all of my Canon 600 EX-RT flashes. These batteries last a really long time. I am still using sets of AA batteries that I put into use 3 years ago. My favorite charger is the MH-C800S which will charge AA and AAA batteries in an hour.


Jeff Cable Sweatshirt, Hat or Mask

Price: Sweatshirt ($35), Hat ($19), Mask ($15) - Plus $8 shipping

OK, I know that these are not really photography accessories, but I thought I would add them to the list anyways. I do have branded sweatshirts, hats and face masks if you are interested in proudly wearing these while you are taking photos. If you are interested in purchasing these, click here.


__________________________________________________________________________
Subscribe to the Jeff Cable Photography Blog by clicking HERE!
__________________________________________________________________________
If you are interested in purchasing ANY equipment, please click here to go to B&H Photo, as I get a referral from them if you enter this way. It does not change the cost to you in any way, but it helps me keep this blog up and running.
__________________________________________________________________________
Check out my upcoming photo tours to amazing places around the world. I have photo tours to Africa, Costa Rica, Cuba, Europe, Asia, India and more. And Canon will loan you any gear you want for FREE for any of my tours. 

__________________________________________________________________________  

Tuesday, December 1, 2020

I am addicted to this new inexpensive photography tool

I have to admit something to all of you...I have been using a new tool on my main editing workstation for the last 6 months and only mentioned it on my Zoom meet ups. I have been meaning to write a blog post about it, but just have not gotten to it. Well...until now.

The product is called the TourBox and it has become an essential part of my workflow now. The company contacted me at the beginning of the year and offered to send me one to try. They said that they had a product that would help save time in my editing by customizing buttons and dials for commonly used tasks. I agreed to try it but did not have high expectations. I figured that this would be another gimmick that I would try a couple of times and throw in a box never to be used again. But I was definitely wrong.

The first thing I noticed was that the product was packaged really nicely which made me think that this company took this product seriously. I removed the TourBox from the box and noticed that it had some serious weight and a really solid build. The buttons and dials all moved with precision. Not what I was expecting.

Then the big questions was: What would this do for me? 

As many of you know, I do almost all of my culling and retouching using a combination of Photo Mechanic and Adobe Photoshop. I do not have a mouse on my editing computer, instead I rely solely on the medium sized Wacom Intuos graphics tablet. 

So...my right hand is usually holding the Wacom stylus, and my left hand used to work the keyboard to select the Photoshop tools, brush sizes and more. 

Now my left hand rests on the TourBox and I have most of my common commands programmed to the TourBox buttons and dials. It works with Mac and Windows and comes with very intuitive software for customizing the device. I have one dial set to control the zoom level, another set to control brush size, and buttons set for commonly used tools like the healing brush, clone tool, the undo command and others. There are many knobs, wheels, and buttons on the top and side of the device. I even have a different set of shortcuts for different applications on my computer, and the software automatically knows which program I am using and switches the commands without me having to do anything. 

I did not even know that I was becoming addicted to this product until I had to unplug it one day to plug in another USB device. I started to retouch some images and immediately became frustrated without having the simple controls of the TourBox. It was plugged back in immediately and has not been removed since.

The price of the TourBox is $159 which makes it a pretty inexpensive tool in the photography world. And since it helps me work faster and more efficiently, I think that this is a great value.  I thought I would share this with all of you, since it could be a great holiday gift for you or your photography friend. 

__________________________________________________________________________
Subscribe to the Jeff Cable Photography Blog by clicking HERE!
__________________________________________________________________________
If you are interested in purchasing ANY equipment, please click here to go to B&H Photo, as I get a referral from them if you enter this way. It does not change the cost to you in any way, but it helps me keep this blog up and running.
__________________________________________________________________________
Check out my upcoming photo tours to amazing places around the world. I have photo tours to Africa, Costa Rica, Cuba, Europe, Asia, India and more. And Canon will loan you any gear you want for FREE for any of my tours. 

__________________________________________________________________________ 

Friday, October 30, 2020

Engagement portraits: Chasing the light in Lake Tahoe

A couple of weeks ago I was invited to join my brother and his family in Lake Tahoe, CA for a couple days of relaxation. Since I am not very good at the whole relaxation thing, and since my nephew and his finance were due for some engagement photos, we decided to make use of the beautiful location to capture their photos. 

Capturing portraits in a new environment is always a challenge, even in a pretty place like this. I had to figure out where we would take the photos and determine the best times for optimum lighting. As always I try to keep my setup very simple with a Canon R6, two lenses (Canon 70-200mm and Canon 24-105mm), and a couple of Canon 600EX-RT flashes. I thought that this would make an interesting blog post for all of you, with me explaining how I determined the shooting locations, compositions, posing and lighting.  

Let's start with the scouting on the day before we took the portraits...


I arrived at the cabin around 3pm, just in time for Stephanie (the bride to be) and I to drive out to a location that she and my nephew (Dean) really liked. I brought my camera with me to do some test shots. Since these were just test shots for composition, I did not bring any flashes and only shot using available light. But I knew that we could do more with the right lighting equipment during the real shoot.


We walked around this rocky area and I looked for good foreground and backgrounds. 

I looked for interesting patterns and leading lines. Looking at the location of the setting sun, I determined that this would be a good spot for late day portraits.

The next morning we decided to drive into Tahoe City to see if there were any good locations there. I didn't see anything special, but decided that we might find some nice spots along the Truckee River. After driving for no more than 10 minutes, I saw this location from the road and pulled over to test it out.

(Canon R6, Canon 70-200mm lens, ISO 100, f/6.3, 1/160 sec, Canon 600EX-RT flash at -1)

The morning sun was facing towards me, so I had Stephanie and Dean turn their backs to the sun. This kept the sunlight off of their faces, but still backlit their hair. I liked what I was seeing in the Canon R6 viewfinder, and so they changed into their nicer clothes for our first real portraits of the day.

(Canon R6Canon 70-200mm lens, ISO 160, f/7.1, 1/200 sec, Canon 600EX-RT flash at -1)

For these photos, I decided to keep it very simple, with an on-camera Canon 600EX-RT flash which was powered down to -1. This added just the right amount of fill flash to light the couple and keep them from being silhouetted. 

(Canon R6Canon 70-200mm lens, ISO 100, f/5.6, 1/250 sec, Canon 600EX-RT flash at -1)

We moved to a couple of different spots and I shot both tight and wide. In this photo, I chose to shoot using the rule of thirds, keeping them off center. Once again, I made sure that they had their backs to the sun and added light from the on-camera flash.

(Canon R6Canon 70-200mm lens, ISO 320, f/3.2, 1/160 sec, Canon 600EX-RT flash at -1)

We drove around looking for other locations, but since the sun was getting high in the sky, the choices were limited. I did find this one tree by the edge of the lake and had some fun photographing them in between the branches.

(Canon R6Canon 70-200mm lens, ISO 320, f/3.2, 1/160 sec, Canon 600EX-RT flash at -1)

Whenever I take portraits, I try come up with a lot of different "looks" for my clients (or in this case, my relatives). 

Since the mid-day light was not optimum for portraits, we took a long lunch break before heading back to the Sand Harbor Beach (the rocky area we visited the day before) around 5pm.

(Canon R6Canon RF24-105mm lens, ISO 200, f/9, 1/200 sec, Canon 600EX-RT flash)

On this visit, I came with my sister-in-law (Kath) who was nice enough to hold a couple of Canon 600EX-RT off-camera flashes and be my voice activated light stand. 

(Canon R6Canon RF24-105mm lens, ISO 200, f/7.1, 1/800 sec)

I told Dean and Stephanie that we would be chasing the light for the next 90 minutes.  We were walking all over the place and climbed some of the rocks. I saw them at the top of a rock and saw the golden sunlight on their faces. I knew that I could not get a nice shot of them looking at me, since they would be squinting, looking directly into the sun. To solve this,  I had them look out to the side. 

(Canon R6Canon RF24-105mm lens, ISO 640, f/14, 1/200 sec, Canon 600EX-RT flash)

We were walking down this pathway when I saw the sun setting behind the trees. I knew that this would be a great time to change my camera to a narrow aperture (f/14) and create the starburst effect for the sun in the background. 

(Canon R6Canon RF24-105mm lens, ISO 640, f/11, 1/160 sec, Canon 600EX-RT flash)

Once we got around the bend, I used the golden sunlight to backlight my subjects. Kath was standing behind me with one of the flashes to light them.

(Canon R6Canon RF24-105mm lens, ISO 640, f/16, 1/125 sec, Canon 600EX-RT flash)

Once again I changed the camera settings to a narrow aperture (this time f/16) for the starburst effect for the setting sun.

(Canon R6Canon RF24-105mm lens, ISO 640, f/16, 1/125 sec, Canon 600EX-RT flash)

I moved behind Dean and Stephanie to position the sun to either side of them and in between them. And then...seconds later the sun was gone.

(Canon R6Canon RF24-105mm lens, ISO 1000, f/9, 1/125 sec, Canon 600EX-RT flash at -1)

The lack of direct sunlight gave us a chance to shoot portraits in flat light. We went to a nearby rock formation and took some photos there.

(Canon R6Canon RF24-105mm lens, ISO 1000, f/7.1, 1/125 sec, Canon 600EX-RT flash at -1)

I photographed them in many different poses, with the wedding save-the-date sign and without. 

(Canon R6Canon RF24-105mm lens, ISO 1000, f/11, 1/125 sec, Canon 600EX-RT flash)

We were just about to leave the rocks when I looked up them and saw these clouds in the sky. The clouds were being lit in this pink color by the sun below the horizon. I got down low to the ground (so that the clouds would be directly behind them), put the camera in manual mode, and changed the settings to under expose the background. I had Kath point both of the Canon 600EX-RT flashes at them, to light them and keep them from being silhouetted.

At that point, I thought we were done. I packed up my gear and we headed back towards the parking lot. 

(Canon R6Canon RF24-105mm lens, ISO 1000, f/9, 1/125 sec, Canon 600EX-RT flash)

The pathway to the parking lot went parallel to the beach, and seeing the sunset, they asked if I could take a couple more photos of them there. It was getting really dark, but I knew that this could yield some nice shots as long as I could achieve focus on them. I asked Kath to get close to them and light them with her cell phone light, so that I could lock focus on their faces. Then I had her stand behind me and slightly to my right to light them with the Canon flashes.

(Canon R6Canon RF24-105mm lens, ISO 1000, f/9, 1/125 sec, Canon 600EX-RT flash)

A couple more poses and we were done! 

It was a long day of smiling for Dean and Stephanie, a fun and challenging day for me, and educational for my sister-in-law (who got a quick education on lighting). The end result were a bunch of nice photos for them to have for their save-the-date card and so much more. And now they are prepared for the photography marathon that will happen on their wedding day!

I hope that this gives you an idea of how I took the portraits and inspires you to do the same (or better). 


__________________________________________________________________________
Subscribe to the Jeff Cable Photography Blog by clicking HERE!
__________________________________________________________________________
If you are interested in purchasing ANY equipment, please click here to go to B&H Photo, as I get a referral from them if you enter this way. It does not change the cost to you in any way, but it helps me keep this blog up and running.
__________________________________________________________________________
Check out my upcoming photo tours to amazing places around the world. I have photo tours to Africa, Costa Rica, Cuba, Europe, Asia, India and more. And Canon will loan you any gear you want for FREE for any of my tours.

__________________________________________________________________________ 

Thursday, October 22, 2020

NEW VIDEO: Simple retouching of a photo to take it from good to great (or at least - much better)!

There are people out there who believe that a good photo taken right out of the camera is good enough. In my 15 years of being a photographer, I have found that almost every photo I have taken needs at least a little tweaking to make it stand out. In this new video I want to show you how just making simple adjustments can take a good photo and make it much better.

You can click this image to open the video in YouTube

In this video, I start with Photo Mechanic and then use Adobe Camera Raw to make adjustments to the exposure, shadows, highlights and color balance. After I finish with ACR, I go into Adobe Photoshop to show you how I remove distractions and generally improve a photo. All these tips are really simple, and easy for anyone to master.

As always, my goal in producing this and my other videos is to help you improve your photos and help you learn. I hope this video meets that goal.


__________________________________________________________________________
Subscribe to the Jeff Cable Photography Blog by clicking HERE!
__________________________________________________________________________
If you are interested in purchasing ANY equipment, please click here to go to B&H Photo, as I get a referral from them if you enter this way. It does not change the cost to you in any way, but it helps me keep this blog up and running.
__________________________________________________________________________
Check out my upcoming photo tours to amazing places around the world. I have photo tours to Africa, Costa Rica, Cuba, Europe, Asia, India and more. And Canon will loan you any gear you want for FREE for any of my tours.

__________________________________________________________________________ 

Monday, October 19, 2020

The Costa Rica rain forest photo tour is ON for next month!

Are you tired of being stuck at home and not being creative? We are heading to the rain forest of Costa Rica in 3 weeks! It will be safe, fun, and full of great photo opportunities. 


You can find more information on the trip HERE

We have room for four more people on this photo tour if you are interested. Contact me immediately at jeff@jeffcable.com

Thursday, October 8, 2020

Recommended camera settings for your Canon R5 and R6

There is a ton of excitement as so many people are finally receiving their new Canon R5 and Canon R6 cameras. I was one of the lucky ones to have these cameras before they were released to the public, and have a lot of time to play with them. During this time I was able to put the cameras to test in my day-to-day photography jobs and determine the optimum settings. As it turns out, the combination of changes made to the menus, button and dials made a huge impact on the overall usability of the cameras.

Even though not all settings work for all people in all conditions, I wanted to share all of these with you, so that you too can have the camera set up for the best possible image capturing. I will go through these recommendations in the order of the camera menus.

Here are my recommended settings:

Image quality: I recommend shooting in RAW or CRAW format. RAW is always the best quality, but if you are shooting a ton of images in burst mode, you might like to shoot in CRAW since the image quality is comparable to RAW and the file sizes are much smaller. You can read about this in this blog post. The biggest difference between RAW and CRAW is the ability to manipulate the image in post production. If you are planning on making major adjustments to the shadows and highlights of your images, you will probably want to shot in RAW to get the most detail possible.

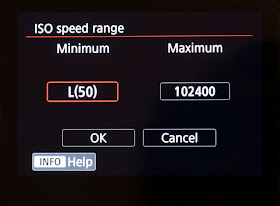
ISO speed settings: Change your Minimum speed to L(50) so that if you are ever in a situation where you are wanting to slow your shutter speed (water, motion panning), you can go slower than ISO 100. ISO 100 is still cleaner than ISO 50 but there are times when you want to kill more of the ambient light in the scene. I do not ever default to this ISO, but I like the ability to roll down to this setting when the need arrises.

Release shutter without card: Turn this OFF. Why would you want to shoot images without a memory card? (Note: I wish that Canon would default this off.)

AF method: I change this depending on what I am photographing, but mostly use the face detection since it is so good. It is either face detection or Spot AF with little in between.

Subject to detect: I leave this on "People" since I mostly photograph people. When I am photographing animals, I will change this setting.

AF Case: I have defaulted the camera to "Auto" as per a recommendation from my technical contact at Canon. So far this has proven to be excellent, with no need to change the setting to anything else. 


AF method selection control - Change this to the 2nd option which is just the dial. This will allow you to easily swap back and forth between face detection and spot AF with the top dial. (Thanks to Bob Davis for this tip!)


Orientation linked AF point - Change this to the second option so that the camera will automatically move the default focus point depending on how you are holding the camera (portrait or landscape).


Highlight alert - I recommend changing this to "Enable" so that when you are reviewing images on the LCD, you can see if portions of your image are blown out.

Record func+card/folder sel  - I always shoot CRAW images to both card slots. For this reason, I change the second Record options (Stills images) to "Rec. to multiple". 

File name - This is not a requirement, by I do prefer to change my file names to identify the camera I am shooting with. You can change your User setting1 to something that makes sense to you. I will put my initials and what camera I am using. So for the Canon R6, it might be "JCR6".


Auto rotate - I always change my Canon cameras to the middle option in this menu. This shows the images shot in portrait mode full screen as opposed to a small portion of the screen in landscape mode. Note: it still rotates the images correctly on my computer.

Date/Time/Zone - I know that this may seem obvious, but make sure to set your camera to the correct date, time and time zone. It is also a good idea to periodically check all your cameras to keep this clock in sync with your other cameras if you are using more than one. 

Custom buttons - I have been using Back Button Focusing (BBF) for so many years that I am just used to shooting this way. With the new face and eye detection of the R5 and R6, this is not as critical. But when I switch to Spot AF, I still prefer BBF. For this reason I change this setting to the top option which is "Shutter button half-press Metering start".

Customize dials - One of the great things about the Canon R5 and Canon R6 cameras is that you can change the functions of almost all the buttons and dials. I have found that the best way (and most similar to previous cameras) is to set up my dials in this order:

* AV (top front)

* ISO (top back)

* TV (back dial)

* Metering (Control ring)


My Menu: This is one of the most unused menus of the Canon cameras and also one of the best. Honestly, it is the most used menu by me. This can be found under the green star and allows you to customize this menu for your most used options. 

I have added the following to my Canon R6 camera:

* Image quality

* Subject to detect

* Highlight alert (in case I want to turn off the blinkies when showing images to a client)

* Record func+folder sel.

* Format card

* Beep (for those times when I want to turn off the beep if I am shooting in a quiet room)


As I mentioned earlier, I have found that the combination of all these modifications has been ideal for me, and that, with these settings the camera performs beautifully in almost all conditions. I hope that these settings help you to get better photos as well. 


__________________________________________________________________________
Subscribe to the Jeff Cable Photography Blog by clicking HERE!
__________________________________________________________________________
If you are interested in purchasing ANY equipment, please click here to go to B&H Photo, as I get a referral from them if you enter this way. It does not change the cost to you in any way, but it helps me keep this blog up and running.
__________________________________________________________________________
Check out my upcoming photo tours to amazing places around the world. I have photo tours to Africa, Costa Rica, Cuba, Europe, Asia, India and more. And Canon will loan you any gear you want for FREE for any of my tours.

__________________________________________________________________________