Tuesday, March 25, 2014

Photographing events and telling the story with photos

This past weekend I photographed my first Bar Mitzvah since returning from the Olympics. As I spent the day capturing photos, I realized that shooting a local event like this is similar to photographing the Olympics. The goal is to tell a story with the photos. And, no matter what I am photographing, my goal is to have fun and find unique photos for my client.

I am writing this blog to explain my thought process in setting goals for a shoot, and how I execute to make them a reality.


Whenever I shoot a mitzvah or a wedding, even if the weather is not ideal, I like to start with photos outside. To me, there is nothing better than ambiant light photos taken in a natural setting. To start the day, I took Sam outside the Temple to shoot some portraits. I like to do this with just the child and myself, as I find that having this one-on-one time helps to build a rapport with them. It also keeps all the other family members from distracting the already nervous kid. Since it is the beginning of Spring here in California, the colors of the leaves were great. I asked Sam to go around the maple bush and shot this over the top of the plant. (Canon 1DX, Canon 70-200mm, f/2.8, 1/250 sec, ISO 200)


Once I get nice photos of my main subject, I add in other family members. In this case, I asked Sam's brothers to come outside and join us. I saw that the light was coming in from behind this bench, and wanted to use this hair light for the boys. Yes, I am jealous that they have so much hair, and wanted to emphasize that in the photo. (Canon 1DXCanon 70-200mm, f/5.6, 1/80 sec, ISO 100)


After taking photos of the kids, I then invited mom and dad to join in. In this case, I placed mom and dad behind the kids to add some dimension to the photo. I am not a big fan of everyone in a line. There are times when it does work, but most of the time I find it one dimensional. (Canon 1DXCanon 70-200mm, f/3.5, 1/160 sec, ISO 160)


After shooting many photos outside, we moved into the synagogue to photograph Sam with the Torah. I did take some photos with a diffuser on my flash, but I really wanted to get more dramatic lighting on him. For this photo, I pointed the Canon 600 EX-RT flash at the wall to my left, and bounced the light off the wall and back at Sam. See how the right side of his face (our left) is brighter than the left side. This contrast of light on his face makes the photo so much stronger than an evenly lit subject.  (Canon 1DXSigma 85mm, f/1.4, 1/100 sec, ISO 320)


And again, I added in the rest of the family to get some group shots inside. Often times, I will repeat many of the same groups inside and out, since I like having a variety of photos in such different environments. Canon 1DXCanon 70-200mm, f/2.8, 1/80 sec, ISO 320)


One of the biggest challenges for us photographers is trying to capture the true personality of our subject. And even though Sam is a confident boy with an outgoing personality, most of the time he would force a smile. Even though I don't know him well, I could tell that this was not the "real him". I did my best to get him to relax, but he was too nervous about the upcoming service and not feeling it. So I asked him not to smile, which yielded better results.  (Canon 5D Mark III, Canon 24-70mm, f/2.8, 1/200 sec, ISO 640)


Guess what happened when I captured Sam in the unposed photos? Yes, you can see the real smile on his face. I was standing in the back of the synagogue shooting with the Canon 100-400mm lens (using the Canon 5D Mark III due to the silent mode of the shutter), and this allowed me to zoom in and capture Sam's real personality.


No matter how hard I tried, there was no way that I was going to get this smile out of him in a posed photo. You will notice that I also turned the camera to shoot this photo in portrait mode. I like to do this to show some of the people in the temple, and again, to add something different from the standard "safe shot".


I never use a flash when shooting a bar mitzvah, but with great window light like this, I wouldn't want it! Look how nicely lit Sam is, as he walks through the Temple with the Torah. I had the Canon 70-200mm lens mounted on the Canon 1DX and shot this handheld at ISO 3200.


The key to photographing events is the ability to capture the key moments.


And you need to be ready to do this at any moment. It is that split second where mom and dad crack up, and it is our job to grab that slice of time for them to remember forever.

After the service was over, I was photographing the luncheon when I swear that I saw Mark Zuckerberg. I thought "Nah, that can't be the founder of Facebook at this Bar Mitzvah, right?" But then I remembered that my client is an executive at Facebook and they are friends. I photographed my good friend, Steve Wozniak who founded Apple Computer, and recently had the founder of Google at one of my events, and now the founder of Facebook. Who's next?

Anyway... after the luncheon wound down, I found a nice restaurant in the area (where I could sit by a power outlet) and started going through all the images from the first half of the day. I built a slide show of all my favorite photos and edited one to print and frame for the family. Yes, I have set up a mobile printing station in my truck, with the Epson R2000, power inverter, and a pack of 13x19" Velvet Fine Art Paper. So cool!

And then it was party time. This family chose to have their party at the Hiller Aviation Museum. I had not photographed there before, and was really excited to shoot in this unique environment.


This is not your typical backdrop for a party, but I live for photographing new things. I was running around like a kid in a candy store.


After checking out the entire museum, I walked back behind the building to see where the catering was set up. And I saw the front end of a Boeing 747 sitting there. All I could think was "I need to get the family in this plane to take some photos!" I walked around and saw that the door in the back (where the plane had been cut) was locked. But, if you know me, you know that this would never stop me from a cool photo opportunity.


After the family arrived, I went and asked the manager of the museum if we could open the plane to take some family portraits. She readily agreed and we were off to check out the inside of the 747. We started downstairs in First Class, where we took some photos of them standing up and in the seats. As I was shooting, I heard the woman, who opened the plane, say something about the cockpit upstairs. Oh yeah - we had to shoot a family portrait there! (Canon 1DX, Canon 24-70mm, f/2.8, 1/100 sec, ISO 640, Canon 600 EX-RT)


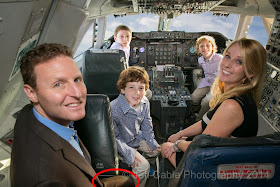
We all climbed up the circular staircase to check out the cockpit. And I was excited to see that there were 5 seats. One for each of the family. I placed the Bar Mitzvah boy in the pilot seat, and without any direction his brothers jumped into the next seats. Mom and dad took the spots closest to me and we got this cool shot. This was definitely one of my favorites from the day. The only thing I didn't like was the bright white "blown out" light coming from the windows. At that point, I figured that I could easily add some clouds to the windows when I got home to Photoshop. I will show you exactly how I did that in a minute. But first, lets get back to the party. (Canon 1DXCanon 24-70mm, f/5.6, 1/60 sec, ISO 640, Canon 600 EX-RT)


They had some really great lighting in the main area of the museum. This is where all the dancing took place. Armed with my Canon 5D Mark III and 16-35mm wide angle lens, I positioned myself right by the chair, anticipating this big moment. I took a lot of photos since the spot lights were all over Sam, making it very difficult to get a clean, properly metered shot of him. Earlier in the evening, I spotted a balcony area above the museum and I found out how to get to that location through a back staircase. Once I got my shots from up close, I ran back to grab my other camera with a Canon 24-70 lens and made a mad dash upstairs to shoot some photos over the crowd.


This photo was taken from the balcony area, looking down at mom raised in the chair.


I always look for good locations for portraits, and I found this spot to be ideal for this group shot. I had a clean foreground, the Kittyhawk plane above, and great colors in the background. I shot this with the Canon 1DX using a diffused 600 EX-RT flash mounted on the camera.


At the beginning of this blog I told you how tough it was to get a smile out of Sam. Well...that was not the case during the photo montage, as he watched a 10 minute video of him growing up. I set the 5D Mark III to ISO 5000, turned off the strobe on my on-camera flash, using the on-camera flash to wirelessly trigger my remote flash on a stand to my left. This lit Sam's face perfectly and really shows the emotion in his face.  (Canon 5D Mark III, Canon 70-200mm, f/2.8, 1/40 sec, ISO 5000)


Using the same setup, I took photos of mom and dad watching the photo montage. More great emotion.


Towards the end of the evening, I went back to my favorite portrait location and took portraits of many of the couples at the party, including mom and dad.


I like to end my day with one last parting shot of my subject. I asked Sam to sit down and give me that "I did it!" pose, and we got this. I think it is a fitting ending to a really great day for this family.

Now...as promised...I am going to show you how I took the cockpit photo and fixed it up.


This is the original photo, with the windows very over-exposed.


I went into my photo collection to find a photo with a good cloudy sky. I found a shot that I took in Colorado many years ago. I then grabbed a good wide selection of the sky and copied it onto a new Photoshop layer, over a duplicate layer of my main photo.


I then created a layer mask on the family portrait shot and painted the new sky into each window pane. This is where the Wacom Cintiq 24" HD makes a huge difference, with me painting in the new layer on the actual photo. My wife took this photo of me working on the Cintiq, as I carefully painted along the edges of the airplane window.


After I had the sky painted into the windows, I took one more look at the photo and saw one more problem. David (the father), had bright sunlight on his leg, which was a bit distracting.


I then reprocessed the RAW photo in Adobe Camera Raw and exposed to darken David's pant leg. I then copied that small portion into a new layer and moved it over the bright section, and voila!


Once again, here is the finished photo. 

I hope that this gives you an idea of how I shoot events, and how I process my photos afterwards. Honestly, it is such an honor to be invited to capture family history for others. I just love getting home, downloading all the photos, and seeing what I shot. And then, taking good photos and working on them, making them even better. But what is even better is waking up on Monday morning to an email from the family saying "The photos are AMAZING!!!!!!!". It doesn't get any better than that!

Tuesday, March 18, 2014

The new Mac Pro from Apple: Converting from the old Mac Pro, set up, and first reactions!

After years of waiting to see if Apple was ever going to come out with a new Mac Pro, earlier this year Apple announced the new model for 2013. And then, after way too many months of waiting, my new Mac Pro has finally arrived!


Wow - what a difference in size between the old Mac Pro and the new one. The old Mac Pro was really large and built up some serious heat. During the summer it was painful to work on the machine as it did double duty as a computer and a heater in my office. This new computer is tiny in comparison and seems to run cool all the time.

With that said, the size of the new Mac Pro is relative, in that there is only room for the one SSD and does not have space for any additional hard drives. When I saw the announcement of the new computer, with no expansion options for internal drives, I was a bit put off. Storage is VERY important to me and I use a lot of drive space. Apple's philosophy is to use external drives connected through Thunderbolt. This is supposed to be a very fast solution, but also adds more devices on my desk.


Thinking that the new computer was coming in December, I started my transition plan months ago. I figured out what accessories I would need and purchased those in advance. I bought some adapters, cables, and an external optical drive (knowing that I would need to burn some CDs or DVDs for clients).


I knew that I needed to get all the information off of my old Mac, which had an SSD and three 3TB Western Digital hard drives, and move the data onto Thunderbolt drives. My first step was to get a Thunderbolt hard drive that could hold a lot of data. I decided on the Western Digital 8TB drive. But I also knew that there was no way to connect this drive to my existing Mac Pro, since this machine did not have a Thunderbolt port. I devised a plan in which I would transfer all of my data to my older Drobo S, which had FireWire 800 and USB 3.0. I connected the Drobo to my older Mac through FireWire 800 and transferred all of my photos over many evenings.

Then, since I have a Macbook Pro which has USB 3.0 and Thunderbolt, I connected the Drobo S to the USB 3.0 port and the new WD 8TB drive to the Thunderbolt port and moved all the data from the older Drobo to the new and fast Thunderbolt drive. That took approximately 14 hours, but I did this overnight, so it was not a problem. I later realized that I could have also used an inexpensive Thunderbolt to FireWire 800 cable to connect the newer hard drive to the older computer. I purchased one of those, but had trouble getting it to work correctly. Since I have more than 7TB of photos which is nearly filling the WD 8TB drive, I am also connecting my Drobo 5D with 16TB of WD drives as additional storage and backup. This might be a little overkill, but it gives me plenty of room for the future.

I had a 2TB Western Digital Passport Ultra drive connected to my older Mac Pro, acting as a Time Machine backup of the SSD. This means that my operating system and applications are always being backed up. I could have connected this time machine drive to the new MacPro and moved all the applications, but decided that I wanted to start with a clean install. So, I booted up the new Mac Pro and installed the most important applications (Photo Mechanic, Photoshop CC, MS Office, Chrome, NIK Software...). I wasn't sure how to deactivate Adobe CC from my old machine, but it turned out to be simple. I just signed out on the old machine, signed in to the new one. Simple! I also moved many of my preference files and data files (like Mail, Photoshop brushes and actions, Photo Mechanic IPTC data) over from the old machine so that many of my settings would be on the new machine. I was really happy that so much of my data was transferred to this new computer over the cloud. All of my browser info (bookmarks, cookies, settings) came across seamlessly with Chrome, and iCloud made sure that all my contacts and calendar info were on the new machine. That was really handy.


Oh, I forgot to mention that my Apple 30" Cinema Display would connect to the new Mac Pro, but the adapter I purchased was the wrong one. In my preparations months ago, I purchased the Mini DisplayPort to DVI Adapter, but this would only let the 30" display go up to 1280x800 resolution. And that was not going to cut it. So I returned the adapter and purchased the Mini DisplayPort to Dual-Link adaptor and that let me show a much higher resolution. As it turns out, the day after my initial setup, I received my new Wacom Cintiq 24HD display, and that works with the new adapter as well. The first thing I did, was connect my Spyder calibrator to color calibrate the Cintiq.

The fun part of having the new Mac Pro is all the high-speed expandability that I have at my disposal. I have connected numerous Thunderbolt drives (Western Digital 8TB drives and Drobo RAID system) to the computer, and USB 3.0 for my Lexar HR1 Workflow reader solution. And I love knowing that everything connected is running at high speed. The only bad thing is that the new Mac Pro only has 4 USB ports, which are all filled now. I have so many devices (Wacom Cintiq, Epson R2000 printer, video adaptor, Dymo Labelwriter 450 printer, keyboard, Intuos tablet, card reader) that I am short one port. I have ordered a 7 port USB 3.0 hub, but I can't understand why Apple would put only 4 USB ports when they have 6 Thunderbolt ports. The Thunderbolt ports can daisy chain up to 30 devices, but the USB ports can't. A small oversight in my opinion.

I knew that 16GB of RAM would probably not be enough, so I have also added a bunch of Crucial DRAM to the computer, boosting it from 16GB to 64GB. This is much less expensive than ordering Apple's memory and worked perfectly. It should make the machine even faster. Installing the memory was so easy that I did not have to look at a manual or online. I just opened up the computer and slid in the four 16GB modules.

 Here are the 4GB DRAM modules which came with the Mac Pro. 

 I popped them out one at a time...

I then inserted each of the Crucial 16GB modules. 

There are two DRAM modules on each side of the Mac Pro.

So...at this point, you might be asking how much faster this computer is as compared to my older Mac Pro. Well....honestly, I am not sure yet. I just started editing photos on the computer and have not put it through my "real world" tests yet. My older Mac Pro was pretty decked out, but I hope to see some big differences with the power of this new computer. My goal is to never see the little spinning beach ball ever again in Photoshop.

Was it worth the money? Again, I think it is too early to tell you, but I will keep you posted once I get everything dialed in. I know that a lot of people on Facebook were saying that I could get the same amount of power from a custom built PC, but this is not what I want. I want something that works great straight out of the box, and I love the Mac ecosystem. I spend so much time on this machine, that I am willing to pay more to get the best. Time is money after all.


A lot of people talk about the cool look of this cylinder, and I agree that it is pretty slick looking. But, honestly, I have it behind my Cintiq and don't even see it. That is a good thing, as the old Mac Pro was enormous. Do I like having all the devices hanging off of the computer? Not really. I still think I would have been happier with a machine that was a little bigger with more internal expandability, but if the speed and external expandability pan out, then I can deal with that.

I plan to crank on this new computer for another couple of weeks and then give you my final decision. After 3 days of working on it, applications seem to be performing very well and I have yet to see any spinning beach ball telling me to wait. That is a good sign. Stay tuned!

Tuesday, March 11, 2014

Photographing water drops: This is really fun, and so easy that you can do this too!

I am now home from the Olympics and I am getting back to normal life once again. It usually takes me a month or so, but this time I jumped right back into the swing of things and adjusted in a couple of days. I stayed up for 30 hours straight and then slept all night and had no jet lag at all. Yippee.

But just because I am not shooting Olympic sports, does not mean that I am not shooting and blogging. After traveling for 4 weeks straight, I thought it would be fun to shoot something at home. Many years ago, I photographed water drops, and wanted to do this again. This is proof that you do not have to travel half way around the world to take fun photos. These photos were taken on our dining room table.


Let me start out by saying that, although this may look difficult, it is not too hard. And in this blog, I will explain how you can take these photos too. I started photographing the water drops without any background. I set the camera to manual mode with a shutter speed of 1/6 sec. What??? How am I freezing a very fast water drop at 1/6 sec?


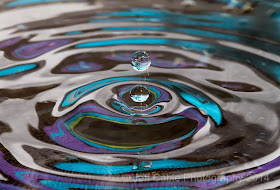
The trick is this...I was using an off-camera flash and the duration of the flash actually freezes the water drop. So...even though I had a slow shutter speed, the flash is lighting the subject so quickly that the drop is frozen in place. The color that you see in the water is a combination of the dark pan and a pink bag that was in the background.


I liked the water drop, but wanted to add more color to the water. Some people might suggest adding food coloring to the water, but as it turns out, all you have to do is change the color in the background. So, I grabbed a colorful backpack (which I brought home from Sochi) and put it behind the pan. I pointed the flash at the backpack and got a little more color in the water. But it still was not enough color for what I wanted.


Then I found a colorful towel that was hanging up in the backyard. I put it over the backpack and fired the flash at the towel, and got this. Much better!


Here is a picture of my setup. I placed a pan with water on the table, and then suspended plastic ziplock bag filled with water about 2 feet above the pan. I poked a very small hole in the bag, so that I would have a slow drip into the pan. (Note - this was the hardest part of the process, with it taking numerous attempts at getting the hole the right size, and having the right amount of water to in the bag, to create a consistent drip and not a constant flow of water.) I set my Canon 1DX camera with the Canon 100mm macro lens (although I could have easily used my Canon 5D Mark III and almost any lens that will focus within 6 inches) on my Gitzo tripod and then pointed the Canon Speedlite 600EX-RT flash towards my background. I used Canon's ST-E3-RT transmitter to fire the flash, but you can also use a flash extension cord which would work just fine and is only $30. I had a black background, but probably did not even have to have that. I used numerous colorful items as backgrounds. In this photo I have one of my wife's encaustic paintings.


As you can see, I used different props from around the house to get cool reflections back on the surface of the water. On the table, you can see my daughter's "Happy Birthday" bag, the colorful beach towel and even the seat cushion.


This photo shows the reflection off of the seat cushion. Who would have known that this simple household item could create something so awesome?!


And, it doesn't always have to be the water drop in the photo. Here is the splash caused by the incoming drop.


I really liked the reflection of the seat cushion and took many photos with this background.


This is one of my favorites from the group. Oh, at this point, you are probably wondering about my camera settings. Here is how I set the camera:

* Manual mode
* ISO 800
* Shutter speed 1/6 sec
* f/16 (to get more of the frame in focus)
* Manual focus
* Flash in TTL mode


It is very difficult to prefocus on a water drop, so I took the same pin which I used to put a hole in the plastic bag, and turned it around. The back side of the pin had this little round ball. I put the red ball right where the water drops were falling, and prefocused the camera on that spot.


This shows another photo taken with the blue and green beach towel as my background.


This pink background was using the "Birthday bag" as my background.


I even tried using a potted plant to see if I could get the color of the leaves in the shot.


As my water was dripping out of the bag, I searched the house for more colorful objects. I looked in one of our closets and found some unused wrapping paper from last Christmas. I rolled that out behind the pan of water and got this shot. If you look closely at the water drop, you can see Santa Claus hiding in there.


Another splash crater within the red and green of the Christmas wrapping paper.


Since I really like the color blue, I went back to the blue and green beach towel. But, this time I added in a blue and white beanie that I purchased in Sochi.


Here is a close up of the previous photo, showing the reflection of the blue and white beanie at the bottom of the water drop. Pretty cool huh?

I hope that this has inspired you to try this fun at-home photography project. Try it and amaze your friends with the details in the simple little things that most of us never see.

And...if you like this...stay tuned for the next blog when I teach you how to photograph smoke.