I am writing this blog to explain my thought process in setting goals for a shoot, and how I execute to make them a reality.
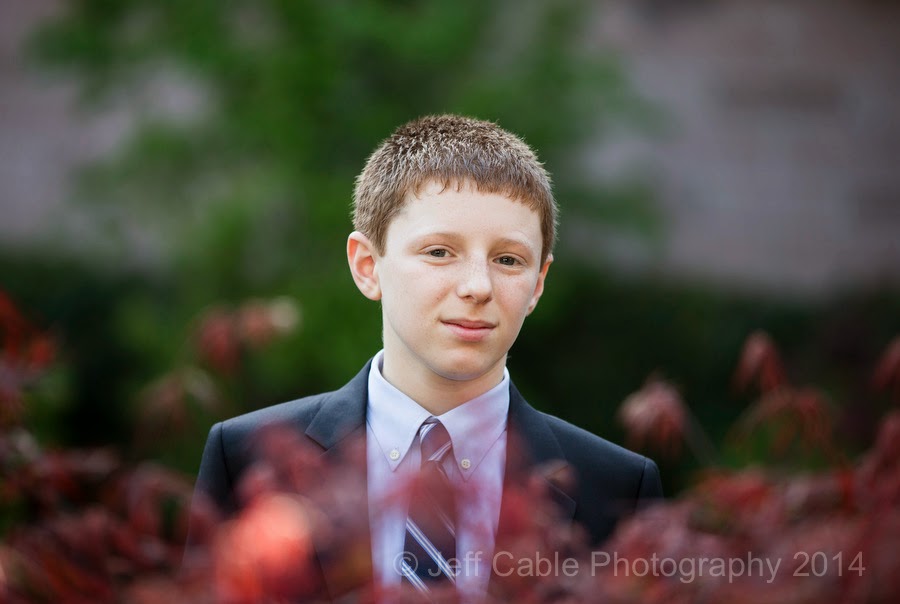
Whenever I shoot a mitzvah or a wedding, even if the weather is not ideal, I like to start with photos outside. To me, there is nothing better than ambiant light photos taken in a natural setting. To start the day, I took Sam outside the Temple to shoot some portraits. I like to do this with just the child and myself, as I find that having this one-on-one time helps to build a rapport with them. It also keeps all the other family members from distracting the already nervous kid. Since it is the beginning of Spring here in California, the colors of the leaves were great. I asked Sam to go around the maple bush and shot this over the top of the plant. (Canon 1DX, Canon 70-200mm, f/2.8, 1/250 sec, ISO 200)
Once I get nice photos of my main subject, I add in other family members. In this case, I asked Sam's brothers to come outside and join us. I saw that the light was coming in from behind this bench, and wanted to use this hair light for the boys. Yes, I am jealous that they have so much hair, and wanted to emphasize that in the photo. (Canon 1DX, Canon 70-200mm, f/5.6, 1/80 sec, ISO 100)
After taking photos of the kids, I then invited mom and dad to join in. In this case, I placed mom and dad behind the kids to add some dimension to the photo. I am not a big fan of everyone in a line. There are times when it does work, but most of the time I find it one dimensional. (Canon 1DX, Canon 70-200mm, f/3.5, 1/160 sec, ISO 160)
After shooting many photos outside, we moved into the synagogue to photograph Sam with the Torah. I did take some photos with a diffuser on my flash, but I really wanted to get more dramatic lighting on him. For this photo, I pointed the Canon 600 EX-RT flash at the wall to my left, and bounced the light off the wall and back at Sam. See how the right side of his face (our left) is brighter than the left side. This contrast of light on his face makes the photo so much stronger than an evenly lit subject. (Canon 1DX, Sigma 85mm, f/1.4, 1/100 sec, ISO 320)
And again, I added in the rest of the family to get some group shots inside. Often times, I will repeat many of the same groups inside and out, since I like having a variety of photos in such different environments. Canon 1DX, Canon 70-200mm, f/2.8, 1/80 sec, ISO 320)
One of the biggest challenges for us photographers is trying to capture the true personality of our subject. And even though Sam is a confident boy with an outgoing personality, most of the time he would force a smile. Even though I don't know him well, I could tell that this was not the "real him". I did my best to get him to relax, but he was too nervous about the upcoming service and not feeling it. So I asked him not to smile, which yielded better results. (Canon 5D Mark III, Canon 24-70mm, f/2.8, 1/200 sec, ISO 640)
No matter how hard I tried, there was no way that I was going to get this smile out of him in a posed photo. You will notice that I also turned the camera to shoot this photo in portrait mode. I like to do this to show some of the people in the temple, and again, to add something different from the standard "safe shot".
I never use a flash when shooting a bar mitzvah, but with great window light like this, I wouldn't want it! Look how nicely lit Sam is, as he walks through the Temple with the Torah. I had the Canon 70-200mm lens mounted on the Canon 1DX and shot this handheld at ISO 3200.
The key to photographing events is the ability to capture the key moments.
After the service was over, I was photographing the luncheon when I swear that I saw Mark Zuckerberg. I thought "Nah, that can't be the founder of Facebook at this Bar Mitzvah, right?" But then I remembered that my client is an executive at Facebook and they are friends. I photographed my good friend, Steve Wozniak who founded Apple Computer, and recently had the founder of Google at one of my events, and now the founder of Facebook. Who's next?
Anyway... after the luncheon wound down, I found a nice restaurant in the area (where I could sit by a power outlet) and started going through all the images from the first half of the day. I built a slide show of all my favorite photos and edited one to print and frame for the family. Yes, I have set up a mobile printing station in my truck, with the Epson R2000, power inverter, and a pack of 13x19" Velvet Fine Art Paper. So cool!
And then it was party time. This family chose to have their party at the Hiller Aviation Museum. I had not photographed there before, and was really excited to shoot in this unique environment.
This is not your typical backdrop for a party, but I live for photographing new things. I was running around like a kid in a candy store.
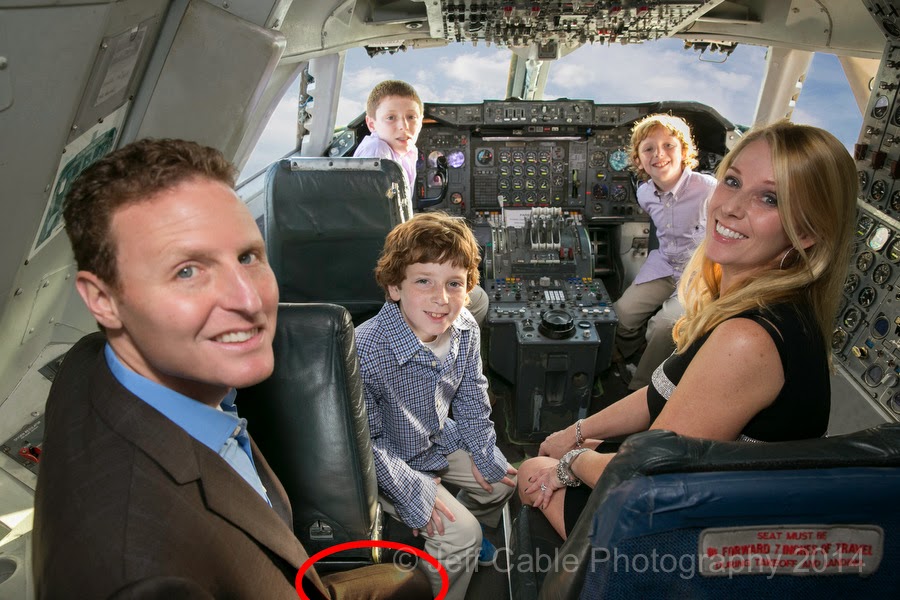
After the family arrived, I went and asked the manager of the museum if we could open the plane to take some family portraits. She readily agreed and we were off to check out the inside of the 747. We started downstairs in First Class, where we took some photos of them standing up and in the seats. As I was shooting, I heard the woman, who opened the plane, say something about the cockpit upstairs. Oh yeah - we had to shoot a family portrait there! (Canon 1DX, Canon 24-70mm, f/2.8, 1/100 sec, ISO 640, Canon 600 EX-RT)
We all climbed up the circular staircase to check out the cockpit. And I was excited to see that there were 5 seats. One for each of the family. I placed the Bar Mitzvah boy in the pilot seat, and without any direction his brothers jumped into the next seats. Mom and dad took the spots closest to me and we got this cool shot. This was definitely one of my favorites from the day. The only thing I didn't like was the bright white "blown out" light coming from the windows. At that point, I figured that I could easily add some clouds to the windows when I got home to Photoshop. I will show you exactly how I did that in a minute. But first, lets get back to the party. (Canon 1DX, Canon 24-70mm, f/5.6, 1/60 sec, ISO 640, Canon 600 EX-RT)
They had some really great lighting in the main area of the museum. This is where all the dancing took place. Armed with my Canon 5D Mark III and 16-35mm wide angle lens, I positioned myself right by the chair, anticipating this big moment. I took a lot of photos since the spot lights were all over Sam, making it very difficult to get a clean, properly metered shot of him. Earlier in the evening, I spotted a balcony area above the museum and I found out how to get to that location through a back staircase. Once I got my shots from up close, I ran back to grab my other camera with a Canon 24-70 lens and made a mad dash upstairs to shoot some photos over the crowd.
This photo was taken from the balcony area, looking down at mom raised in the chair.
I always look for good locations for portraits, and I found this spot to be ideal for this group shot. I had a clean foreground, the Kittyhawk plane above, and great colors in the background. I shot this with the Canon 1DX using a diffused 600 EX-RT flash mounted on the camera.
At the beginning of this blog I told you how tough it was to get a smile out of Sam. Well...that was not the case during the photo montage, as he watched a 10 minute video of him growing up. I set the 5D Mark III to ISO 5000, turned off the strobe on my on-camera flash, using the on-camera flash to wirelessly trigger my remote flash on a stand to my left. This lit Sam's face perfectly and really shows the emotion in his face. (Canon 5D Mark III, Canon 70-200mm, f/2.8, 1/40 sec, ISO 5000)
Using the same setup, I took photos of mom and dad watching the photo montage. More great emotion.
Towards the end of the evening, I went back to my favorite portrait location and took portraits of many of the couples at the party, including mom and dad.
I like to end my day with one last parting shot of my subject. I asked Sam to sit down and give me that "I did it!" pose, and we got this. I think it is a fitting ending to a really great day for this family.
Now...as promised...I am going to show you how I took the cockpit photo and fixed it up.
This is the original photo, with the windows very over-exposed.
I went into my photo collection to find a photo with a good cloudy sky. I found a shot that I took in Colorado many years ago. I then grabbed a good wide selection of the sky and copied it onto a new Photoshop layer, over a duplicate layer of my main photo.
I then created a layer mask on the family portrait shot and painted the new sky into each window pane. This is where the Wacom Cintiq 24" HD makes a huge difference, with me painting in the new layer on the actual photo. My wife took this photo of me working on the Cintiq, as I carefully painted along the edges of the airplane window.
After I had the sky painted into the windows, I took one more look at the photo and saw one more problem. David (the father), had bright sunlight on his leg, which was a bit distracting.
I then reprocessed the RAW photo in Adobe Camera Raw and exposed to darken David's pant leg. I then copied that small portion into a new layer and moved it over the bright section, and voila!
Once again, here is the finished photo.
I hope that this gives you an idea of how I shoot events, and how I process my photos afterwards. Honestly, it is such an honor to be invited to capture family history for others. I just love getting home, downloading all the photos, and seeing what I shot. And then, taking good photos and working on them, making them even better. But what is even better is waking up on Monday morning to an email from the family saying "The photos are AMAZING!!!!!!!". It doesn't get any better than that!


