Friday, July 31, 2015

How to photograph waterfalls - my tips to help you get great photos!

I am currently in Pennsylvania, and was out scouting locations today for a private class I am teaching here. Two of the locations that I hiked into were waterfalls.

When I got back to my hotel room and downloaded the images, I started to make notes of how to properly photograph waterfalls. I took a break and went downstairs to get some dinner, and while at the table (where they do not allow any electronics - so no distractions) I thought that the information should be shared with all of you, not just the people coming tomorrow.

So...here you go. A blog post explaining the best techniques for photographing waterfalls.


Gear

First, lets talk about the equipment that you need. Beside having a camera and lens, you really should have a good tripod and a polarizing filter. The tripod holds the camera perfectly still so that you can shoot at slow shutter speeds (which we will talk about in a moment). The polarizing filter lets you cut the glare off the tops of the still water and the wet rocks surrounding the waterfall. The filter also blocks some of the light, which is helpful. I relied on my Canon 1Dx, 24-105mm lens, Gitzo travel tripod and the Tiffen Circular Polarizing filter for all of today's photos.

Optimal weather

Believe it or not, I prefer to have overcast skies when shooting waterfalls and streams. This gives me nice even light across the frame, without the splotches of sunlight coming through the surrounding trees. The other advantage of overcast skies is that it is usually darker outside. This, along with the polarizing filter, makes it easier to get a nice slow shutter speed.

Slow shutter speeds

Freezing action in sports is great, but freeing water coming off of a waterfall is not ideal. The photo below was taken at 1/500th of a second and shows the water as we see it in person.


I prefer to slow down the shutter speed to create a milky smooth flow of water. Depending on the speed of the flowing water, I usually shoot between half a second and 2 seconds to get a nice flow.


This second image, taken in the exact same spot as the first photo, was taken with a shutter speed of 1.7 seconds. When you are shooting, I would recommend that you try different shutter speeds to see which yields the look that you want.

For those of you wondering how to slow your shutter speed, I would recommend the following. Set your ISO to 100 and then you can try shooting in shutter priority mode at the desired speed or aperture priority at a very small aperture (maybe something like f/22).

Isolate

Most people who take photos of waterfalls, do so with the entire waterfall in the photo. Sometimes it is more interesting to isolate a portion of the fall. Try zooming in with your lens to find interesting scenes within the larger picture.


I saw the water dripping straight off of the rock in the foreground and thought that this would make for an interesting shot.

Look around

OK, this may not be about shooting waterfalls, but I wanted to remind you all to look around when you are taking photos. Don't get so consumed with a subject that you miss other interesting photo opportunities.


I was walking from one area of the river to another and spotted these flowers reflecting in the still water. It is not the intensity of a waterfall, but it is definitely worth a shot.

Include foreground and backgrounds

There is nothing more boring to me than a straight-on photo of a waterfall, especially if it taken at a fast shutter speed. Heck, anyone can take that photo, and many do. You should strive to include the surroundings. Look for a scene which compliments the water fall and adds interest to the overall photo. Don't be afraid to move around (as long as it is safe) to get a pleasing angle.


I loved all the green that surrounded this waterfall. I moved to a position that let me show off the movement of the water, but also include greenery in the front and back of the frame. You will notice that I usually photograph waterfalls at an angle, to show off the cascading water off of the rocks. Even with the overcast skies, this photo was a bit bright in the background, but I knew that I could darken this in Photoshop later (which I did).


I was walking back to the main road when I saw this waterfall way off in the distance.  I switched to my Canon 100-400mm II lens to get in close, positioning myself so that the trees framed the waterfall.

More water is not always better

Contrary to what most people think, more water coming off of a waterfall is not always better. As a matter of fact, I prefer to find waterfalls that have "just the right amount of water". I don't want the water bursting over the edge, but prefer it to fall down and cascade from one water to another. To me, this adds much more interest the photo.


For this photo, I moved to a rock at the very edge of the river to that I could see the upper part of this water fall, which was otherwise hidden. Notice how the frontmost water is cascading from one rock to another, whereas some of the other water is "over" flowing. I like this photo because my "main subject" is the closest part of the fall, but there are varying amounts of water flowing in one photo.

I am going to end this blog post with two older waterfall photos.


Both of these photos were taken at Niagara Falls (from the Canadian side), but they are very different views of the falls. Both were taken at slow shutter speeds, but one is a typical wide shot and the other is an isolated shot.


I like them both for different reasons. 

OH, one more thing!

Dust spots

It is very likely that when you take these photos at a narrow aperture (to achieve the slower shutter speed), that you will notice dust spots on your photo (caused by dust on your camera sensor).


Make sure that you zoom into your favorite photos when you are editing and remove those little buggers. If you have a bunch of them, it is probably time for you to have your sensor cleaned. (I will write a blog on how to clean your own sensor coming up soon.)

I hope this helps all of you. Now go out, find a waterfall and have some fun!

_________________________________________________________________________________

If you are interested in purchasing any camera equipment, please click here to go to B&H Photo, as I get a referral from them if you enter this way. I would really appreciate that.
_________________________________________________________________________________

And also, remember that you and your friends can enter your email address at the top right of this blog to get an email any time I write a new blog post, and my monthly newsletter .


_________________________________________________________________________________


Thursday, July 23, 2015

Photographing a Swim Meet - Proper camera settings and creative ideas to help you get great photos

Both of our kids have been swimming for our local swim club since they were 4 years old. And last weekend was the last meet for my daughter. That means that, after 16 years of waking up early on Saturday mornings to watch the kids swim, we have hit the end of the road. Both kids have now aged out of the swim team.

Most people at our club know that I am an Olympic photographer, which means that people are always asking me to photograph these types of events. And for those of you who photograph sports, you know that when shooting these events, you actually miss most of the meet. I end up concentrating on the focus, composition and everything photographic, but miss the race itself. So...for many of the last meets, I chose not to bring the camera, and to just be dad.

But since this was our last swim meet, and the big final meet of the season, I decided to bring the camera and capture as much as I could.

I am going to share some of the photos with you all, and also share the camera settings and thought processes so that you too can capture nice photos of your own.

Here we go...

(2020 UPDATE - Since this is one of my most read blog posts, I decided to create a view on this subject. You can view it HERE)

My daughter in action
The first stroke is butterfly, which happens to be my favorite event to photograph. Why? Because the swimmers come out of the water quite often and look straight ahead. For that reason, I usually position myself straight on to the swimmer. And most often, when I am photographing a fast moving sport like this, I will aim for a shutter speed of at least 1/1000 sec. In this case, I put the Canon 7D Mark II in aperture priority mode, set the ISO to 250 (which is still VERY clean) and set the aperture to best that the Canon 100-400 II could get (usually f/5 - f/5.6). This gave me ample shutter speed to freeze the action.


Using the fast shutter speed freezes the swimmers and the water around them. In order to keep the swimmer in focus,, I set the camera to servo focus mode and I move the focus point to the upper center. If you do not know how to use servo focus mode, read your manual and try this. It is almost always the best way to get good photos of sports action. Get that focus point right on the face of the swimmer and fire away. The nice thing about the Canon 1Dx and the Canon 7D Mark II is that they can take photos at a very fast frame rate. Something in the area of 12 photos per second. This really helps you get photos at the peak of action.


I would shoot photos at different points of the swimmer's stroke. This would give me a nice variety of photos, not always having the swimmer looking directly at me. This shot clearly shows the muscles of this young man.


When shooting a swim meet, don't only capture the action. Have some fun and look for other good shots.


I saw the reflection of the Stanford swimming pool in this man's sunglasses and zoomed into for this photo. This is way more interesting than a straight shot of the pool, don't you think?


For backstroke, I decided that the photos would look better from a high position. So I climbed to the top of the stands and shot down from this location. For this shot, I turned the camera and I adjusted the 100-400mm lens all the way back to 100mm (on this crop sensor camera) to include most of the swimmers diving into the pool. When shooting this way, I changed the aperture to f/11 so that they would all be in focus. Even at this narrower aperture, I still had a shutter speed of 1/640 sec.


I also zoomed the lens in tight to isolate some of the swimmers diving back from the edge of the ppol.


Just like in the butterfly stroke, I will often shoot photos at different times during the swimmer's race. In this case, I chose to shoot photos as the swimmer was still underwater and just about to break the surface to start her backstroke.


I also took some backstroke photos from the pool deck. As you can tell, this yields a completely different look than the shots from up above. Don't be afraid the move around and try different shooting locations. I really like the veil of water coming over Rachel's face on this shot.


With all of the distractions at this end of the pool, I did not take too many photos of the kids diving in for the start of their race. But it is a good idea to get some photos of this, since it is an important part of the meet.


The breast stroke in an interesting event to photograph, since the swimmers come out of the water quite often and get their faces low to the water line. Much like the butterfly stroke, I usually choose to shoot this from straight on.


Some shots with them high out of the water and some not...


And then there are the mishaps. I always feel bad for the swimmers who have to complete with their goggles out of place. But it does make for some interesting photos.


I have seen many kids swim with their goggles off, but never seen anyone chewing on them as they swim. :)


And...of course, you have to photograph the little ones. They are just too darned cute!


The last stroke is freestyle, which is best captured from the side of the pool. Shooting from the side of the pool means that you can see the swimmer's face. The biggest challenge with this is when some kids only breath to one side. If they breath on the side away from where you are standing, this may mean that you can never get a shot of their face.


I usually shoot when the swimmer is directly across from me, but in this photo. I waited and shot from a position behind this young man. This let me get a shot of his face through his outstretched arm.

You might be wondering how many photos I shot over the 8 hour time period of this meet. Using the high speed shooting mode of the Canon 7D Mark II, meant that I had a lot of photos to sort through that evening. Turns out that I shot 64GB of photos (3000 images in MRAW). Luckily I was using the Lexar 128GB 1066x Professional CF card so I had plenty of room to spare. I pared through the 3000 photos, using Photo Mechanic, and kept my favorite 1200. I then went through and marked the 400 photos that I would share with the club members. I did some quick retouching in Adobe Lightroom (mostly cropping and making small exposure adjustments) before uploading them to my web site for everyone to download and enjoy.

As a recap, here is what I recommend for camera settings for a swim meet:

* High speed shooting mode (this could be anywhere from 3-14 photos per second depending on the camera)
* Servo focus to help keep the swimmer in focus as they swim to and away from you
* Keep a shutter speed of at least 1/1000 sec for all fast action (adjusting ISO and aperture to get this shutter speed)
* If you know how to shoot with back button focusing, do that. I did for all these photos. If you do not know about back button focusing, check out this video.

And some other non-camera reminders:

* Move around to get different perspectives
* Be creative and look for interesting reflections and details
* Be polite to the people around you, especially when moving in front of them to get a shot.
* Have fun

I hope this helps you get some great shots of your own!

__________________________________________________________________________

Subscribe to the Jeff Cable Photography Blog by clicking HERE!
__________________________________________________________________________
If you are interested in purchasing ANY equipment, please click here to go to B&H Photo, as I get a referral from them if you enter this way. It does not change the cost to you in any way, but it helps me keep this blog up and running.
__________________________________________________________________________
Check out my upcoming photo tours to amazing places around the world. I have photo tours to Africa, Costa Rica, Cuba, Europe, Asia, India and more. And Canon will loan you any gear you want for FREE for any of my tours. 

__________________________________________________________________________  

Friday, July 17, 2015

Photos from the ground and the air at Union Valley Reservoir in Northern California

Earlier this week, I was able to carve out some time to join my family for the annual camping trip to Union Valley Reservoir. This is is a really nice spot, not too far from Lake Tahoe. But unlike Tahoe, this is a quiet little spot with very few people and wide open spaces. And you know that I brought my Canon DSLR (5D Mark III with the 24-105mm lens) to capture photos. And this time, for the first time ever, I also brought along my DJI Phantom 3 Advanced to get some aerial photos and videos of the lake and the some water sports action.


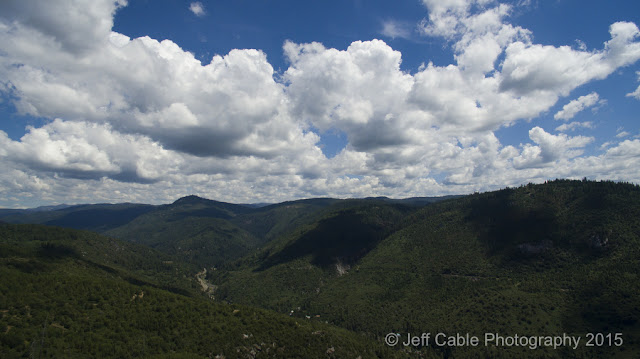
Heck, I didn't even make it to the camping site before launching the drone. As I drove up Ice House Road, heading to the reservoir, I decided to pull over and get an aerial shot of the surroundings. I loved the big puffy clouds and endless trees.

My family and my wife's extended family and friends, had been camping for 5 days before I was able to join them. I arrived on Saturday afternoon and tried as hard as I could to slow down. If you know me, you know that I move at a fast pace, and it is not easy for me to slow down and relax. One way that I do relax is when I break out the camera and capture photos. This allows me to slow down and take in the scenes around me.


This was one of the first photos that I took at the reservoir. The water level is much lower than normal due to the drought that we are suffering from in California, and there is new vegetation growing on the extended shoreline.


The next morning, I woke up early to take the dog for a walk. As we started our walk, I looked out over the reservoir and saw this perfectly still water with these great reflections. I walked straight back to the camp, grabbed my camera and started shooting. I almost didn't turn around for my camera, but I am really glad that I did. This was the only time that I saw the water so still and really like this photo. The dog was not happy, but I made it up to him with a really long walk a little later. (Photographer's note: I decided to include the boat in the photo for a couple of reasons. It helps show the scale of the rocks and trees and the red color really pops from the bottom left of the image.)


Later in the afternoon, the overcast skies had cleared and we had more of those really nice clouds. I decided to put the Phantom 3 back up in the air to get some wide aerial shots.


These aerial shots really show the decreased water levels. And this is the beginning of summer. I can only imagine what these same images would look like in another month or two.


Just for fun, I decided to rotate the camera of the drone straight down on our beach setup.


On the second day, I did a little impromptu photo class for my nephew's girlfriend, Julie. She really loves photography, and it was fun to share the photo passion with her.


As part of the lesson, I decided to get my nephew, Shane, into the fun. I was showing Julie how to use an external flash to create directional light. Using Shane as our model, I moved him next to one of the white camper shells, had him look towards the camper and bounced the flash off of the white wall. This was taken in broad daylight, but I used the manual settings of the camera to darken the scene. (Canon 5D Mark III, 24-105mm lens, ISO 100, f/13, 1/200 sec, Canon 600 EX-RT flash in TTL +1/2 stop)


On Monday, I decided to take some risks with the Phantom 3. I figured that with all of my experience flying the drone, that I could shoot video of the kids on their wakeboard from the back of the boat. I had a blast following them, shooting video, as we motored around the reservoir.


These are a couple of screen grabs from those videos. (I am hoping to have the videos edited and posted soon.) I just love the unique perspective that these aerial cameras bring to us photographers.


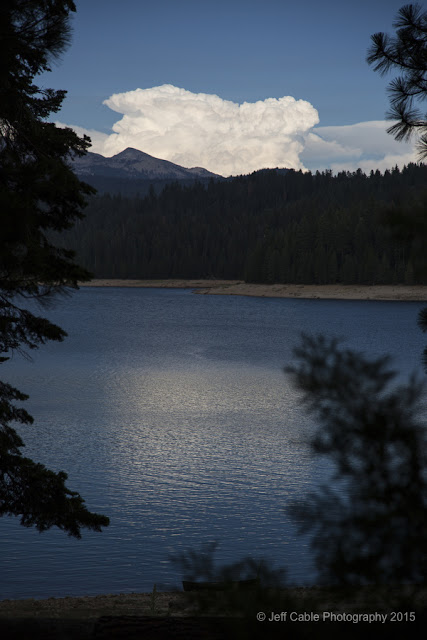
Late in the afternoon, on our last day at Union Valley, I saw this white reflection on the water. I had to move to a different location to find the source of that reflection. There was this huge cumulous cloud out in the distance.

As night fell, Julie asked me if we could do some night shots. And you know that I LOVE night photography! I went to my car and grabbed the Gitzo tripod with the Acratech ballhead and cable release from my trunk.

It was time to capture some night shots of the AMAZING sky!

(Canon 5D Mark III, 24-105mm lens at 24mm, ISO 2500, f/4, 41 sec)
Julie and I walked down to the beach area, away from all the lights of the campfire. I set the Canon 5D Mark III on the Gitzo tripod and set the camera at .... We tried different settings to determine the best for this scene. I prefer to use lower ISO settings, but this meant that my shutter speed would be longer and the stars would be streaked (showing the Earth's movement).

(Canon 5D Mark III, 24-105mm lens at 24mm, ISO 6400, f/4, 20 sec)
This was my favorite night shot, showing the Milky Way to the left of the silhouetted trees. Spending most of my time in cities, I rarely get the chance to see a sky lit up like this. I am not sure what caused the orange light just over the mountain tops, but assume that it was light from a distant town. But I love the detail in the night sky.

This is one of those photos can can not tell the full story. As we stood there, waiting for the camera to capture each image, it was so mesmerizing. Looking up at all those stars, so bright and colorful, it didn't even look real.

_________________________________________________________________________________

If you are interested in purchasing any camera equipment, please click here to go to B&H Photo, as I get a referral from them if you enter this way. I would really appreciate that.
_________________________________________________________________________________

And also, remember that you and your friends can enter your email address at the top right of this blog to get an email any time I write a new blog post, and my monthly newsletter .


_________________________________________________________________________________


Monday, July 6, 2015

A new video taken from my DJI Phantom 3 Aerial camera (Drone)

I just posted a video that I edited last weekend. This was taken with the DJI Phantom 3 Advanced (Drone) flying over our local swim meet. It really shows what a cool new perspective you can capture with an aerial camera. You can click on the video shot below or see it HERE.


I combined shots from high above the pool and low enough to see the swimmers in action. I would have flown even lower except that it would have disrupted the swimmers and probably irritated some of the parents as well. I might try that shot with just one or two of the older swimmers during a practice some time.

My goal was to get videos and still shots that I could not get from my normal vantage point (on the ground). I have photographed these swim meets for many of the 15 years that my kids have been swimming for our local swim club, and it was so cool to be able to see the competition from above the swimmers for the first time.

The last sequence shows the final relay (15-18 year olds) and it shows how impressive these kids really are. I especially love the butterfly stroke (at 3:30 in the video). You can really see the power in their strokes.

I hope you enjoy this...

_________________________________________________________________________________

If you are interested in purchasing any camera equipment, please click here to go to B&H Photo, as I get a referral from them if you enter this way. I would really appreciate that.
_________________________________________________________________________________

And also, remember that you and your friends can enter your email address at the top right of this blog to get an email any time I write a new blog post, and my monthly newsletter .


_________________________________________________________________________________


Wednesday, July 1, 2015

How to photograph fireworks - something to think about BEFORE the 4th of July

I have received numerous questions from readers asking how to properly photograph fireworks. As the 4th of July is only days away, I thought I would help you all get better photos from this year's fireworks show. And the good news is that I can point you all to last year's blog entry.

You see, last year, I posted a blog on photographing fireworks, but I did so on the 5th of July (using the previous night's photos as examples or what to do and not do). And yes, there were numerous comments from readers saying "I wish I had known this last night." Well...here is your reminder to check out the "do's and don'ts" of photographing fireworks You can check out that blog entry HERE.

In the mean time, here are some of my favorite fireworks photos:


In Beijing, during the Opening Ceremonies of the 2008 Summer Olympics


Fireworks over Niagara Falls (from the Canadian side)


Fireworks over Melbourne, Australia


A celebration of the 125th anniversary of the Statue of Liberty in New York


Another shot from the Statue of Liberty celebration


Christmas celebration in Mammoth, CA.

In case you missed the link to last years blog, it is HERE.

To all of you in the US, have a great 4th of July!
_________________________________________________________________________________

If you are interested in purchasing any camera equipment, please click here to go to B&H Photo, as I get a referral from them if you enter this way. I would really appreciate that.
_________________________________________________________________________________

And also, remember that you and your friends can enter your email address at the top right of this blog to get an email any time I write a new blog post.


_________________________________________________________________________________