* Canon 5D Mark IV camera
* Canon 100-400mm II lens
* Canon 1.4x tele converter
* Gitzo tripod
* Acratech ball head
* Lexar 128GB 1066x Memory Card
* Canon Shutter Release Cable
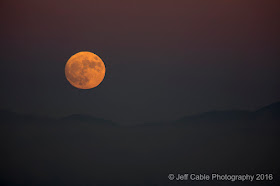
I used the LightTrac app on my iPhone to determine the exact time and location of the moon rise. When we got to the top of the mountain, I was a little disappointed to the see the hazy sky over downtown San Jose. but that was not going to stop me from capturing photos. I set the camera on the tripod and prepared for the moonrise. And just as the app told me, the moon rose above the mountain tops in the distance.
My wife was nice enough to take some photos with her iPhone, so you can see my setup.
I worked quickly to get shots of the moon coming up over the mountains, knowing that this would not last long.
I shot photos wide (to show the moon over the city) and tight to isolate the moon as close as I could. Since I was using the Canon 1.4x tele converter with the Canon 100-400mm lens, I was effectively shooting photos at 560mm. As you can see from this photo, the advantage of the haze is the orange coloring in the moon.

My wife, being the creative one in the family, even took a panorama shot of me shooting. Good idea Annette!
As the moon kept rising, I kept shooting.
At this point, you are probably wanting to know what my camera settings were. ( I know this, because I get so many messages from all of you asking me to give you camera settings.) So here is how I took the photos. I actually shot in two different modes. To start, when the moon and night sky were about the same brightness, I was shooting in Aperture Priority mode, but using the exposure compensation at -0.7 to darken the scene and keep the moon from being blowing out (being too bright). My settings for these images were ISO 160, f/8, 1/40 sec)
In this smaller image, you can barely see the silhouette of the mountain tops at the bottom of the frame, but it looks better in the large image.
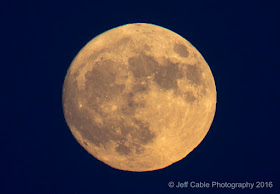
Here is a crop from another photo. The advantage to using the Canon 5D Mark IV, is having 30 megapixels, allowing me to crop in and still have very nice resolution.
One more tip for you all... Try to find a good foreground for the moon. Sure, we can all get cool close-up shots, like the image above this last one, but it is more interesting if you can find something else to show in the photo. For these photos, I used the city of San Jose. I would have preferred to use a more iconic foreground, like the Golden Gate Bridge or something like that, but I don't have the time to make the trip to SF right now.
Tonight is another chance to capture the super moon. I hope that this information helps you to capture some cool shots of your own!
ADDED: Here is a shot from tonight's shoot
For this shot, I decided to use my Canon 7D Mark II with the same lens setup. This added the crop factor making the lens closer to a 700mm focal length.
_________________________________________________________________________________
And also, remember that you and your friends can enter your email address at the top right of this blog to get an email any time I write a new blog post or send my monthly newsletter.
_________________________________________________________________________________
If you are interested in purchasing ANY equipment, please click here to go to B&H Photo, as I get a referral from them if you enter this way. It does not change the cost to you in any way, but it helps me keep this blog up and running.
_________________________________________________________________________________


ReplyDeletemakasih banyak om
umpan jitu ikan mas super
First, let me tell you that your work is stunning all these tips can be really usefull. I remember when I tried to shoot The Moon for the first time, that was a catastrophe, but if I had such a handy post back then I'd succeeded way faster. Though your photos are great, I'd rather made some formatting changes to them.
ReplyDelete