Thursday, May 31, 2018

A "Breakfast at Tiffany's" portrait session

A couple of months ago, I had one of my favorite clients contact me and ask if I could do pre-mitzvah portraits of their daughter Esti. This is something I do often, but this one had a couple of twists. For one thing, my client, whom I have worked with before, was now living in London for a couple of years. We needed to work around both of our schedules to get the photos done in CA on one of their visits back home. And since Esti loves Audrey Hepburn, she wanted her mitzvah theme to be "Breakfast at Tiffany's".  Keeping with that theme, Esti wanted her portraits to transport her back in time and take on the Audrey look.

We set a date that would work for both of us and then her mother put the plan in place. She arranged for Esti to have her hair and makeup done earlier on that day in April. While they were doing all that, I was doing some research. I have not seen the movie, but made sure to watch numerous scenes on YouTube, and pulled up images of Audrey Hepburn from back in that era.

I then went to work setting up a makeshift studio in my living room.


I started with the white side of the Lastolite reversable backdrop. This was connected to the Lastolite Magnetic Background support (which is one of my favorite photo products ever, since it makes setting up a backdrop SO easy). I used three different Canon 600EX-RT flashes for this shoot. One on either side of my subject for main lights and one which was firing onto the white backdrop.


The main lights were shooting into umbrellas that were mounted onto my Manfrotto light stands.


The third Canon 600 EX-RT was gelled using the MagMod MagGel holder. I inserted the blue gel and pointed the flash at the white backdrop. I then adjusted the exposure of the camera and flash power so that the end result would be a light blue.


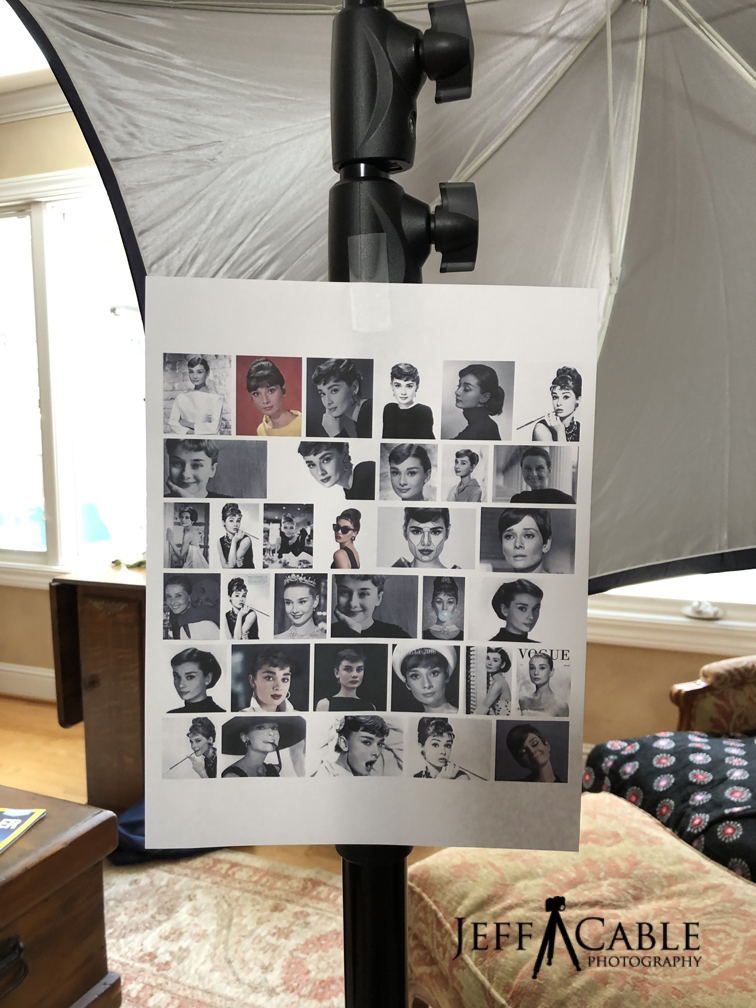
Before Esti and her mother arrived, I printed out some of Audrey Hepburn's poses that I had found on the Internet. I figured that this would be a helpful guide for Esti to mimic certain Audrey poses.

Since nobody was home at the time, I went next door to my neighbor and asked if he would sit in for me. Using him as my subject allowed me to adjust each of the flash units to get the correct exposure for Esti.

I used my Canon 1D X Mark II camera with the Canon 70-200mm lens for all the photos.

Then it was go time!


Esti showed up with the perfect hair and makeup and in a classic black dress and gloves. She totally fit the part. At first I just had her mimic some of the poses that I found on the Internet.


She is a confident and fun kid who was totally in her element here.


At one point, I did try changing the gel colors, but ended up liking the blue best, and decided to stay with that for the remainder of the shoot.


I did vary the amount of flash on the background to try different brightness behind her.


Once I had a bunch of different poses from Esti, we decided to add some props to the mix. I had given my wife a dozen roses a couple of days before this, and we decided to "borrow" one for Esti.


Esti and her mother had brought a Tiffany's bag and box with them, so we used those as well.


About a year ago, my wife purchased an old suitcase at an estate sale. She brought it home and I said "why the heck did you buy that thing?" She said that someday it could be used as a prop, and darn it, she was right once again!


When retouching the images, I sent a bunch of black and white versions to her mom. And just for the fun of it, I also decided to do some selective color editing.  They loved this one and wanted me to do a couple more.


In our living room, we have the old phone from the house I grew up in. It still has the label with my old San Francisco phone number in the middle. We handed this old relic to Esti and had her play with that for a couple of shots.


We also have some really old cameras here at the house and felt that this could be fun too.


It was Esti's idea to do a "selfie pose" with the old camera. We all laughed at that!


After we were done with all the other poses, we put the old suitcase on a stool to raise it up. I then asked Esti to lean onto it. She was smart enough to lay the gloves in front of her. I asked her not to look at me, but to look up towards my main light source. And this is my favorite photo from the 45 minute session. 


Her relatives and friends loved seeing these photos at her Bat Mitzvah last weekend. Not only did we capture photos for her big day, but photos that she and her family will cherish forever. Oh, and we had a blast doing it!

Did I ever mention that I love my job? :)


__________________________________________________________________________
Subscribe to the Jeff Cable Photography Blog by clicking HERE!
__________________________________________________________________________
If you are interested in purchasing ANY equipment, please click here to go to B&H Photo, as I get a referral from them if you enter this way. It does not change the cost to you in any way, but it helps me keep this blog up and running.
__________________________________________________________________________
Check out my upcoming photo tours to amazing places around the world. I have photo tours to Africa, Costa Rica, Europe, Asia, India and more. And Canon will loan you any gear you want for FREE for any of my tours.
__________________________________________________________________________

Thursday, May 24, 2018

Photographing a wedding by yourself - Part V - Post processing: How I cull through thousands of images quickly!

I thought that the last blog post was the final in a four part series about photographing a wedding. But I had numerous people ask me about my post processing workflow, and how I cull through 4000 photos and post the images by the next afternoon. So...I guess my four part blog is now going to head into part five!

My post processing workflow starts the minute I get home. Even though I have been going nonstop for more than 14 hours, I still feel the need to download all images (from various ProGrade Digital memory cards to the ProGrade memory card reader) that same night. I want to know that everything is downloaded successfully to my Drobo 5D3 before I go to bed. I download using Photo Mechanic and make sure that all the metadata is added (client's name, location of event, date, my copyright...)

The next morning I usually wake up feeling like I got hit by a truck, with my muscles sore and my brain tired, but I make my way back into my office to start culling through my images. The first step is to go through the whole lot and select the images I do not want to keep. Usually, these are images that fall into the following categories:

* Duplicates - since I almost always shoot multiples of every shot, I end up with duplicates.
* Subjects have their eyes closed or do not have a good expression
* The shot is out of focus or slightly out of focus
* My flash did not go off and all I have is a black image

I go through all the images in Photo Mechanic tagging the images I want to delete. I then hit "Command T" to select all tagged images and delete them. This whole process usually takes about 45 minutes.

Now that I have my keeper collection of images from the event, I select them all and then hit "Command M" in Photo Mechanic to rename them. If it is the Hamilton wedding, then the first file name will look something like this: Lynda_Cardiff_Weddding_0001. I don't use spaces in my file names since some web sites or applications don't like spaces, so I use underscores.


My next step is to go back through all the photos, but this time, instead of looking for the "bad ones", I am looking for the good ones. I rank any of the keepers (which are images I want the client to see) with the following ranking:

* Yellow (hitting 4 on my keyboard) - a good image that should be in the client's gallery
* Orange (hitting 3 on my keyboard) - this is a stand out image and one that I will likley edit for the client in advance and possibly keep in my portfolio.
* Red (hitting 2 on my keyboard) - this is a real money shot! and will definitely end up in my portfolio and on my web site. After shooting so many events, and being very selective, this is a rare occasion when I get an image that is so epic that it deserves a red mark. But I still push myself to get them.


When I am done picking the keepers from the entire gallery, I then hit "Command S" to save all the images as small JPEGs. I already have a preset created in Photo Mechanic called "Gallery Proofs" which sizes the files to 1200 pixels, compresses them at JPEG level 3, and puts them in a subfolder called "proofs".

At this point, I could upload these to my Zenfolio gallery for the client to see, but I am not quite ready to do that yet. In each client's gallery, I have a folder called "Photographer's Retouched" where I will put 10-15 fully retouched images.  I have this for three reasons:

1. I want the to show the client how the finished products will look.
2. These are images which I will watermark and send to the client in an email for them to share with family, friends and on social media.
3. These are images that I want to retouch for my own portfolio and to share on my social media channels.

Finding the best images to retouch is simple. In Photo Mechanic, I filter out all images that are not ranked or are ranked as yellow. That leaves me with only the orange and red (if there are any marked red). Ta da! I now see my ultimate favorites in the collection.

If I am lucky enough to have too many to retouch, I will then scan through these to determine which ones I will retouch. Typically I will retouch anywhere from 10-20 depending on the event. To do this, when on that image I hit "E" on my keyboard and Photo Mechanic will launch Photoshop (well technically Adobe Camera RAW) for me, so that I can properly retouch the photo.


I then color code all my retouched images in purple (hitting 1 on my keyboard). I reserve purple only for full finished images, making it very easy to find them in my folders. I then select all the purples and hit "Command S" again, but this time I choose another preset called "Photog Retouched". Basically all the settings are the same as the "Gallery Proofs" preset except that the images go into a subfolder called "photog favorites".

At this point I am ready to upload all the images to my client gallery in Zenfolio. Because I have resized the images to small JPEG files and compressed them heavily, they upload really quickly. This process takes only a couple of minutes.


Then, in Zenfolio, I customize the client's gallery url, create a password, set the duration for their gallery to be online, and send the client and invitation to see their proof images.

And no, I am still not done yet! Once I have their invitation sent, I then create a separate email for the clients with the retouched images at 900 pixels and with my logo on them. In order to put the logo in the best place, I have created a brush in Photoshop that is my logo. This makes resizing, placing and changing the logo color so easy!  I encourage them to share these small images online since this is great way for everyone in their network to see my work.

At this point, I am almost done, and breathing a sigh of relief. I am almost ready to step away from my computer and say hello to my family. But I have one more VERY important step to complete. At this point I have a folder with all the client's RAW files (many of which I have selected for the gallery and some not) as well as the images I have retouched. Everything is renamed, ranked and ready to be backed up.


I then drag that completed folder (likely to be 30GB or 40GB in size) to my Drobo 810n NAS drive. This provides me with the ultimate peace of mind knowing that my images are not just on one drive. But since I have another Drobo 810n offsite, which synchronizes every night at 11pm with the one in my studio (using the included Drobo DR software), I know that later that night all those same images are now on three different drives.

And that my friends is how I work almost every Sunday morning.

I hope that this helps all you photographers out there. I know how time consuming all this can be. By refining your workflow, you can minimize your time at the computer and spend more time behind the camera. But even more importantly, you will be able to deliver images to your client's faster and make them happier, which in turn should result in more business for you!

__________________________________________________________________________
Subscribe to the Jeff Cable Photography Blog by clicking HERE!
__________________________________________________________________________
If you are interested in purchasing ANY equipment, please click here to go to B&H Photo, as I get a referral from them if you enter this way. It does not change the cost to you in any way, but it helps me keep this blog up and running.
__________________________________________________________________________
Check out my upcoming photo tours to amazing places around the world. I have photo tours to Africa, Costa Rica, Europe, Asia, India and more. And Canon will loan you any gear you want for FREE for any of my tours.
__________________________________________________________________________

Wednesday, May 16, 2018

Photographing a wedding by yourself - Part IV - The reception

Today's blog post is the fourth and last in this wedding photography series, and fittingly covers the final part of the wedding day, the reception.

At this point, as a photographer, we have completed the toughest part of the day, trying to orchestrate all the posed shots. We have gone through the shot list to make sure that all requested photos have been taken, and done so at a fairly frantic pace. We want to make sure that we are never at fault for messing up the couple's wedding schedule. This always creates a bit of panic for me, as I am conflicted with trying to work quickly but also keep the creativity flowing.

Once the reception starts, that flow changes, because at this point I am capturing only what happens in front of me, and no longer directing anything. I am still running around trying to capture all the activity, so I still feel the pressure of capturing all the great moments, but in my mind it is now different. I am now in my photo journalistic mode,  searching for the best moments, but knowing that what happens from this point is out of my control. Even though it is louder and more chaotic, it is a little more calming to me. This would be even more true if I had a second shooter, but in this case it was just me, so I needed to be very attentive to what was happening in all areas of the room.

So...let's get to it...


Early in the day, when I was photographing the groomsmen, I noticed a bunch of cans of silly string in one of the guy's room. I asked what that was for, and he told me that they were all going to use this when the bride and groom made their entrance into the reception. I made a mental note of this to make sure I was was prepared to capture this fun. Before the wedding party was introduced, I went up to them and asked them where they were going to spray the silly string. Knowing this in advance allowed me to me prepared to capture this photo. I usually ask the participants if there are any special moments planned, since I would hate to miss something like this.


I usually set up one Canon 600 EX-RT flash on a 12' Manfrotto light stand somewhere in the room. For this reception, I decided to set up two of these, one on each corner (on one side) of the dance floor. I also had another flash on my camera, which was diffused with a MagMod MagSphere. This setup worked really well, as you can see the remote lights hitting the side and back of Cardiff's brother as he gave his speech.


BUT...when I turned the camera to photograph Cardiff and Lynda, I noticed that I did not have enough light on their faces. Putting the Canon 1D X MKII and Canon 5D MK IV cameras down quickly, I ran and moved one of the remote lights so that it faced the bride and groom. Now I had one remote facing the speaker and one remote facing them and it worked perfectly.


Taking the time to move the remote light was tough decision for me. A wedding photographer has to be ready to capture photos every second, never knowing what will happen at any given time. I knew that taking the 30 seconds to make this change could mean missing a great shot, so I had to weigh the risks versus the reward. Again, this is where having a second shooter really helps. I can rely on them to capture moments that I might miss.


But, since there were a lot more speeches and I needed more light on my main subjects, the decision turned out to be a good one.


One of the reasons that I love photographing events like this, is the challenge of capturing people's personalities in a photo. This photo of Gail (Cardiff's mother) really shows how fun and easy going she is.


And speaking of that...Lynda had some fun too. I was not expecting her to smash the cake in Cardiff's face, but after gently feeding him a bite, she went for it!


And even though I said that I don't usually pose people during the reception, there are plenty of times when I will ask people to get together for a photo. This was one of those times.


Just as in the wedding ceremony itself, where I am expected to get photos of the ring exchange, first kiss and more, there are key moments in the reception as well. The bride and groom's first dance is one of those moments.


I told you earlier that I like to know about any planned surprises in advance. But this is a good example of not knowing what was going to happen. Lynda was doing a formal dance with her father when they changed things up and had some fun. I had no idea that they were going to do this, but was ready to capture the fun.


I am a sucker for cute kids, and when I saw this little guy on the dance floor, I just could not help myself.


Some guys have all the moves (not me!)


This is another one of those key moments, when the bride throws her bouquet. Since they opted not to do a garter toss, they invited all single ladies AND men onto the dance floor for this. That made for a unique photo!


My wife and I showed up at 10am that morning to start the photos of them getting ready, and here it was 12 hours later and the day was coming to a close. As I always do, I went over to get one closing shot of the bride and groom. I decided to spin the camera and have a little fun. I grabbed my Canon 1D X MKII, which had the Canon 16-35mm lens mounted on it, along with a Canon 600 EX-RT flash and the MagSphere diffuser. I set the shutter speed to .25 second and spun the camera as I took the photo. The flash freezes my subject, keeping them in focus, but everything in the distance shows motion.

Throughout the day I had:

* Taken 4000 images
* Used two cameras, 6 lenses, and 4 flash units
* Burned through 8 sets of Powerex AA batteries
* Partially filled 6 ProGrade Digital cards
* Changed cameras settings about 500 times
* Walked more than 9 miles

The next day I had the usual feeling of being hit by a bus. But as I always do, I got up in the morning and started culling through all 4000 images to build a gallery for the couple, their friends and family. By 3pm I had my Zenfolio gallery built and the email sent off to Cardiff and Lynda.

Photographing a wedding is not for the faint of heart. It takes an enormous amount of physical endurance and mental awareness to make it through the day with a successful outcome. But the reward from all this effort is immense. I love knowing that I just captured precious photos for Cardiff and Lynda that they will cherish forever.

Congratulations to both of them, and I thank them for letting me share their images and stories with all of you.

For those of you looking to photograph a wedding for the first time, or those who were just curious what it is like to photograph a wedding, I hope that these blog posts have given you some insight.


__________________________________________________________________________
Subscribe to the Jeff Cable Photography Blog by clicking HERE!
__________________________________________________________________________
If you are interested in purchasing ANY equipment, please click here to go to B&H Photo, as I get a referral from them if you enter this way. It does not change the cost to you in any way, but it helps me keep this blog up and running.
__________________________________________________________________________
Check out my upcoming photo tours to amazing places around the world. I have photo tours to Africa, Costa Rica, Europe, Asia, India and more. And Canon will loan you any gear you want for FREE for any of my tours.
__________________________________________________________________________

Thursday, May 10, 2018

Photographing a wedding by yourself - Part III - The ceremony and portraits directly after the wedding

Today, I continue onto part III of the wedding photography series. The first two blog posts, "Getting Ready" and "The First Look" took us up until the actual wedding ceremony. And now it is time for the big moment when the bride and groom are ready to be married.

I had attended the rehearsal the day before the ceremony, which gave me some real advantages on the big day:

1. I got to know all the people in the wedding party
2. I watched them rehearse and knew how they would be entering the wedding
3. I got a chance to look at the surroundings and determine best shooting locations
4. I was able to get some test shots to gauge available light and potential camera settings


Here is the wedding party about to enter the ceremony. I moved outside to get this shot of them in this shaded location.


During the rehearsal I looked back at the barn doors where the wedding party would be entering, and determined that it was not an ideal shot. The background was so bright that all the photos would be severely backlit. I knew that I could use a flash to avoid a completely silhouetted shot, but it still was not great.


For this reason, I chose to get the shots of the attendants from outside the room. And yes, there is always one character in the group. Love it!


Here is the bride's brother escorting their mother into the ceremony. I liked this location because I had muted sunlight on their left side, and shadow on their right. This created some beautiful side-light on their faces. I did also use a Canon 600 EX-RT flash powered down by -1 stop to add a touch of light to the front of them.


Originally I thought I would have to use a remote flash to light the inside of the building. But the sun was bright enough on the wedding day and provided sufficient light for me to use the Canon 1D X MK II at ISO 2500 without any flash.


I was using the Canon 70-200mm lens at f/2.8 to get most of the photos. And yes, I used that narrow depth of view to capture this woman's phone recording the ceremony. As much as we frown on people using their phones, it is inevitable, and so I used it to my advantage.


During the ceremony, I moved from the back center to both sides, in order to get front-on to the bride and groom.


I made sure to get back to the center before their first kiss..


As they were pronounced husband and wife, I quickly switched the camera from fixed focus mode to IO Servo focus to track them as they exited the wedding. I walked backwards as I shot these photos.

Immediately after the wedding party exited the ceremony, my wife and I went to work corralling everyone for photos.


I started with the bride and groom, moving them over to these beautiful flowers, grabbing that "just married" excitement from the minutes before.


We then added the bridesmaids and groomsmen.


I like to get formal poses and more fun ones as well.


As I was taking the photos, my wife was cueing up the next groups of people, like this shot with both sets of parents.


I was taking a formal picture of the bride and groom with their brothers when they asked me to hold on a second.  The brothers jumped onto their siblings and I shot this. This photo is now their profile photo on Facebook.


Whenever I take photos, I am always keeping my head on a swivel and looking at what is happening around me. I saw this little girl walking through the flowers and had to grab a shot. Precious!


Once we got all the group shots, we took the bride and groom for a walk around the property to get some photos in different locations. I was looking for good settings, but also keeping a close eye on my watch, as I did not want to take them away from the reception for too long.


This was the last portrait I took of Lynda and Cardiff before we all returned to the wedding reception. The total time shooting portraits took 50 minutes. We were slightly ahead of schedule, and that was a good thing!

The next blog will talk about photographing the reception, including the key moments and creative lighting.

__________________________________________________________________________
Subscribe to the Jeff Cable Photography Blog by clicking HERE!
__________________________________________________________________________
If you are interested in purchasing ANY equipment, please click here to go to B&H Photo, as I get a referral from them if you enter this way. It does not change the cost to you in any way, but it helps me keep this blog up and running.
__________________________________________________________________________
Check out my upcoming photo tours to amazing places around the world. I have photo tours to Africa, Costa Rica, Europe, Asia, India and more. And Canon will loan you any gear you want for FREE for any of my tours.
__________________________________________________________________________