Showing posts with label Studio. Show all posts

Tuesday, March 19, 2024

My first LIVE television interview: Yikes!

Last week I traveled up to Sacramento to the studios of FOX 40 for my first live TV interview. I have done plenty of pre-recorded video pieces, but never done one live. As it turns out, it was a lot of fun.

After NBC ran the piece on me last month, I received an email from a producer at FOX 40, who had seen the video, asking me if I would come up for an interview on their Studio40 show. Due to my travel schedule, we had to wait 3 weeks to make it happen, but last Wednesday we got it done.


This is what it looked like behind the scene.

I was supposed to be on air for 4 minutes, but they ended up letting it go for a full 9 minutes. 

You can watch the interview here (or by clicking on the image below):

I hope you enjoy the interview.

BTW - I messed up on one detail in the interview. For those who have followed the blog for numerous Olympics, see if you can find that one mistake. :)


__________________________________________________________

• Subscribe to the Jeff Cable Photography Blog by clicking HERE!

• You can now purchase Jeff Cable Photography images from my new fine art site at: https://fineart.jeffcable.com/

• If you are interested in purchasing ANY equipment, please click here to go to B&H Photo, as I get a referral from them if you enter this way. It does not change the cost to you in any way, but it helps me keep this blog up and running.

• Check out my upcoming photo tours to amazing places around the world. I have photo tours to Africa Costa Rica and more. And Canon will loan you any gear you want for FREE for any of my tours.

 _________________________________________________________________   


Thursday, June 15, 2023

Printing big and BIGGER with my Canon printers!

In the last blog post, I talked about the importance of color calibration. I also said that I would follow up that blog post to cover the final step in the process...printing. 

For the last 8 years I have been relying on the Canon Pro-1000 printer. This printer has been an absolute work-horse for me, printing the bulk of my 4x6, 5x7, 8x10 prints for clients, and really anything up to 16x20. Then, about 6 months ago I added the larger Canon Pro-4100 printer to my arsenal so that I can print REALLY large images.

Actually - I have three Canon printers if you want to include my multifunction printer (to the left), which I generally only use for printing documents and scanning. The Canon Pro-1000 printer is right next to my computer for easy loading of smaller photo paper.


This is the Canon Pro-4100 printer taking up a lot of space in the office, but worth it. I posted this photo of my granddaughter and I (taken by my daughter-in-law) on social media last week because it is one of my favorites. I had to print that one big!

But I am getting ahead of myself here. Before I talk about the printers, I need to further explain the importance of color calibration as part of the printing process. Regardless of whether you are printing on a large format printer or a small one, the color calibration is really needed because nobody wants to spend the money on the ink and paper only to find out that the colors and brightness are off. Having the Spyder X2 connected to my computer means that, not only are my colors going to be correct both on screen and from the printer, but also that the brightness of the monitor will be set so I can properly set the exposure levels before the images is sent to the printer. With this combination, I have complete confidence knowing that what I output will be accurate, without having to reprint over and over.

Unlike many photographers, I do not use Adobe Lightroom very often, but instead choose to do all my retouching directly in Adobe Photoshop (using Photo Mechanic for all my culling and organization). Once I have done all the retouching in Photoshop, I then choose which printer I am going to output to. Most of the time this determination is made strictly on the size of the final print. If the print is going to be smaller than 16x20, then I still default to the Canon Pro-1000. Anything larger and I use the new Canon Pro-4100, which can print all the way up to 44" wide by 100 feet. 

Some people have asked me why I decided to get the Canon Pro-4100. Honestly I got this beast for the following reasons:

1. I have always wanted to be able to print my images really large, to frame and put in the house.

2. I periodically have clients who want large prints and I like being able to create them quickly.

3. I had a corporate client who wanted images printed for an office building, and it seemed more cost effective to print them here than to order a large quantity from my color lab.

One of the features I love the most about the Canon Pro-1000 is the paper loading system. Unlike many other printers, this one uses a vacuum system to pull the paper in. My previous printer (from another company) would bring paper in crooked all the time, creating a lot of waste and frustration. In all my years using the Pro-1000, I have never once had the paper go in off angle. The Canon Pro-4100 uses paper rolls, and has also been perfect in the loading and printing department. Even the process of replacing a roll is incredibly easy. I just put the roll of paper onto the bar and the printer does the rest.

As for the quality of the prints, they are always remarkable. The colors are perfect and the resolution is museum grade. There is nothing like seeing your favorite images printed in the highest quality and large!

For both printers, my favorite media is the Lustre paper and I use this 90% of the time.  


These are some of the photos that I printed for the office building. I generally lay them down on the ground for a couple of days to get the curl out of the paper (since they are coming off of a roll). 


Ever since getting the new printer, I have been having fun framing favorite images and putting them up at the house. When I get tired of them. I switch them out for new ones.

If you are interested in getting any of my photos in a large print, just send me an email and tell me which image (any from my web site or blog) and I can print that for you at a reasonable price. Then you can enjoy these large photos as much as I am. 😀

__________________________________________________________

Subscribe to the Jeff Cable Photography Blog by clicking HERE!
_________________________________________________________________
If you are interested in purchasing ANY equipment, please click here to go to B&H Photo, as I get a referral from them if you enter this way. It does not change the cost to you in any way, but it helps me keep this blog up and running.
_________________________________________________________________
Check out my upcoming photo tours to amazing places around the world. I have photo tours to Africa Costa Rica and more. And Canon will loan you any gear you want for FREE for any of my tours. 

_________________________________________________________________  

Tuesday, February 7, 2023

Goodbye Drobo, Hello QNAP - My new data storage solution!

As you can imagine, the process of transferring all of my data from one hard drive system to another is a daunting task, and not one I looked forward to. But...about 6 months ago I got a letter in the mail stating that Drobo was going bankrupt, just as my trusted Drobo 8D was crashing every 6 hours or so. This drive has EVERY digital photo I have taken since 1990. I was also using two of the Drobo 810n NAS drives to remotely backup my data more than a hundred miles from my house. These stopped working correctly as well.

It was panic time!

I tried reaching out to my contacts at Drobo, and they did whatever they could to try and fix the issues, but the writing was on the wall. I needed to investigate new NAS solutions and do it quickly!

I was doing a workflow presentation for B&H, and as part of that I mentioned my dilemma. I said that if anyone out there knew of a good replacement solution to let me know. I received numerous emails from listeners and one of them mentioned QNAP. I really did not know know much about QNAP, but looked at their website and saw the solutions they offered. 

I reached out to their support people and peppered them with questions. 

I wanted to know about:

* The speed of their devices

* Remote synchronization abilities

* Remote access from anywhere in the world

* Over the air synch of data from my phone

* Management utilities and options

The answers I got were really encouraging. They had really great hardware, remote synchronization options and a lot more. I then reached out to their corporate marketing people to learn more. 

As it turned out, they are located in Southern California, and I was scheduled to be down near their offices last December. A meeting was set up and I met them to get even more information, and to see their products in more detail. This time I was totally blown away. I brought a long list of features that I required and another list of features I had long wanted from Drobo. QNAP was able to deliver on all of them!

Fast forward a couple of months and I am now moving ALL of my data to the QNAP TVS-h874 NAS drive, which is populated with 8 of the Seagate IronWolf 20TB hard drives. Yep, this will give me more than 100TB of storage, even set up in Raid 6 (which means all my data is safe even if two drives fail at the same time). 

I have been moving the data (literally millions of images) from my old Drobo 8D to the QNAP drive over the last 5 days, and I am almost done. I hope to have everything on the QNAP by the end of tomorrow. Then my plan is to replicate everything from the TVS-h874 NAS drive to the TS-832PX NAS drive (which has 8 of the 16TB Seagate IronWolf drives in it). This second box is the one that will be placed offsite. I want to get all the data on the second drive here locally so that I am not trying to remotely synchronize all this data over the Internet. Once I get everything copied to the second drive, then I will set it up for nightly synchronization from my location to the location in far from here. 

I have yet to set up everything, but I wanted to let all of your Drobo users out there, that there is a great alternate solution. Not only does it do what Drobo did, it also happens to be way more powerful, have a ton more features, and a substantially better user interface.

This is what the web-based user interface looks like. I have yet to dive into all of these options yet, but I will report back once I am fully up and running.

I have tried accessing files on the TVS-hx74 NAS drive while traveling and it is amazing how much faster and easier it is than using the Drobo. What used to take 10 minutes can now be done in 1 minute. I love that!

Stay tuned for more information on my data transition. I am sure there is a lot more information to come.


__________________________________________________________________________

Subscribe to the Jeff Cable Photography Blog by clicking HERE!
__________________________________________________________________________
If you are interested in purchasing ANY equipment, please click here to go to B&H Photo, as I get a referral from them if you enter this way. It does not change the cost to you in any way, but it helps me keep this blog up and running.
__________________________________________________________________________
Check out my upcoming photo tours to amazing places around the world. I have photo tours to Africa, Costa Rica, Cuba, Europe, Asia, India and more. And Canon will loan you any gear you want for FREE for any of my tours. 

__________________________________________________________________________  

Tuesday, March 20, 2018

Tomorrow I am LIVE on Scott Kelby's "The Grid" at 4pm EST

Well folks, after more than 5 years of people asking me when I will be on Scott Kelby's "The Grid" show, it is finally happening. I will be live on the show tomorrow.

I was talking to Scott right after I returned from PyeongChang and we found a way for me to get on the show. I had another trip that was postponed, so I was able to fit this into my schedule. And here I am on a plane and heading to Tampa, FL to join Scott in the studio for his webcast.

I have always admired Scott and the way that he teaches photography and Photoshop, and I am honored to finally be joining him for this show.


Join in tomorrow to watch the show and ask any questions you might have!


__________________________________________________________________________
Subscribe to the Jeff Cable Photography Blog by clicking HERE!
__________________________________________________________________________
If you are interested in purchasing ANY equipment, please click here to go to B&H Photo, as I get a referral from them if you enter this way. It does not change the cost to you in any way, but it helps me keep this blog up and running.
__________________________________________________________________________
Check out my upcoming photo tours to amazing places around the world.
__________________________________________________________________________

Friday, July 28, 2017

How to take some fun and creative photos with speedlites and MagMod modifiers - My SNL photo shoot

A while back, I had a client ask me to shoot some portraits of their son in preparation for his Bar Mitzvah. It is not uncommon for me to do a portrait session for a sign-in board or book, but this family wanted something completely different. Their son's name is Niles and the theme of his Bar Mitzvah was Saturday Niles Live (playing off the TV show Saturday Night Live).

As part of this theme, they wanted me to take photos that were similar to what SNL would do on their TV show. I loved the concept and embraced the challenge!

The first thing I did, was go to my DVR and bring up a bunch of past episodes of Saturday Night Live. I was looking specifically for the colors of the backdrops, the poses and even the layouts that they were using.

Here are some examples of what I saw on the TV show:

Property of SNL and NBC

Property of SNL and NBC
I saw these images and thought "I should be able to do this."  I just needed to figure out an easy way to replicate their look.

I did not want to bring a ton of equipment to their home, so I needed to figure out the best way to shoot these portraits without bringing a ton of equipment to the client's house. And it turned out to be pretty simple and effective.

Here is my equipment list for the shoot:

* Manfotto Light Stands (2)
* Lastolite Magnetic Background Support
* A Lastolite Black/White backdrop
* Canon 600EX-RT flash units (3 to be used and one as a backup)
* Canon ST-E3_RT Speedlite Transmitter
* Canon 1D X Mark II camera
* Canon 24-70mm II lens
* MagMod Basic Kits (2)
* MagMod Grid
* MagMod Creative Gel Kit

And that was it!

I started by setting up the white backdrop on the Lastolite Magnetic Background Support bar. God, I love this thing!!!! It is one of the least expensive items in my gear and a godsend. I then set up the 3 Canon flash units. I had the main flash on my left (Nile's right), and another flash to my right. The third flash was placed on the floor (and then moved to a nearby coffee table) behind where Niles was standing. It was pointing at the white backdrop.  Then I had to get them at the power levels that worked for me.

First, I wanted to determine the right camera settings and power to the flash on the background.


As you can see, these were not the optimum settings! This was taken at ISO 800, f/4, 1/100 sec with the Canon 600EX-RT flash in TTL mode. Way too bright!!!


I then changed the camera settings to ISO 400, f/4, 1/200 sec and kept the flash in TTL mode. Much better! Now I was getting the gelled background colors on my white backdrop. The goal was to change out the colored gels and create different backgrounds behind Niles without having to purchase and bring different colored backdrops. It also would have been a lot harder to change out a bunch of backdrops vs. changing a colored gel on a flash head.


OK, now that I had the background flash figured out, I needed to figure out the power to the main light and fill flash. I started with a normal portrait, just to test the lighting and power levels. This was one of my test shots. I liked everything about it, except for the harsh shadows on the left side of his face. To solve this problem. I moved my main flash and powered up the flash on the left side of his face. I placed MagMod grids on both of the front lights to make sure they were lighting Niles without spilling the white light on my colored background.

OK - so now I had the flash power figured out and the camera settings where I wanted them, and it was time to get some portraits.


I placed a green gel on the back flash and then asked Niles to have some fun with me. He loves drama and had some fun expressions for me.


After taking some portraits against the green backdrop, I changed to gel to purple and we started up once again. Remembering some of the SNL poses I had seen on my DVR, I asked Niles to give me some different looks.


After shooting a bunch of portraits of Niles, I looked around the family room to see what was laying around. I saw this big nerf gun and had Niles use that as a prop.


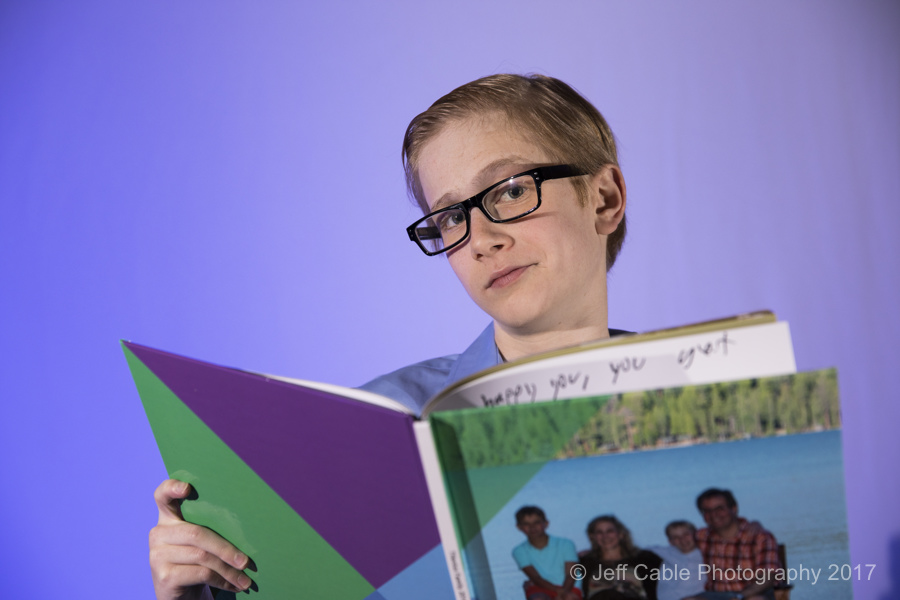
His mom was standing in the room with us and suggested that he hold one of their family books.


So we had some fun with that as well.


I asked Niles what other colors he wanted to be put onto the white backdrop and let him pick some gels to pop in to the MagMod gel holder. Here he is giving me his Trump imitation in front of a red background.


Then we combined the red and yellow gels to get this orange color. Looking through the camera, Niles reminded me a lot of Macaulay Culkin from the "Home Alone" movie. I had him give me that look too.


I asked Niles to tell me about his other hobbies and he mentioned drumming. I asked him to get his drum sticks for some more fun poses.


I took all kinds of fun poses with Niles, and even asked him to do some quirky things like putting the drumstick in his nose. Why did I do this? Because many of the SNL photos I had seen on TV has this type of quirky look and he was a funny kid who could pull it off.


A little later, I went back to the green gel and took more photos of Niles with the Nerf gun.


He picked up a guitar and posed for more photos. I had a lot of photos with him looking at me, so I changed it up and asked him to look away from the camera for this shot.

This whole shoot took about 90 minutes from setup to tear down. I then got home and posted all of my favorites to a Zenfolio gallery for the family to review.

The family picked out their favorites and then asked me to complete the process by adding the SNL lettering.

Here are the final images:


After I completed all of the SNL treatment to the photos, I sent them to their party planner. 


About a month later, it was mitzvah day for Niles, and you can see that the photos were put to good use. Here is his signature board that I designed for them.


They had a large video wall by the dance floor and used the images for that as well,


It was a great party with Niles performing his own skit and dancing the night away with his friends. The Saturday Niles Live theme was a huge hit, and I was proud to help them create the photos. Not only was it great to create the images that the family wanted, it was fun for me to try something completely new and different. 

If you are into photography, I encourage you to give this a try. It would be a fun weekend project for you! You do not need the big old expensive Canon 1D X Mark II camera for this, but you will need some flash units that work together wirelessly.

I hope this inspires you to try a new lighting project of your own!

__________________________________________________________________________
Remember that you and your friends can enter your email address at the top right of this blog to get an email any time I write a new blog post.
__________________________________________________________________________
If you are interested in purchasing ANY equipment, please click here to go to B&H Photo, as I get a referral from them if you enter this way. It does not change the cost to you in any way, but it helps me keep this blog up and running.
__________________________________________________________________________
Check out my upcoming photo tours to amazing places around the world.
__________________________________________________________________________

Thursday, December 15, 2016

Photographing senior portraits and doing it in a unique "glittery" way!

I love taking senior portraits, since I am working with energetic young people who allow me to photograph them to show off their personalities. I make sure that we have at least a couple of hours together, so that we can take photos in numerous locations and with some wardrobe changes. This amount of time also gives me the freedom to try out new techniques.

A while back, I took senior portraits of the beautiful and lovely Sydney.


We started by taking photos at a nearby winery, which is one of my favorite locations in the area. I love the rustic old wood and the patchwork of stone. Since we met late in the afternoon, the sun had already dropped behind a nearby hillside and we had flat light. This was great, since we did not have to worry about harsh shadows on Sydney, or patches of bright sunlight and shade in the background.


My wife brought along some of her favorite props, and we shot this photo for Sydney's thank you cards.


After shooting at the winery for a little while, we decided to move to a park in my home town. As we were walking around, looking for good spots to shoot, I saw sunlight coming through some local trees. I asked Sydney to stand by this tree and move back until the sunlight hit the back of her hair. I used my Canon 1Dx Mark II with an on camera Canon 600 EX-RT flash turned down by one stop. The small amount of flash helps to fill her with some light and also adds some catch light to her eyes.


My wife went back into her stash of props and put together this grouping of scrabble pieces. I zoomed the Canon 70-200mm 2.8 II lens to capture this photo of just her shoes and the scrabble pieces.


Even though the light was dropping quick, I had Sydney sit down at the base of this tree to get a more relaxed pose. I had my wife hold another Canon 600 EX-RT flash to my left to get more directional light on our subject.


I saw the sunset starting to go dark behind Sydney, and was taking photos of her on the grass when my wife grabbed a pen and wrote on the bottoms of her shoes. Great idea!

We were just finishing up, when I thought of another idea. Ever time I shoot photos, I try to do something unique. Seeing the sunset in the background, behind the park, I thought it would be cool to get an action shot. I wanted to get a shot of Sydney jumping in the air. I had her go to a spot with a good background, and then I moved back to frame her correctly. I set my flash to high speed synch and changed the camera settings to ISO 1600, f/2.8, 1/500 sec. The problem was...it was so dark that I could not lock in focus on my subject. I turned on the flashlight on my iPhone and handed it to Sydney's mom.


I asked her mom to go right over to her face to give me enough light to get a focus point. Since I use back button focus for most of my photography, once I achieved a good focus point on my subject's face, I was good to go.


Using manual mode, I metered the Canon 1DX Mark II for the sunset and chose to increase the shutter speed to darken the background a bit. I then had my wife go behind Sydney and point one Canon 600 EX-RT flash right at her back. I used the on camera 600 EX-RT to trigger both flashes at the same time. Since my shutter speed was 1/500 sec, I had both flashes set for high speed sync mode. The on-camera flash lit Sydney perfectly, while the flash in the background back-lit Sydney and helped to separate her from the background.

Soon after this shot, we were out of light and we decided to stop shooting for the evening. We wanted to do some photos of Sydney using a backdrop, but had to wait a while to set up a second time to shoot.


I was off traveling for a couple of weeks and then we met up for the second shoot. This time, we met at our house and I shot some photos of Sydney in our backyard....


...and in our front yard. As you will notice from the last couple of photos, my goal was to find a nice foreground and background that would compliment, not compete with, Sydney. The photo in the backyard has very neutral light, while this photo has a little more directional light coming from the sunlight. I got down low to the bush and angled the lens up, bringing the colorful leaves of the plum tree behind her head. I shot at f/2.8 to make sure that my foreground and background were nicely out of focus while Sydney was tack sharp.

And then it was time to try our "studio shots".


For the shoot, I set up one of my black Lastolite reversible backdrops in the backyard. This time I used one Canon 600 EX-RT flash on a Manfrotto light stand and the Canon ST-E3 RT transmitter on camera.  I had Sydney sit down on a wood stool and I shot some photos of her. I wanted to get some nice photos of her, but also wanted to test my lighting for our upcoming "prop" shot.


Sydney's mom had seen a photo of someone blowing glitter towards the camera and wanted to know if I could shoot a photo with her daughter like this. I loved the challenge and was excited to give it a try. This photo was one of our first and did not have the effect I was looking for. I knew that we would need more glitter to make this look really cool.


This time I poured a whole bunch of glitter into Sydney's hands and told her to blow really hard. As you can see, the effect was pretty good, but her expression was not right. I suggested that on the next try, she blow really hard but try to do so while keeping her eyes open. Not easy! The problem was that the glitter was blowing back into her eyes. It was also getting all over her, which meant that we had to try and clean her up after every take.

On top of all of those challenges, I also noticed that the glitter was not lit enough, so I put a second Canon 600 EX-RT flash behind Sydney and pointing at an angle towards me, to backlight the sparkles.


We had been saving the blue and gold glitter for the final take, since it was her school colors. I decided to go for broke on this last photo. I poured all of the glitter into her hands for one last "take it or leave it" shot!

And it paid off.


We had Sydney move her hands a little farther from her face (to avoid having the glitter blow back into her eyes) and I counted her down. With one big breath, she was able to disperse the glitter but also keep her eyes wide open. Voila!


We looked at the LCD on the back of the camera and knew that we got the shot. Then it was time to relax and have some fun. I handed her a Jeff Cable Photography hat and we took this shot for some shameless self promotion.

There are times when these types of experiments work and times when they don't. But this one went really well with Sydney happy to get some really cool senior portraits and me happy to have tried something new and achieving a really cool result. I hope that this inspires you to go out and try to shoot something fun and unique.

_________________________________________________________________________________
And also, remember that you and your friends can enter your email address at the top right of this blog to get an email any time I write a new blog post or send my monthly newsletter.
_________________________________________________________________________________
If you are interested in purchasing ANY equipment, please click here to go to B&H Photo, as I get a referral from them if you enter this way. It does not change the cost to you in any way, but it helps me keep this blog up and running.
_________________________________________________________________________________