Wednesday, October 24, 2012

Fall colors in New Jersey - Shooting images of just one tree (Working the subject)

Last Saturday, myself and Moose Peterson were teaching a workshop (for Unique Photo) in Paterson, New Jersey. The good people at Unique Photo picked the location for us, so we had no idea what to expect when we arrived. We had heard that the town was not the greatest or safest place, but that they had a waterfall right in the middle of town. So...we headed out from our hotels in NYC and headed for the location. As we arrived, the first thing we saw was this amazing tree full of fall colors. As Moose said, this tree just called out "shoot photos of me" and so we did.

As Moose taught the students, I went around and shot images of this tree and thought that it would make an interesting blog entry and lesson. The thought was...How can you use just one tree and make many interesting images?

I took this photo to show the entire tree. This is the "standard shot" that most people would take. It is nice, but we can do more with this.


I replaced my wide lens with my 70-200 zoom lens and keyed in on one section of the tree that interested me. A totally different look from the wide shot.


I saw this one branch partially bathed in sunlight and took this photo, using the brick wall from the nearby building as a background. (Photographer's note: I shot this image at f2.8 to not only add depth of field to the leaves, but also to make sure that there was plenty of separation from the brick wall. I also shot most of the images in this blog post at 1/2 stop down to accentuate the colors and shadows.)


For this image, I went under the tree and positioned myself so that the sun was peeking through the leaves. I then set my camera to a low aperture (f16) to create the star burst effect and shot this, filling the frame with the canopy of the tree. (Photographer's note: Any time that you are shooting into the sun or lights, you can get the star burst effect by using an aperture small than f11. I frequently will use this technique in my night photos to get this same effect from street lights.)


Some more detail shots of the tree branches and colorful leaves.


A good photographer is always aware of their surroundings. I always teach people to not only look in front of them, but all around, up and down. In this case, I looked down by one of the tree roots and saw this nice cluster of leaves resting against the root.


When looking around the area, I also came across these steps. I loved the way that the leaves were evening scattered across the concrete. You will notice that there is a slightly red tint to the concrete. This was caused by the sunlight hitting the red brick walls just off to the right of the image.


I walked down towards the waterfall, turned back and saw the same tree in the background of this statue. I did shoot some tight shots of the statue and tree, but liked this image, which uses the staircase as an added element to the photo.


And, since we were at the waterfall, I thought that I would include a couple of images of this, so that you could see where we were.


This last shot was taken from the sidewalk, as we made our way towards the bridge over the waterfall. I stopped the group and had everyone shoot from this location since it has the classic foreground (trees), middle ground (building and bridge) and background (falls) elements to make a nice shot.

I will do another blog soon, showing the photos that we took of the models during the workshop.

Friday, October 19, 2012

New York City - Teaching photography to 450 people on the Circle Line Cruise

Thursday was an amazing day in New York City. After months of planning by B&H Photo, we embarked on a private Circle Line Cruise with Moose Peterson and 450 people eager to learn better photography. I was joking with Moose about a week ago that I wanted clear skies and puffy clouds, and we got them! Good thing...because today is rainy and nasty here in the city.


Since it was a cruise, Moose decided to play pirate for the day. He and I greeted each person as they hopped aboard the ship...


...and there were a lot of people to greet!


And you can probably see from this photo, we had an amazing day to work with. People usually think that having a clear blue sky is the best thing for photos, but trust me, these clouds really make the photo more dramatic. Wow!


I took many photos of the new World Trade Center tower since it really close to it's final height. It is great to see a tall building back in this spot. I hope to go back to shoot more images at the 911 memorial  next week. If you are a regular blog reader, you will know that I was there last year, but this time I want to shoot images with a wider lens (knowing what I know now).


Another view of the financial center framed with awesome clouds.


As we approached the Statue of Liberty, I turned back towards to city and saw this view of the lower part of Manhattan with a straight line of clouds overhead. So beautiful.


We passed by Ellis Island and got a quick shot of that. (Since I was teaching and shooting, and since there were so many people on the boat, I was not always able to get the shot that I wanted).


(Photographer's note: When photographing skylines like this, it is always a good idea to look past the obvious. Even when you don't have a marquis building in the shot, you should look for the combination of colors and patterns like what we see in all these different buildings. Having the sun behind the clouds, thus creating a nice flat light with very little direct sunlight and harsh shadows, helps to make a shot like this even stronger.)


Another shot showing how the new World Trade Center building rises above all the others in lower Manhattan.


Did I mention that we had a lot of people on the boat? I took these shots of everyone else shooting the Statue of Liberty. I figure that there must have been almost one million dollars worth of camera gear on this boat at the time. :)


I was switching between my 70-200mm lens (sometimes with a 1.4x extender) and my 24-105mm lens. For this shot, I used the 24-105 at 24mm to get Miss Liberty and the city skyline in one shot. In order to get this wide view, I cropped out a lot of the water at the bottom of the image.


Could I have shot a close up shot of the Statue of Liberty? Sure. But, as I was teaching to the others around me, it is more interesting when you see the statue surrounded by the clouds.


Just after we launched from the pier, we were able to see a bunch of helicopters in the distance, signaling the arrival of President Obama. After leaving the Statue of Liberty, we headed towards the Brooklyn Bridge and could see Marine One (the President's helicopter) at the nearby heliport. Needless to say, security on the water was high. Even our wireless microphones stopped working, leading us to wonder if all wireless devices were being scrambled in this area.


Focusing my attention back to the bridges again, I waited for a good angle and shot this image of the Brooklyn Bridge and the Manhattan Bridge.


It was my first time making a complete circle around the island and I saw many new views of the city.


Here is a view of the Cloisters from the river. I have photographed at the Cloister 4 or 5 years ago, and need to go back to shoot there again. It is a very cool place in the Northern part of the city.


We shot photos for 3 hours and then came back to the piers. Before leaving, I had all of the kids from NYC Salt (an amazing charitable organization for which I am on the board) to pose for a shot with Moose, myself and some of our B&H friends.


To top off the day, we were invited to eat at the amazing River Cafe, which is located at the base of the Brooklyn Bridge.


This is a very expensive place, but the view is amazing! I could not help but take this shot. (Photographer's note: I shot this without using a tripod, firstly because I would not want to break out a tripod in a fancy place like this, and secondly, because I didn't have mine with me at the time. I set the camera to ISO 3200 and held tight. This images was captured at 1/40 sec using only the lights of the city and the lights in the restaurant. The host of our dinner told the Maitre' D that I was an Olympic photographer, and he came over to introduce himself and gave me his business card. Since I had his email address, I sent him this image later that evening.


After shooting the images inside the restaurant, I went out to the deck and shot this last photo, showing the last glimpse of light of the day. It was a spectacular ending to a spectacular day.


Monday, October 15, 2012

Tips for photographing kids before a Homecoming dance or Prom

Something funny happens when your kid's are going to a formal dance and their dad is a photographer. For some odd reason, all the kids want to meet at our house so that they can have their photos taken. And I am always thrilled to be the "picture taker" for them and their families. I shot images of my daughter and her friends, before they headed off to their Homecoming Dance. As I was retouching them, I thought that this would be a good time to write a blog to help others take better images of their kids before their formal events.

So...here are some tips for taking nice formal shots of your kids and their friends.


When shooting portraits of people, I usually look for a nice background for my shots. Since our backyard does not have a large bush (large enough for a group shot), I took these images next door at our neighbor's backyard. Their daughter was one of the girls in the group, and we are good friends, so I knew I could shoot there.


It usually prefer to shoot the images in all shade. In this case, it was just before sunset and there were no harsh shadows to deal with. I was using my trusty Canon 5D Mark III camera. I made sure that my daughter was standing far enough away from the bush so that I could shoot at a wide aperture (f2.8 using my favorite lens which is the Canon 70-200 2.8 IS) and diffuse the bush to become a blurry green background. Since it was getting dark, I also used a flash for all these shots, with the flash turned down one stop so that it would not add too much light to the kids.


As you can see, I made sure to take individual photos and group shots. It is always great to get one photo of all the kids together.


Here is a tip for the Photoshop savvy. When shooting this larger group shot, there was not a clean shot with foliage behind all of them. There was a basketball locker to the left of the image. In post processing, I cloned the foliage and painted that over the locker to remove the obvious distraction. You want to do your best to avoid distractions in the background.


I took group photos of all the girls together and all the guys together.


This is probably stating the obvious, but you need to shoot images of each couple. When I was shooting individual or couples photos, I would have my DSLR set in aperture priority at f2.8 or f4. When shooting the large groups, I would change my aperture to f5.6 or f7.1 to make sure that everyone was in focus.


Even though less obvious than the standard couple shot, it is good to take some different shots. In this case, I wanted to get a photo of my daughter's hair. A friend had braided it for her and I wanted to capture that as part of the day. I had them both turn the other direction and shot this.


And...you want the kids to be kids, so along with the posed images, you should take photos of them playing around.


I was getting ready to shoot an image of the guys when my daughter jumped in front of them. I quickly focused on her and took this shot. This photo shows Ali being goofy, which is totally her personality (like her dad).


After taking my daughter's friend, Erica's, portrait, she turned and gave me two thumbs up. Even though I liked her portrait a lot, I actually liked this picture more. Why? Because it is her!


With all these kids on Facebook, they will want individual shots for their Facebook pages. Our neighbors have this really cute little playhouse in their backyard. I asked their daughter to come over by the door so that I could take some shots, and I really liked the scene.


Since it worked well with the wood on one side and the flowers in the foreground, I had each girl come over for an individual portrait.


I should also talk about the post process a little bit. On each of these images, I would bring them into Photoshop and adjust the exposure, contrast, and black levels. Once that was done, I would go in and clean any skin imperfections (in teenage years - otherwise known as zits), and then do some slight skin smoothing. When it comes to skin smoothing, I like to smooth it just enough, without making the kid's skin look too fake.

I hope that the next time someone asks you to take pictures of kids before a formal dance, you will be able to use some of these tips.

Thursday, October 4, 2012

Fast memory cards and card readers - Do you really need them?

The Basics

Want to know more about how your camera, computer and memory cards work - and work together? Or how to make sure you're not underbuying or overbuying equipment? Then this post is for you. Being a professional photographer and also being affiliated with Lexar, I have a unique understanding of both the needs of a photographer and the technology that's out there to address those needs. I hope I can help explain the elements of digital workflow (cameras, computers, memory cards and card readers) to help you purchase the right products, and maybe even save you some time and money in the process.

I have been a photographers for many years and have photographed a wide range of subjects - The Olympic Games, landscapes, Bar Mitzvahs, Senior Portraits, and countless others. Each type of photography is very different and presents different needs in equipment.
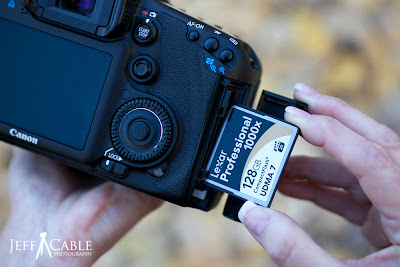
Memory Cards

One of the most common questions I get is, "Do I need a high speed memory card?" Before I answer this question, I want to explain that there are actually two speeds that you should be aware of. There is the card's write speed, and there is the card's read speed. The write speed determines how quickly your camera can move the digital photos from it's buffer to the card, whereas the read speed determines how quickly those photos can be copied from the card to your computer's hard drive.


Lets first answer the question in reference to the write speed. My answer to this question is usually another question, "Are you filling the buffer of your camera?" When I shoot sports, there are many times when I fill the buffer of my camera and need the camera to flush the images as quickly as possible to the memory card. For this, I want to have the memory card with the fastest write speed possible. But if I am shooting senior portraits, I'm not hammering on the shutter release, and almost never fill the buffer in my camera. Do I need a 1000x CompactFlash (CF) card for this? Nope.

I rarely shoot video with my DSLR cameras, but if you do, this is another good reason to get a fast memory card.  Since the camera is pouring so much data to the card, video requires a fast card that can handle at least 90MB per second. If you try to shoot video with a slow memory card, chances are that the video will either stop during the recording or you will lose frames in the process.

If you are using an older digital camera, and you purchase the fastest memory cards, you may be wasting your money. The newer CF cards use a technology called UDMA to achieve really fast transfer speeds, while SD cards use a technology called UHS, but if your camera is more than 5 years old, chances are it doesn't support either of those technologies and can clear your buffer no faster than 133x. Yep, that means that even though you bought a really fast card, your camera defaults to a much slower write speed.

Now let's answer the same question in reference to the read speed. For this, I ask "How fast do you need to download to your computer?" Even if you have an older camera that can't write to the card quickly, it may be that you still need to download quickly, in which case a faster card will still be beneficial to you. If you're a regular blog reader, you know that at the Olympics, I was under major pressure to download, select, retouch, resize and post within two hours of every event. For this, I needed to have the fastest cards and fastest card readers possible. (We'll talk about card readers in a little bit.) Inversely, if I have just photographed my wife's birthday party, download speed may not be as critical, and a slower, less expensive memory card would be sufficient. So at this point, you might be thinking that shooting sports is the only time that I need high speed memory cards and readers, right? Nope - not the case. I shoot events like Bar Mitzvahs and weddings here in the San Francisco Bay Area, and do my best to be unique. I like to photograph the service and then provide a slideshow of the best images, sometimes within minutes of the event. At these times, having memory cards with a fast read speed is very important. This gives me the ability to download, select the best images and build the slideshow, and then get right back to shooting more images - without missing a beat.

Time have changed, and with the newer cameras shooting at high megapixels, I find myself burning through gigabytes at an alarming rate. A typical day of event shooting will yield me more than 40GB of images. A memory card with a fast read speed can help me offload those images in minutes instead of hours.

Readers

This brings me to card readers. Before working at Lexar, I would head down to the local store, find the least expensive reader and make m y purchase. I was the guy who thought that all card readers were the same. I remember, many years ago, walking through the hallways at Lexar and hearing about the development of a high-speed reader, and I thought, "Huh? I thought a reader was a reader." Nothing could be farther fro the truth.

The fact is, just like memory cards, readers come in different speeds. And it is important to make sure that you use the right reader for your computer. If you are using a newer computer that has a USB 3.0 port, you should purchase a USB 3.0 card reader, which will provide you the fastest possible transfer rate. I always carry USB 3.0 readers with me for two reasons. First of all, as I mentioned, they are wicked fast, and secondly, I love the fact that they can be used on almost any computer since they are backward compatible to USB 2.0 ports. Even better, they are not very expensive.


People ask me if the brand really matters. I can honestly tell you that it does. I am not going to be biased here, and I will tell you that there are some very good brands in the market. But there are also some brands of memory cards which use low quality memory and inexpensive parts. These might be fine for the typical consumer, but if you are serious about your photography, you should stick to the name brands.

Technical tidbits

For those of you who are feeling really geeky right now and want to dive into the technical aspects of memory cards and readers, this section is for you.

Cards:

There are really three key components of a memory card. First there is the flash memory where all of the images are stored. There are numerous types of memory used in cards, with the most common being MLC (multilayered chips) and the more expensive and faster cards using SLC (single layer chips). Secondly, there is the controller chip which is essentially the brain of the card. Just like the memory chips, there are different speed controllers, which, when married with high speed memory chips, ultimately determine the speed of the card. I like to tell people that the card's controller is equivalent to the card's brain. Lastly, there is the firmware. This is basically the software that resides inside the controller, giving the instructions on how data should be moved.

To give you an example of how a card communicates with a camera, think of a foreigner communicating with you using a translator, who then needs to decipher your information and communicate it back out to the other person. The faster the translator, the faster your communication. The controller is a lot like the translator. It takes the image data from the camera, determines how it should be stored on the memory chips, puts it in the right place, and does so at it's fastest speed.

Readers:

Did you know that card readers also have controllers and firmware in them? And just like in the memory cards, these determine the speed of data transfer between your card, your reader and your computer. This means that if you want to get the fastest data transfer possible, you need to have a fast card and a fast reader. If you have a memory card capable of transferring 150MB per second, and insert it into a slow reader, it is quite possible that you will only be moving the data at 9MB per second. Scary, but true!


Now, the next time you walk into a store and see all the different memory card and card reader options in front of you, hopefully you will be able to make a more informed decision when making your purchase. At the very least, maybe you will have a little more appreciation for these little pieces of metal and plastic.

Don't forget to "Like" the Jeff Cable Photography Facebook page or enter your email address in the "Follow by email" box above, to be notified of future posts.