Tuesday, March 25, 2014

Photographing events and telling the story with photos

This past weekend I photographed my first Bar Mitzvah since returning from the Olympics. As I spent the day capturing photos, I realized that shooting a local event like this is similar to photographing the Olympics. The goal is to tell a story with the photos. And, no matter what I am photographing, my goal is to have fun and find unique photos for my client.

I am writing this blog to explain my thought process in setting goals for a shoot, and how I execute to make them a reality.
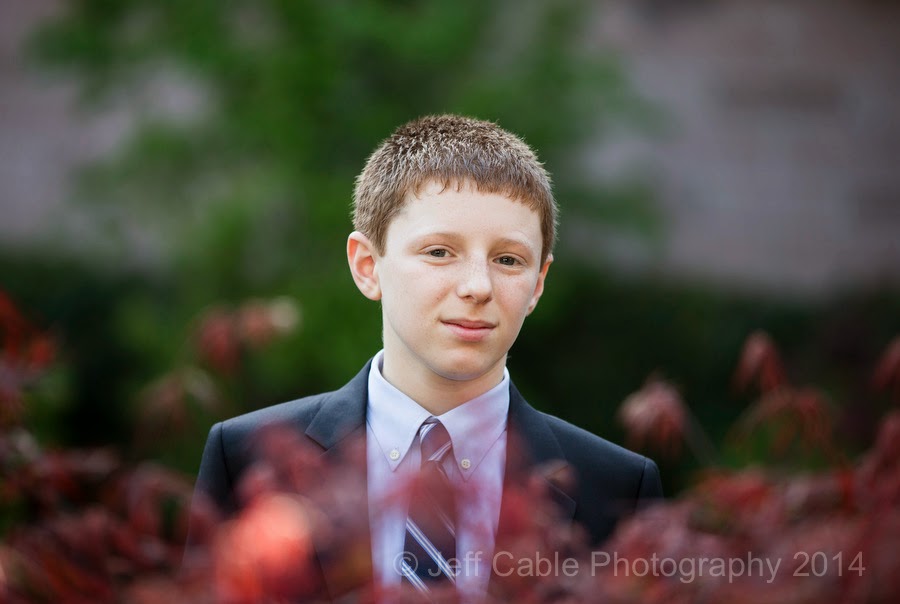

Whenever I shoot a mitzvah or a wedding, even if the weather is not ideal, I like to start with photos outside. To me, there is nothing better than ambiant light photos taken in a natural setting. To start the day, I took Sam outside the Temple to shoot some portraits. I like to do this with just the child and myself, as I find that having this one-on-one time helps to build a rapport with them. It also keeps all the other family members from distracting the already nervous kid. Since it is the beginning of Spring here in California, the colors of the leaves were great. I asked Sam to go around the maple bush and shot this over the top of the plant. (Canon 1DX, Canon 70-200mm, f/2.8, 1/250 sec, ISO 200)


Once I get nice photos of my main subject, I add in other family members. In this case, I asked Sam's brothers to come outside and join us. I saw that the light was coming in from behind this bench, and wanted to use this hair light for the boys. Yes, I am jealous that they have so much hair, and wanted to emphasize that in the photo. (Canon 1DX, Canon 70-200mm, f/5.6, 1/80 sec, ISO 100)


After taking photos of the kids, I then invited mom and dad to join in. In this case, I placed mom and dad behind the kids to add some dimension to the photo. I am not a big fan of everyone in a line. There are times when it does work, but most of the time I find it one dimensional. (Canon 1DX, Canon 70-200mm, f/3.5, 1/160 sec, ISO 160)


After shooting many photos outside, we moved into the synagogue to photograph Sam with the Torah. I did take some photos with a diffuser on my flash, but I really wanted to get more dramatic lighting on him. For this photo, I pointed the Canon 600 EX-RT flash at the wall to my left, and bounced the light off the wall and back at Sam. See how the right side of his face (our left) is brighter than the left side. This contrast of light on his face makes the photo so much stronger than an evenly lit subject.  (Canon 1DX, Sigma 85mm, f/1.4, 1/100 sec, ISO 320)


And again, I added in the rest of the family to get some group shots inside. Often times, I will repeat many of the same groups inside and out, since I like having a variety of photos in such different environments. Canon 1DX, Canon 70-200mm, f/2.8, 1/80 sec, ISO 320)


One of the biggest challenges for us photographers is trying to capture the true personality of our subject. And even though Sam is a confident boy with an outgoing personality, most of the time he would force a smile. Even though I don't know him well, I could tell that this was not the "real him". I did my best to get him to relax, but he was too nervous about the upcoming service and not feeling it. So I asked him not to smile, which yielded better results.  (Canon 5D Mark III, Canon 24-70mm, f/2.8, 1/200 sec, ISO 640)


Guess what happened when I captured Sam in the unposed photos? Yes, you can see the real smile on his face. I was standing in the back of the synagogue shooting with the Canon 100-400mm lens (using the Canon 5D Mark III due to the silent mode of the shutter), and this allowed me to zoom in and capture Sam's real personality.


No matter how hard I tried, there was no way that I was going to get this smile out of him in a posed photo. You will notice that I also turned the camera to shoot this photo in portrait mode. I like to do this to show some of the people in the temple, and again, to add something different from the standard "safe shot".


I never use a flash when shooting a bar mitzvah, but with great window light like this, I wouldn't want it! Look how nicely lit Sam is, as he walks through the Temple with the Torah. I had the Canon 70-200mm lens mounted on the Canon 1DX and shot this handheld at ISO 3200.


The key to photographing events is the ability to capture the key moments.


And you need to be ready to do this at any moment. It is that split second where mom and dad crack up, and it is our job to grab that slice of time for them to remember forever.

After the service was over, I was photographing the luncheon when I swear that I saw Mark Zuckerberg. I thought "Nah, that can't be the founder of Facebook at this Bar Mitzvah, right?" But then I remembered that my client is an executive at Facebook and they are friends. I photographed my good friend, Steve Wozniak who founded Apple Computer, and recently had the founder of Google at one of my events, and now the founder of Facebook. Who's next?

Anyway... after the luncheon wound down, I found a nice restaurant in the area (where I could sit by a power outlet) and started going through all the images from the first half of the day. I built a slide show of all my favorite photos and edited one to print and frame for the family. Yes, I have set up a mobile printing station in my truck, with the Epson R2000, power inverter, and a pack of 13x19" Velvet Fine Art Paper. So cool!

And then it was party time. This family chose to have their party at the Hiller Aviation Museum. I had not photographed there before, and was really excited to shoot in this unique environment.


This is not your typical backdrop for a party, but I live for photographing new things. I was running around like a kid in a candy store.


After checking out the entire museum, I walked back behind the building to see where the catering was set up. And I saw the front end of a Boeing 747 sitting there. All I could think was "I need to get the family in this plane to take some photos!" I walked around and saw that the door in the back (where the plane had been cut) was locked. But, if you know me, you know that this would never stop me from a cool photo opportunity.


After the family arrived, I went and asked the manager of the museum if we could open the plane to take some family portraits. She readily agreed and we were off to check out the inside of the 747. We started downstairs in First Class, where we took some photos of them standing up and in the seats. As I was shooting, I heard the woman, who opened the plane, say something about the cockpit upstairs. Oh yeah - we had to shoot a family portrait there! (Canon 1DX, Canon 24-70mm, f/2.8, 1/100 sec, ISO 640, Canon 600 EX-RT)


We all climbed up the circular staircase to check out the cockpit. And I was excited to see that there were 5 seats. One for each of the family. I placed the Bar Mitzvah boy in the pilot seat, and without any direction his brothers jumped into the next seats. Mom and dad took the spots closest to me and we got this cool shot. This was definitely one of my favorites from the day. The only thing I didn't like was the bright white "blown out" light coming from the windows. At that point, I figured that I could easily add some clouds to the windows when I got home to Photoshop. I will show you exactly how I did that in a minute. But first, lets get back to the party. (Canon 1DX, Canon 24-70mm, f/5.6, 1/60 sec, ISO 640, Canon 600 EX-RT)


They had some really great lighting in the main area of the museum. This is where all the dancing took place. Armed with my Canon 5D Mark III and 16-35mm wide angle lens, I positioned myself right by the chair, anticipating this big moment. I took a lot of photos since the spot lights were all over Sam, making it very difficult to get a clean, properly metered shot of him. Earlier in the evening, I spotted a balcony area above the museum and I found out how to get to that location through a back staircase. Once I got my shots from up close, I ran back to grab my other camera with a Canon 24-70 lens and made a mad dash upstairs to shoot some photos over the crowd.


This photo was taken from the balcony area, looking down at mom raised in the chair.


I always look for good locations for portraits, and I found this spot to be ideal for this group shot. I had a clean foreground, the Kittyhawk plane above, and great colors in the background. I shot this with the Canon 1DX using a diffused 600 EX-RT flash mounted on the camera.


At the beginning of this blog I told you how tough it was to get a smile out of Sam. Well...that was not the case during the photo montage, as he watched a 10 minute video of him growing up. I set the 5D Mark III to ISO 5000, turned off the strobe on my on-camera flash, using the on-camera flash to wirelessly trigger my remote flash on a stand to my left. This lit Sam's face perfectly and really shows the emotion in his face.  (Canon 5D Mark III, Canon 70-200mm, f/2.8, 1/40 sec, ISO 5000)


Using the same setup, I took photos of mom and dad watching the photo montage. More great emotion.


Towards the end of the evening, I went back to my favorite portrait location and took portraits of many of the couples at the party, including mom and dad.


I like to end my day with one last parting shot of my subject. I asked Sam to sit down and give me that "I did it!" pose, and we got this. I think it is a fitting ending to a really great day for this family.

Now...as promised...I am going to show you how I took the cockpit photo and fixed it up.


This is the original photo, with the windows very over-exposed.


I went into my photo collection to find a photo with a good cloudy sky. I found a shot that I took in Colorado many years ago. I then grabbed a good wide selection of the sky and copied it onto a new Photoshop layer, over a duplicate layer of my main photo.


I then created a layer mask on the family portrait shot and painted the new sky into each window pane. This is where the Wacom Cintiq 24" HD makes a huge difference, with me painting in the new layer on the actual photo. My wife took this photo of me working on the Cintiq, as I carefully painted along the edges of the airplane window.


After I had the sky painted into the windows, I took one more look at the photo and saw one more problem. David (the father), had bright sunlight on his leg, which was a bit distracting.
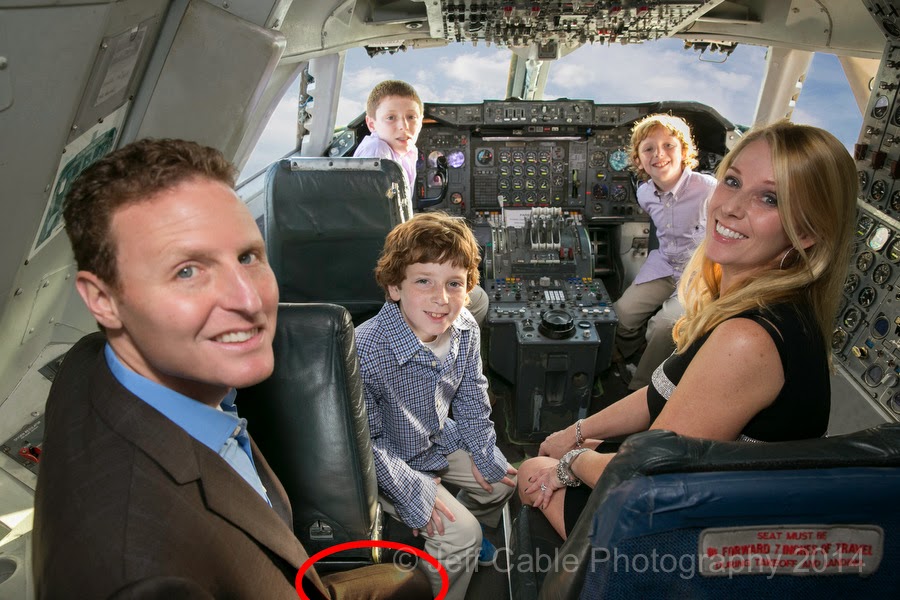

I then reprocessed the RAW photo in Adobe Camera Raw and exposed to darken David's pant leg. I then copied that small portion into a new layer and moved it over the bright section, and voila!


Once again, here is the finished photo. 

I hope that this gives you an idea of how I shoot events, and how I process my photos afterwards. Honestly, it is such an honor to be invited to capture family history for others. I just love getting home, downloading all the photos, and seeing what I shot. And then, taking good photos and working on them, making them even better. But what is even better is waking up on Monday morning to an email from the family saying "The photos are AMAZING!!!!!!!". It doesn't get any better than that!

Tuesday, March 18, 2014

The new Mac Pro from Apple: Converting from the old Mac Pro, set up, and first reactions!

After years of waiting to see if Apple was ever going to come out with a new Mac Pro, earlier this year Apple announced the new model for 2013. And then, after way too many months of waiting, my new Mac Pro has finally arrived!


Wow - what a difference in size between the old Mac Pro and the new one. The old Mac Pro was really large and built up some serious heat. During the summer it was painful to work on the machine as it did double duty as a computer and a heater in my office. This new computer is tiny in comparison and seems to run cool all the time.

With that said, the size of the new Mac Pro is relative, in that there is only room for the one SSD and does not have space for any additional hard drives. When I saw the announcement of the new computer, with no expansion options for internal drives, I was a bit put off. Storage is VERY important to me and I use a lot of drive space. Apple's philosophy is to use external drives connected through Thunderbolt. This is supposed to be a very fast solution, but also adds more devices on my desk.


Thinking that the new computer was coming in December, I started my transition plan months ago. I figured out what accessories I would need and purchased those in advance. I bought some adapters, cables, and an external optical drive (knowing that I would need to burn some CDs or DVDs for clients).


I knew that I needed to get all the information off of my old Mac, which had an SSD and three 3TB Western Digital hard drives, and move the data onto Thunderbolt drives. My first step was to get a Thunderbolt hard drive that could hold a lot of data. I decided on the Western Digital 8TB drive. But I also knew that there was no way to connect this drive to my existing Mac Pro, since this machine did not have a Thunderbolt port. I devised a plan in which I would transfer all of my data to my older Drobo S, which had FireWire 800 and USB 3.0. I connected the Drobo to my older Mac through FireWire 800 and transferred all of my photos over many evenings.

Then, since I have a Macbook Pro which has USB 3.0 and Thunderbolt, I connected the Drobo S to the USB 3.0 port and the new WD 8TB drive to the Thunderbolt port and moved all the data from the older Drobo to the new and fast Thunderbolt drive. That took approximately 14 hours, but I did this overnight, so it was not a problem. I later realized that I could have also used an inexpensive Thunderbolt to FireWire 800 cable to connect the newer hard drive to the older computer. I purchased one of those, but had trouble getting it to work correctly. Since I have more than 7TB of photos which is nearly filling the WD 8TB drive, I am also connecting my Drobo 5D with 16TB of WD drives as additional storage and backup. This might be a little overkill, but it gives me plenty of room for the future.

I had a 2TB Western Digital Passport Ultra drive connected to my older Mac Pro, acting as a Time Machine backup of the SSD. This means that my operating system and applications are always being backed up. I could have connected this time machine drive to the new MacPro and moved all the applications, but decided that I wanted to start with a clean install. So, I booted up the new Mac Pro and installed the most important applications (Photo Mechanic, Photoshop CC, MS Office, Chrome, NIK Software...). I wasn't sure how to deactivate Adobe CC from my old machine, but it turned out to be simple. I just signed out on the old machine, signed in to the new one. Simple! I also moved many of my preference files and data files (like Mail, Photoshop brushes and actions, Photo Mechanic IPTC data) over from the old machine so that many of my settings would be on the new machine. I was really happy that so much of my data was transferred to this new computer over the cloud. All of my browser info (bookmarks, cookies, settings) came across seamlessly with Chrome, and iCloud made sure that all my contacts and calendar info were on the new machine. That was really handy.


Oh, I forgot to mention that my Apple 30" Cinema Display would connect to the new Mac Pro, but the adapter I purchased was the wrong one. In my preparations months ago, I purchased the Mini DisplayPort to DVI Adapter, but this would only let the 30" display go up to 1280x800 resolution. And that was not going to cut it. So I returned the adapter and purchased the Mini DisplayPort to Dual-Link adaptor and that let me show a much higher resolution. As it turns out, the day after my initial setup, I received my new Wacom Cintiq 24HD display, and that works with the new adapter as well. The first thing I did, was connect my Spyder calibrator to color calibrate the Cintiq.

The fun part of having the new Mac Pro is all the high-speed expandability that I have at my disposal. I have connected numerous Thunderbolt drives (Western Digital 8TB drives and Drobo RAID system) to the computer, and USB 3.0 for my Lexar HR1 Workflow reader solution. And I love knowing that everything connected is running at high speed. The only bad thing is that the new Mac Pro only has 4 USB ports, which are all filled now. I have so many devices (Wacom Cintiq, Epson R2000 printer, video adaptor, Dymo Labelwriter 450 printer, keyboard, Intuos tablet, card reader) that I am short one port. I have ordered a 7 port USB 3.0 hub, but I can't understand why Apple would put only 4 USB ports when they have 6 Thunderbolt ports. The Thunderbolt ports can daisy chain up to 30 devices, but the USB ports can't. A small oversight in my opinion.

I knew that 16GB of RAM would probably not be enough, so I have also added a bunch of Crucial DRAM to the computer, boosting it from 16GB to 64GB. This is much less expensive than ordering Apple's memory and worked perfectly. It should make the machine even faster. Installing the memory was so easy that I did not have to look at a manual or online. I just opened up the computer and slid in the four 16GB modules.

 Here are the 4GB DRAM modules which came with the Mac Pro. 

 I popped them out one at a time...

I then inserted each of the Crucial 16GB modules. 

There are two DRAM modules on each side of the Mac Pro.

So...at this point, you might be asking how much faster this computer is as compared to my older Mac Pro. Well....honestly, I am not sure yet. I just started editing photos on the computer and have not put it through my "real world" tests yet. My older Mac Pro was pretty decked out, but I hope to see some big differences with the power of this new computer. My goal is to never see the little spinning beach ball ever again in Photoshop.

Was it worth the money? Again, I think it is too early to tell you, but I will keep you posted once I get everything dialed in. I know that a lot of people on Facebook were saying that I could get the same amount of power from a custom built PC, but this is not what I want. I want something that works great straight out of the box, and I love the Mac ecosystem. I spend so much time on this machine, that I am willing to pay more to get the best. Time is money after all.


A lot of people talk about the cool look of this cylinder, and I agree that it is pretty slick looking. But, honestly, I have it behind my Cintiq and don't even see it. That is a good thing, as the old Mac Pro was enormous. Do I like having all the devices hanging off of the computer? Not really. I still think I would have been happier with a machine that was a little bigger with more internal expandability, but if the speed and external expandability pan out, then I can deal with that.

I plan to crank on this new computer for another couple of weeks and then give you my final decision. After 3 days of working on it, applications seem to be performing very well and I have yet to see any spinning beach ball telling me to wait. That is a good sign. Stay tuned!

Tuesday, March 11, 2014

Photographing water drops: This is really fun, and so easy that you can do this too!

I am now home from the Olympics and I am getting back to normal life once again. It usually takes me a month or so, but this time I jumped right back into the swing of things and adjusted in a couple of days. I stayed up for 30 hours straight and then slept all night and had no jet lag at all. Yippee.

But just because I am not shooting Olympic sports, does not mean that I am not shooting and blogging. After traveling for 4 weeks straight, I thought it would be fun to shoot something at home. Many years ago, I photographed water drops, and wanted to do this again. This is proof that you do not have to travel half way around the world to take fun photos. These photos were taken on our dining room table.


Let me start out by saying that, although this may look difficult, it is not too hard. And in this blog, I will explain how you can take these photos too. I started photographing the water drops without any background. I set the camera to manual mode with a shutter speed of 1/6 sec. What??? How am I freezing a very fast water drop at 1/6 sec?


The trick is this...I was using an off-camera flash and the duration of the flash actually freezes the water drop. So...even though I had a slow shutter speed, the flash is lighting the subject so quickly that the drop is frozen in place. The color that you see in the water is a combination of the dark pan and a pink bag that was in the background.


I liked the water drop, but wanted to add more color to the water. Some people might suggest adding food coloring to the water, but as it turns out, all you have to do is change the color in the background. So, I grabbed a colorful backpack (which I brought home from Sochi) and put it behind the pan. I pointed the flash at the backpack and got a little more color in the water. But it still was not enough color for what I wanted.


Then I found a colorful towel that was hanging up in the backyard. I put it over the backpack and fired the flash at the towel, and got this. Much better!


Here is a picture of my setup. I placed a pan with water on the table, and then suspended plastic ziplock bag filled with water about 2 feet above the pan. I poked a very small hole in the bag, so that I would have a slow drip into the pan. (Note - this was the hardest part of the process, with it taking numerous attempts at getting the hole the right size, and having the right amount of water to in the bag, to create a consistent drip and not a constant flow of water.) I set my Canon 1DX camera with the Canon 100mm macro lens (although I could have easily used my Canon 5D Mark III and almost any lens that will focus within 6 inches) on my Gitzo tripod and then pointed the Canon Speedlite 600EX-RT flash towards my background. I used Canon's ST-E3-RT transmitter to fire the flash, but you can also use a flash extension cord which would work just fine and is only $30. I had a black background, but probably did not even have to have that. I used numerous colorful items as backgrounds. In this photo I have one of my wife's encaustic paintings.


As you can see, I used different props from around the house to get cool reflections back on the surface of the water. On the table, you can see my daughter's "Happy Birthday" bag, the colorful beach towel and even the seat cushion.


This photo shows the reflection off of the seat cushion. Who would have known that this simple household item could create something so awesome?!


And, it doesn't always have to be the water drop in the photo. Here is the splash caused by the incoming drop.


I really liked the reflection of the seat cushion and took many photos with this background.


This is one of my favorites from the group. Oh, at this point, you are probably wondering about my camera settings. Here is how I set the camera:

* Manual mode
* ISO 800
* Shutter speed 1/6 sec
* f/16 (to get more of the frame in focus)
* Manual focus
* Flash in TTL mode


It is very difficult to prefocus on a water drop, so I took the same pin which I used to put a hole in the plastic bag, and turned it around. The back side of the pin had this little round ball. I put the red ball right where the water drops were falling, and prefocused the camera on that spot.


This shows another photo taken with the blue and green beach towel as my background.


This pink background was using the "Birthday bag" as my background.


I even tried using a potted plant to see if I could get the color of the leaves in the shot.


As my water was dripping out of the bag, I searched the house for more colorful objects. I looked in one of our closets and found some unused wrapping paper from last Christmas. I rolled that out behind the pan of water and got this shot. If you look closely at the water drop, you can see Santa Claus hiding in there.


Another splash crater within the red and green of the Christmas wrapping paper.


Since I really like the color blue, I went back to the blue and green beach towel. But, this time I added in a blue and white beanie that I purchased in Sochi.


Here is a close up of the previous photo, showing the reflection of the blue and white beanie at the bottom of the water drop. Pretty cool huh?

I hope that this has inspired you to try this fun at-home photography project. Try it and amaze your friends with the details in the simple little things that most of us never see.

And...if you like this...stay tuned for the next blog when I teach you how to photograph smoke.

Tuesday, March 4, 2014

The best and worst parts of photographing the Olympics in Sochi

Now that I have returned home from Russia, the number one question from everyone is, "How did you like the Sochi Olympics?" And as I answer this question each time, it forces me to think back and analyze the 3 weeks in Russia.

First of all, I have to say that even in conditions that were less than ideal, it was still the Olympics, and I was really glad to be there. 

I will start with the bad parts.

Honestly, the thing that bugged me the most (and was shared by many other people I talked to this time around) was the lack of soul of this Olympics. Normally, the best part of being at the Olympics is the vibe. When I would walk around Vancouver or London, you would be surrounded by people who were in the Olympic spirit and excited to be there. But this year, I really did not see any of that.  I am not sure why this is, but it could be for numerous reasons:

1. Sochi is a small town, far from any large city. This made it very difficult for people, including Russians, to get there. Most of the venues had empty seats for even the most popular events.

2. The terror threats kept many people away, and cast a negative tone on the Sochi Olympics.

3. Most of us in the media stayed in the "Olympic bubble" for security reasons, and because there was almost no reason to leave the grounds. This meant that there was less mingling with the spectators.

For me this was sad, as I have always enjoyed the positive environment of the Olympics. 

As many of you know, the housing was another negative part of the Olympics for me, paying a lot of money for a place that was lacking many of the services I needed. Here we were, the media, staying in a "hotel" with no Internet (for the first week), very few power outlets that worked, and with locks that could barely keep a child out of the room. At first I was really freaking out about the housing, but I learned to adapt to it. And...with a week left at the Olympics, we did get Internet that was working and reliable. The funniest part is that, after 3 weeks of staying at Omega 18 (which I jokingly called Stalag 18), on the day that I left, they came and installed a hair dryer in my room. Have you seen my head? This was not critical for me! :)

Another bad part of this Olympics was the food in the Olympic Park. In past Olympics, the press center had very good food options for us, with international choices. So, we could choose to have asian, mexican, western or local cuisine. This time around, the food court had very few options and the food was not very good. The worst part was that those options never changed. They served the same 5 things for the entire month. The food court could probably seat 500 people or more, and I swear I never saw more than 30 people in there at one time. It was that bad. So, what did that leave us? Well...there was a McDonalds on site and many of us ended up eating there way more often than we would ever admit. After the second week, I felt like I was living in that "Super Size Me" movie. There were two sit down restaurants outside the press center, and those served pretty decent food. But they were both expensive and they took a while to get us food. At the Olympics, we move at a fast pace all day and all night. Sitting down for an hour long meal or traveling far to eat was not usually an option.

After the Olympics were over and I had a couple of days to explore the towns of Sochi and Adler, we did find some pretty good restaurants.

Traveling to and from Sochi had its challenges too. Most of us flew into the city via Aeroflot Airlines, and for the most part, they were excellent. But they have very strict policies on carry-on and checked luggage. I have flown all over the world with my LowePro x200 rolling bag, and I have never had an issue carrying it onboard. But Aeroflot said that it was too heavy to put in the overhead. Mind you, I have put this in overhead compartments countless times. And I really wasn't comfortable checking a bag with $25,000 worth of camera equipment. I had to get creative with this one. And, they also were strict about the 22k weight restriction on checked luggage, adding steep overage charges to passengers. I talked to a couple of people who had to pay more than $300 for excess weight and to get an extra bag checked.

The best part of the shooting the Olympics in Sochi was probably the Olympic venues. I loved the proximity of all of the venues in the coastal cluster. I could move from men's hockey to women's hockey to speed skating or curling, all within a 5 minute walk. That was awesome! 

The transportation was also very good in Sochi. I am not sure if they blocked the roads for locals, but we almost never saw any traffic on the roads, and the buses ran like clockwork.

I should also mention that the evolution in photography equipment really helped in Sochi. Shooting with the Canon 1DX cameras, and being able to use the Canon 200-400mm lens for all the outside sports was just amazing. I loved carrying one big lens around, as opposed to trying to figure out which focal range (300mm to 600mm) to carry with me. And once again, using the fastest memory cards, readers and laptop helped me meet those crazy fast deadlines. 

This year, even more than Olympics past, I was able to interact with the athletes on a daily basis. I think that this comes with working with the teams in past years, and earning their trust. Getting to know the athletes is such a thrill. Not only to see the personalities behind the faces, but to be more invested in their outcome of the competition.

And...of course...I am always thrilled with the opportunity to photograph some of the top athletes in the world. If it wasn't for them and their abilities, my photos would not be as interesting. They help make the photos come alive! 

One thing that did not change from my prior Olympic games, was the camaraderie amongst the photographers. We tend to see the same faces every couple of years (although there are some photographers who only shoot the Summer games or just the Winter games), and we get to know each other pretty well. And this year, like the others, I made many new friends, one who even lives very near my home town.

Speaking of new friends, this year was a chance for me to share all of the photos and stories with you all, my new online friends. And it was so much fun to have the interactions with people from all over the world. Many of you posted comments or emailed me telling me that you were learning from me. And I learned from many of you as well. There were numerous times when I would post something new to me, only to find out that many of you were familiar with the situation, and would help educate me. The best comments were the messages saying that complete strangers felt like we were friends, and I felt the same way from my side of the computer.


As always, I plan to write blogs at least once a week and share different photos and experiences with you. And then in another couple of years, I will be off to Rio to photograph the Summer Olympics. That should be fun!

Wednesday, February 26, 2014

Closing ceremony - The final photo shoot of the 2014 Winter Olympics

This morning I got up at 3:45am to get to the Sochi airport. Even though my flight did not leave until 8:30am, we were warned to get to the airport very early. It is a good thing that I did, since I only had 30 minutes between getting through allthe lines and boarding the plane. We just took off from the Sochi airport, as I make my way to Frankfurt, Germany and then ultimately to San Francisco. I am still in the Olympic mode of making use of every waking minute, so here I am writing this blog. This blog will be posted from 38,000 feet, since there is WiFi on the long flight home.

I had this last set of photos, from the closing ceremony, that I wanted to share with you all.

Before we go through the photos, I thought I would tell you a little about the difference between opening and ceremonies for me. For opening ceremony, I had to be in place 3 to 4 hours before the event started. For the closing ceremony, all of the photographers who covered the gold medal hockey game, had a tough time making the closing ceremony. The hockey game started at 4pm and went until 7pm. The closing ceremony started at 8:14pm, so there was very little time to download photos, post, and then get from one location to the other. I ended up leaving the gold medal game early.

The nice thing is, I picked photo position B, which was facing the opposite direction from where I sat in the opening ceremony. I figured that a different location would be refreshing (and I didn't know if they ever repaired all the broken seats in the other position). As it turned out, it was a great pick, because there were handicap seats behind our position that were not being used. Before the show started, myself and a couple other photographers, hopped over the railing and sat there. This way we could have ample room for all our bags, cameras and lenses.

So...here are the photos and stories for you.


Before the ceremony started, they had numerous performers to warm up the crowd. Nobody that I had ever heard of, but they were fun nonetheless. This group was the most visually interesting, with their amazing outfits and colors.

I brought a combination of cameras and lenses for this event. For this photo, I used the Canon 1DX with the 200-400mm lens to try and get in close to the subjects. I left the camera in aperture priority mode most of the time, because of the ever changing lighting during the show. For this shot, I was at ISO 3200, f/4, and 1/125 sec.

Then everything stopped for a long time, and we waited 20 minutes for the show to begin. It was really awkward, because unlike other Olympic ceremonies, where the hosts practice the big countdown and get every psyched, they just had silence and a countdown clock on the big screens.


One of the first parts of the show was this large group of people who came out and formed the Olympic rings. But, just like in Vancouver where they mocked there own problems in the ceremonies, the Russians poked fun at themselves, when the rings did not open correctly. This made me laugh.


But after a slight pause, the people did form the Olympic rings correctly and all was good.

All the wide shots in this blog post were taken with another Canon 1DX mounted with a Canon 24-70mm lens.


I saw these drummers coming out from the middle of the stage, and I thought that this would be another great time for a motion blur shot. So, using the long lens, which was mounted on my trusty Gitzo monopod, I slowed the shutter speed and panned slowly with them as the entered the stadium. I lowered the ISO to 2000, changed the aperture to f/8, which gave me a shutter speed of 1/15 sec. Notice the movement in the snare drummers sticks.


And then when they came closer to me, I did the same technique again. The difference here is that they were in much brighter light, so I changed the aperture to f/22 to lower the shutter speed again to 1/15 sec. I thought that this would be a perfect moment for motion blur, with everyone's faces and bodies still, but the arms in motion.


Then they had this whole element of the seasons, similar to the opening ceremony.

Honestly, for those of you who watch this on TV, you probably know much more than I do, since we get no commentary while in the stadium.


I saw this woman suspended in the air, and really liked the composition of her in the white dress against the blue background. Very Mary Poppins esque. :)


Then came this pianist, who I believe is well known in Russia. I shot with the wide lens to show how many others were on the stage with him.


And then I switched to the long lens and slowed the shutter again. Figuring that, with the main pianist not moving, but everyone else moving around him, would make for a cool effect. I shot numerous photos at this time, since I needed the main pianist to keep his head still for one frame.


One of the benefits of using the long lens and getting the 400mm reach, is that I could zoom in and isolate performances.


This is my favorite photo from the closing ceremony. The perfect lighting of the main ballerina, while having muted lighting on the others, makes for a very cool image. To me, it almost looks like a painting. Even the background looks like a painting.

This photo was taken at ISO 3200, f/4, at 1/100 sec and I dialed in -.07 exposure compensation to make sure that the main ballerina was not too bright.


They had these adorable kids throughout the show. I loved it when they had all these papers flying out from the stacks of books.


Mid way through the show, they got down to business and they handed over the Olympic flag to the mayor of PyeongChang, Korea, the site of the next Winter Olympics in 2018.


On the program, it said that they had a whole section on the hall of mirrors. I was hoping for something a little more dynamic than this, but it was still pretty cool.


Have I mentioned how much the Russians love the Olympic mascots? They came out and everyone went crazy.


I switched back to the wide lens to show the whole scene, with all the people in the periphery.


And then, after a performance, the mascot extinguished the Olympic flame.


This famous opera singer came out and sang a song from a suspended boat / blimp. I saw all the fake snow falling around them and though that it would be a cool shot. For this photo, I had to manually focus the lens, since the autofocus would keep focusing on the snowflakes.


At the end of the show, they filled the stage with all of these people. There was supposed to be one more performance, but the fireworks started going off outside the stadium and everyone ran out to watch those.

I ran out to shoot some of the fireworks, but since I was so close to the stadium, with no interesting foreground or background, they were just regular old fireworks shots.


This, folks, is my last Olympic photo taken. I was carrying all of my gear from the Fisht Olympic Stadium back to the main press center, and as I passed the extinguished flame, I put everything down and shot this closing shot. With the flame out, I figured it was the perfect photo to end my journey.

Thanks to all of you for following along, and for posting the hundreds of comments along the way. You all inspired me to keep blogging. When I first started blogging from the Beijing Summer Olympics in 2008, I think I had 50 readers a day. This time there were more than a quarter million viewers. I feel so fortunate to be able to go to the Olympics, to share the experience with you all, and to get your feedback. Thank you, thank you!