Monday, November 21, 2016

It's almost Thanksgiving - Here is what I am thankful for!

Here in the U.S. we celebrate Thanksgiving this Thursday, and it gives us a chance to think about the things that we are thankful for. I don't just think about this at this time of year, but it is a good time to share this with all of you.

Here is what I am most thankful for:

Family


First and foremost, I am thankful for my family. My wife and kids each have their own unique personalities and each of them is amazingly creative in their own rights. They have also been very supportive, as I have travel all over the world and away from home so much. I have a lot to be thankful for, but this one is the biggest!

Friends

Not only do I have my long time friends from college and beyond, but I have also made countless friends in the photo community. I am reminded of this at each trade show, when I walk through the hallways and see so many incredible people whom I have known for years.

Amazing Clients

I am grateful for having so many awesome clients. Sure, I am thankful for them trusting me to be their photographer and for giving me the ability to be a successful full-time photographer. But I am actually more thankful for being able to call so many of them friends.

Independence


As many of you know, this was the year when I retired as Director of Marketing at Lexar and dedicated myself full-time to my photography business. This was a big decision for me, but one that has already proven to be the right choice. I now have the ability to focus 100% on my passion of photography and do what I want to do. After spending more than 10 years doing both jobs, it is SO NICE to focus on photography and have some time to relax.

Creating Art

I am thankful for finding the passion for photography and changing the way I see the world. Every time I take a photo, I get excited about what I just captured. I know many photographers who despise the editing process, but I look forward to downloading my photos and retouching them to finish my art. Most times, I am just as excited about this part of the creative process and taking the photo.

Seeing the World

I know that most people in the world never get a chance to travel outside of their home country, and I am forever thankful for the opportunities to travel the world and see so many epic locations.

All of You

I am eternally grateful for all of you who read the blog, follow along on social media, watch the videos and share the passion for photography. Each day, I receive messages and feedback from you, and I am constantly inspired by your photos and stories.

As you can see, I am very fortunate to have all of this in my life. Each day, I pinch myself, that I am able to do what I love and be in a position to share the excitement with all with you.

Regardless of whether you celebrate the holiday of Thanksgiving or not, I hope that each and every one of you has a list this long!!

Jeff

_________________________________________________________________________________
And also, remember that you and your friends can enter your email address at the top right of this blog to get an email any time I write a new blog post or send my monthly newsletter.
_________________________________________________________________________________
If you are interested in purchasing ANY equipment, please click here to go to B&H Photo, as I get a referral from them if you enter this way. It does not change the cost to you in any way, but it helps me keep this blog up and running.
_________________________________________________________________________________

Wednesday, November 16, 2016

A real world comparison of the new Canon 16-35mm f/2.8L III lens vs the older Canon 16-35mm II f/2.8L lens

When Canon announced the new Canon 5D Mark IV camera, they also announced the Canon 16-35mm f/2.8L III and the Canon 24-105mm f/4 II lenses. All three of these announcements were exciting to me, but the product that intrigued me the most was the Canon 16-35mm f/2.8L III.

Here are my reasons why I was so interested in this new lens:

* I use the Canon 16-35mm f/2.8L II at every event I shoot. It is my "go-to" lens for all wide angle shots, and I shoot a ton of wide angle shots or people dancing at parties.

* After shooting with ultra sharp lenses, like the Canon 70-200mm 2.8mm II, Canon 24-70mm f/2.8 II, the 16-35mm f/2.8 II lens always seemed a little soft to me.

I received my new Canon 16-35mm f/2.8L III from B&H photo the morning I left for the PhotoPlus show in New York. So...my testing of this new lens was delayed by my travels and other commitments. If you have read my other reviews, you know that I like to use the new products for a little bit before writing a review. This way I can see how it performs in real shooting conditions and see if there are other things I like or dislike, that were not apparent at first look. But now I have had a chance to put it to it's test and give you all the results. If you read the last blog post, where I had the once in a lifetime chance to shoot from the top of the Golden Gate Bridge, you know that I chose this new lens as my lens of choice. It was the perfect place to put this lens to the test! If you look at those photos, you see that the lens performs really nicely...but...how does it compare to the older version II lens?

I started the test in my home office, pointing the Canon 5D Mark IV and both lenses at one of my autographed helmets. I had the camera body mounted to the Acratech ball head on my Gitzo tripod and just swapped out lenses for each test. I also removed my Tiffen HT filters for the test, even though I don't believe I lose any quality from these top grade filters.

I have posted all photos in this blog post at full resolution so that you can open the full-res file and see the comparison for yourself. Note: I have not sharpened or adjusted the RAW files in any way. These are all straight out of the camera.
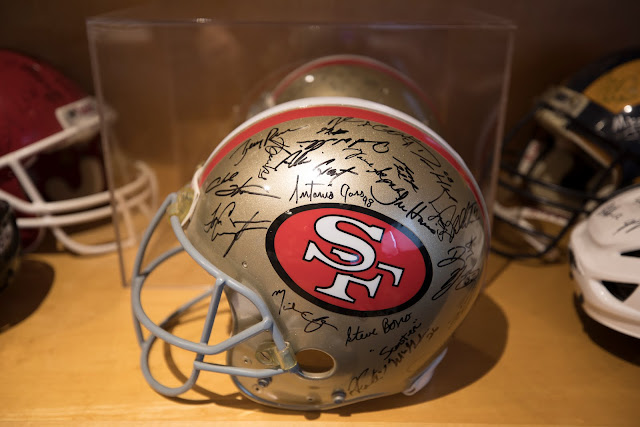
Version III (Click to see full resolution)
These first two images give you a comparison of the newer and older lenses, close to my helmet and set to f/2.8.
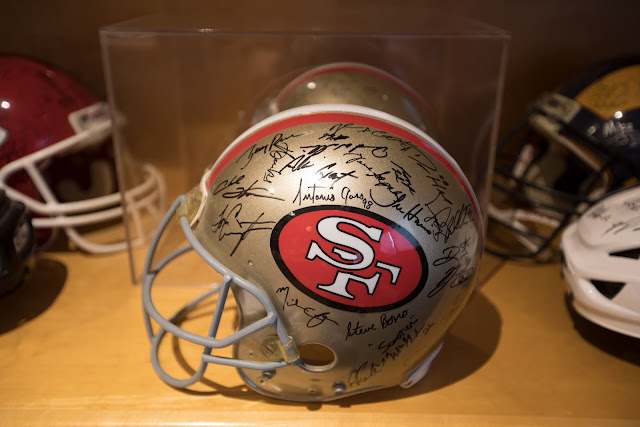
Version II (Click to see full resolution)
If you look closely, you will see that the newer lens is sharper than the older lens, but it is not a huge difference. After shooting these photos, I realized that these do not tell the full story. I needed to find an object with fine details and wide enough to test the edge-to-edge sharpness of the lenses.

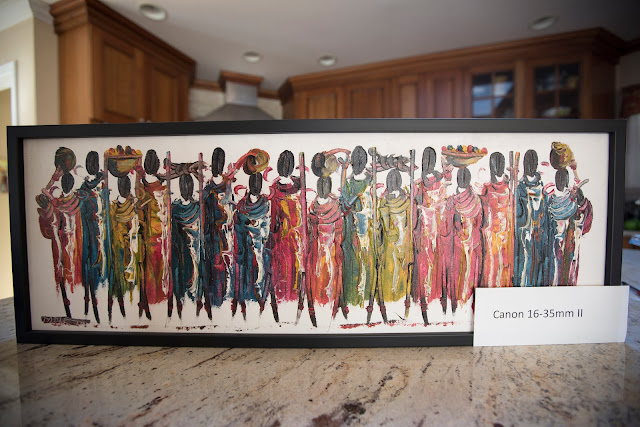
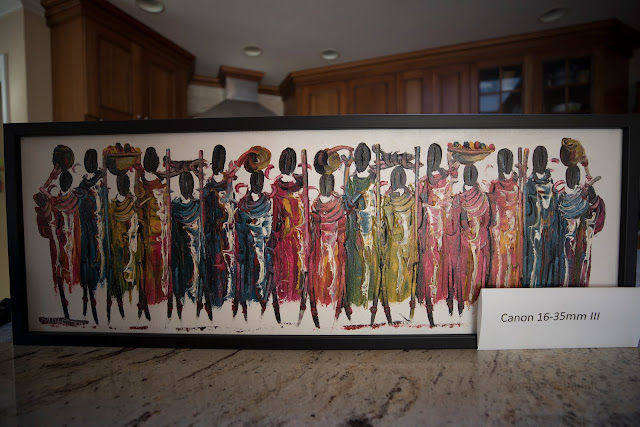
After walking around my house, looking for a new test subject, I decided to use a painting that I picked up on my last trip to Tanzania. It has a lot of detail, and also happens to be nice and wide. I also decided to print out a "label" letting me know which lens I was testing. This made it easier for me to keep track of which lens I was testing.
Version II (Click to see full resolution)
Here are two photos that I used for most of my comparisons. Both were taken with the Canon 5D Mark IV set to AV mode, ISO 160 and f/2.8. The image from the older (version II) lens is above, and the image from the newer (version III) lens is below.
Version III (Click to see full resolution)
When looking at new lenses, I am most concerned with their sharpness, and we are going to get to that in a minute. But, before we zoom in and look at sharpness, do you notice any difference between the two images? Notice that the new Canon 16-35mm f/2.8L III has more light fall-off along all edges of the image, while the older lens did not do that. I find this interesting, but not a big deal, since it is easily correctable.

What is not correctable is the sharpness of the lens. Let's look at that comparison.

UPDATE: I just updated my Lens Aberration Correction on the camera, and this has removed the light fall off that you see in the images above. If you want to update your Canon camera, check out this link.

(For all the photos below, the older model is on the left and the newer lens is on the right)
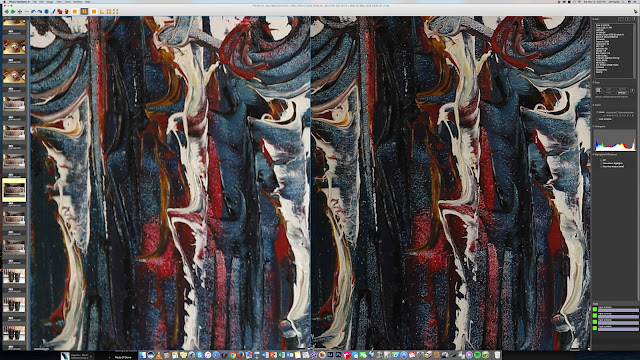
Comparison at Center of lens at f/2.8 (Click to see full resolution)
This first image shows the detail near the center of the painting, and the difference is very visible. The clarity and sharpness of the new Canon 16-35mm f/2.8L III is very apparent. Even in this small preview image, you can see the advantage of the new lens, but zoom in and really take a look.

Comparison at right edge of lens at f/2.8 (Click to see full resolution)
As I mentioned earlier, I was most interested in the clarity of this lens from edge-to-edge. With this in mind, I moved the zoomed image to the far right of the frame, and once again you can see a big difference in the clarity of the Canon 16-35mm f/2.8L III lens vs the older model.
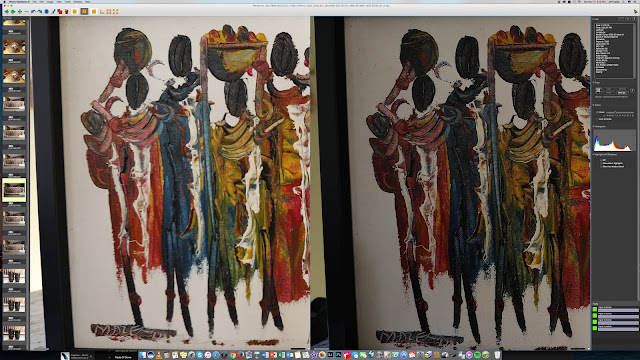
Comparison at left edge of lens at f/2.8 (Click to see full resolution)
I then moved the zoomed image to the far left of the frame and saw an even bigger difference in quality!
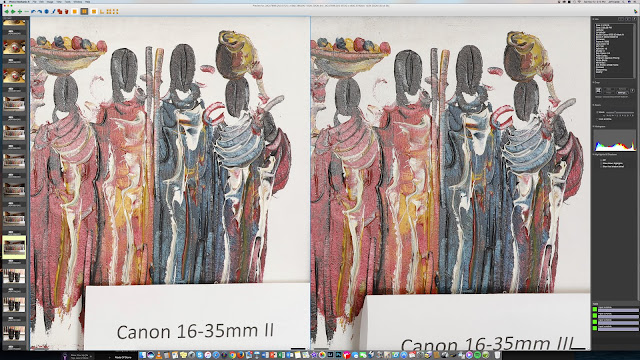
Comparison at right edge of lens at f/16 (Click to see full resolution)
After seeing such a big difference in edge-to-edge clarity of the two lenses at f/2.8, I decided to do the same test at f/16. The photo above shows the comparison of the two lenses at a narrow aperture of f/16, and you will notice that the delta between both lenses lessens. As interesting as this is, this does not matter to me very much, since most of my use for the 16-35mm lens is for events in low light, and I am almost always shooting at f/2.8. The only time I use this lens at an aperture below f/5.6 is for landscapes, and that is not the bulk of my business.


As you can see, the difference between the new Canon 16-35mm f/2.8L III lens (left) and the older Canon 16-35mm f/2.8L II lens (right) is pretty dramatic. The new lens looks and feels more like the newer Canon 24-70mm II lens than the older 16-35mm lens. The new lens maintains the same 82mm lens size but feels more solid. The version III does weigh a little more than the version II, but it feels more balanced in the hand. I like that.

All in all, the new Canon 16-35mm f/2.8L III performs really well and is a welcome newcomer to my camera bag. This lens does not come cheap, at a price of $2200, but since I rely on the 16-35mm for all my wide angle shots, I am willing to invest the money to get my clients the best possible images possible. For the last couple of years, I have been saying that this focal range was the weak spot in Canon's lineup, and I am thrilled to be shooting with the newer and sharper lens now.

Anyone want to buy the older version II lens from me? :)

_________________________________________________________________________________
And also, remember that you and your friends can enter your email address at the top right of this blog to get an email any time I write a new blog post or send my monthly newsletter.
_________________________________________________________________________________
If you are interested in purchasing ANY equipment, please click here to go to B&H Photo, as I get a referral from them if you enter this way. It does not change the cost to you in any way, but it helps me keep this blog up and running.
_________________________________________________________________________________

Monday, November 14, 2016

Photographing the Super Moon - Recommended settings and composition

Last night, my wife and I hiked up to the top of a nearby mountain top so that I could capture photos of the super moon. Here is what I brought with me:

* Canon 5D Mark IV camera
* Canon 100-400mm II lens
* Canon 1.4x tele converter
* Gitzo tripod
* Acratech ball head
* Lexar 128GB 1066x Memory Card
* Canon Shutter Release Cable


I used the LightTrac app on my iPhone to determine the exact time and location of the moon rise. When we got to the top of the mountain, I was a little disappointed to the see the hazy sky over downtown San Jose. but that was not going to stop me from capturing photos. I set the camera on the tripod and prepared for the moonrise. And just as the app told me, the moon rose above the mountain tops in the distance.


My wife was nice enough to take some photos with her iPhone, so you can see my setup.


I worked quickly to get shots of the moon coming up over the mountains, knowing that this would not last long.

I shot photos wide (to show the moon over the city) and tight to isolate the moon as close as I could. Since I was using the Canon 1.4x tele converter with the Canon 100-400mm lens, I was effectively shooting photos at 560mm. As you can see from this photo, the advantage of the haze is the orange coloring in the moon.


My wife, being the creative one in the family, even took a panorama shot of me shooting. Good idea Annette!


As the moon kept rising, I kept shooting.


At this point, you are probably wanting to know what my camera settings were. ( I know this, because I get so many messages from all of you asking me to give you camera settings.) So here is how I took the photos. I actually shot in two different modes. To start, when the moon and night sky were about the same brightness, I was shooting in Aperture Priority mode, but using the exposure compensation at -0.7 to darken the scene and keep the moon from being blowing out (being too bright). My settings for these images were ISO 160, f/8, 1/40 sec)


In this smaller image, you can barely see the silhouette of the mountain tops at the bottom of the frame, but it looks better in the large image.


Here is a crop from another photo. The advantage to using the Canon 5D Mark IV, is having 30 megapixels, allowing me to crop in and still have very nice resolution.


Once the sky darkened and the moon got brighter, it was imperative to switch to manual mode in the camera. My goal when shooting these images, is to keep the moon properly exposed, knowing that I could adjust the exposure of the city later in post processing. At this point, I changed my camera settings to ISO 160, f/6.3, 1/25 sec. I then had to lighten the lower half of the photo in Photoshop, so that you can see the city below the moon.

One more tip for you all... Try to find a good foreground for the moon. Sure, we can all get cool close-up shots, like the image above this last one, but it is more interesting if you can find something else to show in the photo. For these photos, I used the city of San Jose. I would have preferred to use a more iconic foreground, like the Golden Gate Bridge or something like that, but I don't have the time to make the trip to SF right now.

Tonight is another chance to capture the super moon. I hope that this information helps you to capture some cool shots of your own!

ADDED: Here is a shot from tonight's shoot


For this shot, I decided to use my Canon 7D Mark II with the same lens setup. This added the crop factor making the lens closer to a 700mm focal length.
_________________________________________________________________________________
And also, remember that you and your friends can enter your email address at the top right of this blog to get an email any time I write a new blog post or send my monthly newsletter.
_________________________________________________________________________________
If you are interested in purchasing ANY equipment, please click here to go to B&H Photo, as I get a referral from them if you enter this way. It does not change the cost to you in any way, but it helps me keep this blog up and running.
_________________________________________________________________________________

Wednesday, November 9, 2016

A very RARE chance to photograph from the top of the Golden Gate Bridge!!!

Sorry everyone - due to legal reasons, I had to remove the images from the blog. I guess you will just have to trust me that the experience was epic!

Jeff


_________________________________________________________________________________
And also, remember that you and your friends can enter your email address at the top right of this blog to get an email any time I write a new blog post or send my monthly newsletter.
_________________________________________________________________________________
If you are interested in purchasing ANY equipment, please click here to go to B&H Photo, as I get a referral from them if you enter this way. It does not change the cost to you in any way, but it helps me keep this blog up and running.
_________________________________________________________________________________

Wednesday, November 2, 2016

The High Sierras of California - Fall Colors / Devils Postpile and Rainbow Falls

It is November 2nd and it was exactly a month ago that my wife, mother-in-law and I were driving though the Sierras heading to Mammoth Lakes, CA. We were in two different cars, since my mother-in-law would be continuing south to the San Diego area, and we would be heading back to the Bay Area after the mini vacation. This worked out really well, since I wanted to stop and shoot photos when I saw a good shot, and that was fairly often.

As we cut through the Lake Tahoe area, we drove down a hill and saw our first sight of Fall colors. We both pulled over to check out the scene. There were numerous other people on the dirt road, taking photos of the colors, but I left the road and walked closer to the trees. I wanted to get closer to the trees, but also wanted to find a foreground for the photo.


I saw this rock and walked to a location where I could include the rock (foreground), the trees (mid ground) and the sky (background) in one frame. I put on my Tiffen Circular Polarizing Filter to help accentuate the colors in the trees and sky.

I should mention, that for this trip, I packed really light with just the following:

* Canon 5D Mark III
* Canon 28-300mm lens
* Tiffen 77mm Circular Polarizing Filter
* Gitzo travel tripod with the Acratech ball head
* A bunch of Lexar 128GB 1066x CF cards

All of this was packed in my ThinkTank backpack.


About a half hour later, I was on my own, driving towards Mammoth and looking for more Fall colors. I came up a crest and saw these colors off to my right. I pulled over and took another shot. What I liked about this image, was the inclusion of both the Fall colors and the mountains in the distance.


As you can see, we were driving just ahead of an oncoming storm, and so I had cloudy skies. I would have preferred deep blue skies and puffy clouds, but this is what I had. The advantage is, I did not have any harsh shadows to deal with.


As always, I made sure to capture the wide shot, and then zoom in to isolate some of the details.  I love the layers of colors, with green in the back, yellow in the middle and grey in the front.  But hat makes this image most interesting, in my opinion, is this one dark tree popping out from all the yellow trees, purposely positioned off to the right of the photo.


Dramatic skies over a grove of trees.


Once again, I took wide shots and tight shots.


For this image, I took the photo into NIK ColorEfex Pro and added an Bi-Color effect to the trees. Although it is not historically correct, I really like the photo nonetheless.


I took this photo for two reasons. Firstly, I liked the symmetry of all the tree and branches. And secondly, I wanted to show all of you that there is beauty in the trees, even without the colorful leaves.


A couple of days later, we went on a hike and saw some amazing views. As you can see, we had beautiful blue skies at this time. It so pretty with the colorful trees in the valley, with these majestic snow laced mountains in the distance.


I hiked further up the path and found this group of flowers. Just like the first image of this blog post, I was looking for a strong foreground, and these worked perfectly.


I also zoomed in to the flowers and and made them my subject for this shot.


When hiking back along the Aspen lined creek, I looked up and saw the sun peeking through the trees. I changed the camera settings to f/18 and moved to where the sun was just barely visible through the trees, which accentuates the starburst.


And...you guessed it...I shot tight and wide once again. See the trend here? :)


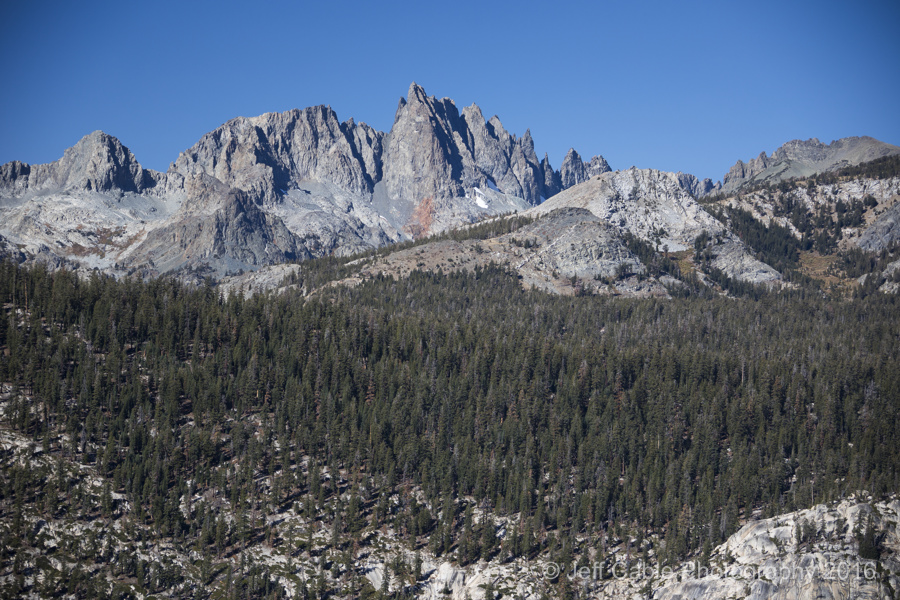
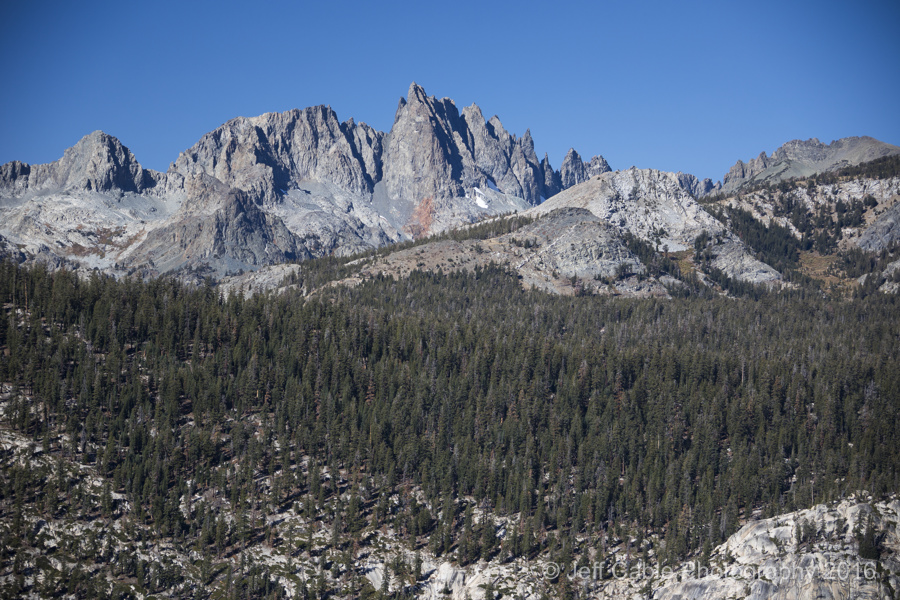
On our last day in Mammoth, my wife and I decided to hike to Devils Postpile and Rainbow Falls. As we made the drive into the park, we stopped to photograph the Minarets.


It was a short hike from the parking lot to Devils Postpile. I had been here a couple of times in the past, but never photographed this National Monument. Using the Canon 28-300mm lens at 28mm, I got down low to the broken columns of Basalt to make them larger in the photo. doing this makes it easier for you, the viewer, to see the awesome columnar shapes of these rocks.


I climbed up another rock formation to get as high as possible to photograph Devils Postpile straight on.

And then...we continued our hike towards Rainbow Falls. And this time, we made it!


You see...last time we did this hike (about 7 years ago), I ended up rolling my ankle and breaking my foot half way down the trail. I had to be taken out of there on horse back. That sucked! But this time, all was good and I made it to the falls, camera, tripod and all. My wife took this photo to commemorate my success this time around.


Whenever I photograph waterfalls, I always use a circular polarizing filter. This helps for two reasons:

1. It helps cut out the glare off of the wet rocks.
2. The filter cuts out some of the light, which means that I can get a slower shutter speed.

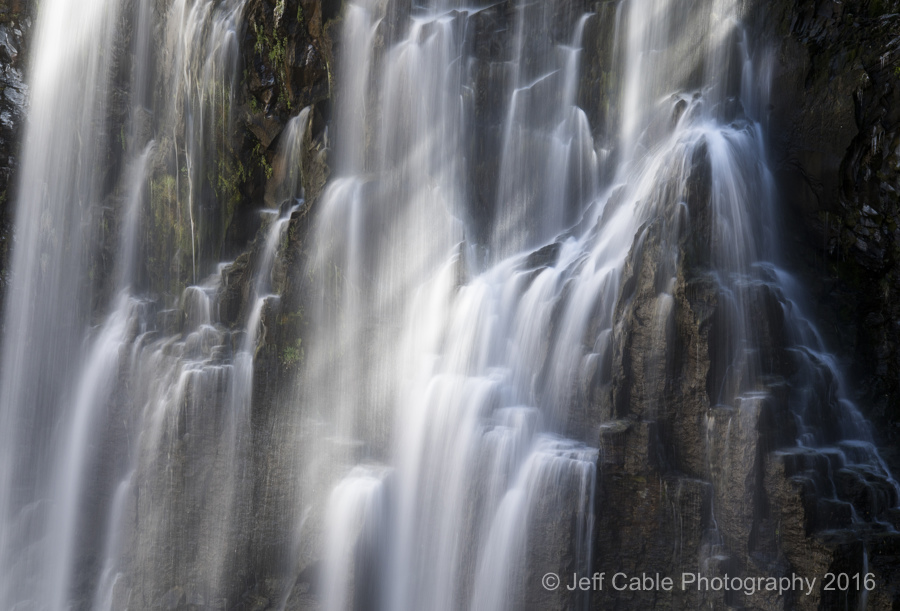
Using the filter and changing the settings of my camera to ISO 100, and an aperture of f/22, I was able to get a shutter speed of 1/4 second. Considering that I had a lot of light in the sky, getting a slow shutter speed (to show the movement of the water) was a challenge.


I looked closely at the waterfall and tried to find the most interesting movement of water. I then zoomed in tight to 300mm to isolate just that area of cascading water. Since I did not have any sky in the frame, I was able to get a shutter speed of 1/2 second for this photo. 

I hope you enjoyed my view of the Sierras. It was a really great 3 days of rest and a chance to get out and breathe the fresh air. Yes, it is true...my version of resting is breaking out the camera and shooting for myself. It is not just my job, it is my passion!

_________________________________________________________________________________
And also, remember that you and your friends can enter your email address at the top right of this blog to get an email any time I write a new blog post or send my monthly newsletter.
_________________________________________________________________________________
If you are interested in purchasing ANY equipment, please click here to go to B&H Photo, as I get a referral from them if you enter this way. It does not change the cost to you in any way, but it helps me keep this blog up and running.
_________________________________________________________________________________


Friday, October 28, 2016

After a really long wait - the new MacBook Pro laptops are here!

I have been using the same MacBook Pro now since before the London Olympics in 2012 and waiting anxiously for a newer faster model to become available. Well...yesterday that time came, and the new model looks great!
Here are my main reasons for wanting a new laptop:

* Processing power - As most of you know, I am all about workflow and the speed at which I can download and retouch my photos. Let's face it, even if I am not under Olympic deadlines, I am still trying to work as efficiently as possible. And as we all know, time is money.

* Smaller and lighter - I carry my laptop all over the world and already have enough weight with cameras and lenses. If I can get a thinner and lighter laptop, I am really happy. In the past, I have had people suggest that I get a MacBook Air, but the Air does not have the 15" screen size, SSD capacity or processing power that I desire.

* Better screen quality - Let's face it, the quality of the screen is vitally important to photographers. Even with the retina display on my older MacBook Pro, I found it difficult to retouch images on the screen as compared to my 32" 4K monitor at home.

* Faster I/O - It seems that a day does not go by without me finding myself downloading images from a memory card or transferring a lot of data to an external device. I want the fastest data ports available so that this process can be as fast as possible.

* Longer battery life - I spend way too much time on airplanes, and really want to have longer battery life on my laptop. I fly United Airlines all the time, and I really hate that they have hidden the A/C plug under the seats. Not only do I have to become a human pretzel to plug in my laptop, but the cord is constantly tangling in my feet. I would love to fly coast-to-coast without worrying about my battery life.

The new MacBook Pro has addressed all of these with the following enhancements:

* A new 2.9Ghz quad-core i7 processor for really fast computing power.
* The laptop is now 17% thinner and a half pound lighter.
* The new screen is 67% brighter, with 25% more color gamut and higher contrast ratio.
* The new MacBook Pro comes with four Thunderbolt 3 ports, with each port able to be a power port, display port, USB port and more. Love that! Yeah - I will need new connector cables, but I am OK with that. I love the idea of being able to plug in the power to the MacBook Pro in any of the four ports, and on either side of the machine. Simple, yet effective!
* The new laptop now has up to 10 hours of battery life. I am not sure how much battery life I will get if I am hammering on Photoshop nonstop, but even if I can get 6 hours of battery life, I will be happy with that.

The new MacBook Pro has addressed all of these issues and added a couple other nice enhancements. Most notably, the new Touch Bar. The Touch Bar is a really innovative way to replace the antiquated function keys with a high res, color, and touch sensitive strip which applications can customize. I love this idea. What excites me most about the Touch Bar is the thought of Adobe Photoshop showing me options depending on what tool I am using at the time. That should be awesome!

There are some other enhancements, which are less important to me, but still welcome:

* A large trackpad, which might make retouching a bit easier
* Better speakers, which might make my hotel neighbors even more irritated. :)
* A more responsive keyboard. This never bothered me in the past, but newer should be better, so...
* It can drive multiple 5K monitors. I may use this, but not sure yet.
* A finger print reader for easier login and for making purchases online.

They have many options when ordering the new laptops. They come in the older silver color and a new Space Grey color. I like the new color best. As I mentioned earlier, I prefer the 15" version, since I find the 13" display too small to work on effectively. I like the 1TB SSD size. Sure...the 2TB version would be awesome but Apple wants way too much more for this option. I am upgrading to the faster 2.9Ghz processor.

Here are the current options at B&H.

There are many times when new products are announced and I have to think long and hard about whether or not I am going to invest in the new technology. Not this time. I have already ordered my new machine!!!

_________________________________________________________________________________

And also, remember that you and your friends can enter your email address at the top right of this blog to get an email any time I write a new blog post or send my monthly newsletter.
_________________________________________________________________________________

If you are interested in purchasing ANY equipment, please click here to go to B&H Photo, as I get a referral from them if you enter this way. It does not change the cost to you in any way, but it helps me keep this blog up and running.
_________________________________________________________________________________

Saturday, October 22, 2016

If you own a Canon printer, I would wait to update to the new Sierra Mac operating system

Last week I decided to upgrade the operating system of my main editing Mac to the latest Mac OS Sierra (10.12). Each time I do this, I cross my fingers and hope that I am on the leading edge and not the bleeding edge of technology.


All of my applications seem to be running just fine, but when I went to print an image on my Canon Pro-1000, I could tell that something was not right. All of my paper profiles were missing. I called Canon tech support (which has consistently been amazing) and they told me that Apple has made some pretty major changes to the print driver pieces of the OS and that they do not have updated printer drivers yet.

Luckily, I have two other Macs in my house, that have not been upgraded to Mac OS Sierra, so I am able to print from them. This is a bit of a pain, having to move images from my main system to another Mac in order to print, but at least it works. But if you own just about any Canon printer, and have not updated your Mac OS yet, I would recommend waiting for a little bit so that Canon can finish developing their new drivers.

I hope this helps some of you Mac people out there.

Thursday, October 13, 2016

Photographing fall colors in the California Sierras and Mammoth Lakes

Yikes! It has been two weeks since my last blog post. Sorry about that everyone. I promise you I was not slacking, I just have been shooting so much lately that I have not had time to sit down and write. the last blog post was all about the Canon 5D Mark IV and this blog post includes all photos taken with the new camera.

Early last week, I did take 4 days away from work to head to Mammoth, CA for a little rest and to celebrate my birthday. Some people might think that taking time off from my photo business, means that I put my camera down for those days and don't think about photography. But for me, it is just the opposite. One of the ways that I relax, is slowing down and taking photos just for the love of it. This is exactly what I did on this last trip.


I was driving with my wife and my mother-in-law and as we made our drive through the Lake Tahoe area we saw our first bit of fall color. We stopped and i grabbed the 5D Mark IV. I only brought a couple of lenses with me on this trip, and ended up using the Canon 28-300mm for almost every photo. I like that this lens gives me so many focal range options in one lens. For this first photo, I walked to a position where this rock would be in the foreground of my image. Even thought the mix of green and yellow trees was my subject, I wanted to include more in my image than just the trees. By moving to this position, I had a strong foreground, middle ground and background (skies).


As we continued driving, we came across numerous other spots of color. I liked this cluster of trees with the Sierras in the background.


This area had a large cluster of fall colors, but I decided to zoom in and isolate just these trees. I liked the way that the one dark green tree popped out amongst all the other lighter trees. I used the rule of thirds to place the dark tree off to the right side of the frame.


As you can see, I like photographing both tight and wide shots. They offer completely different views, but both have their own unique qualities.


Some people might avoid shooting photos which include these barren Aspens trees, but I liked the juxtaposition of the leafless trees and the colorful foliage.


For this photo, I did something completely different. I brought the photo into Google's NIK ColorEfex Pro software and added some effects to bring out the colors in the trees.


On our second day, we were out for a hike when I came across these flowers. They were far enough from the background that I could photograph them showing separation from the tall grass. I zoomed the lens all the way to 300mm and shot this at f/5.6 to have only the flowers in focus.


As I was hiking farther up the McGee Canyon trail, I could not help but be amazed by the scenery. At this point, I put on my Tiffen HT Circular Polarizing filter on the 28-300mm lens to help boost the color in the sky.


The hiking trail took me right up against the trees and I looked up to see the sun coming through the branches. I changed the aperture of the Canon 5D Mark IV to f/18 to give me a starburst effect from the sun. This is a simple shot, but one of my favorites from the trip.


Speaking of favorites, I really love this shot. I had hiked higher along the trail and wanted to get a shot of the colorful tress and mountains in the distance. But I also wanted to have something interesting in the foreground. I saw this patch of flowers off the trail. I went over to the flowers, got down very low and shot this to include all three in one photo. I took this photo at f/13 to have all elements in focus.


The next day, my wife and I decided to visit Devils Postpile and Rainbow Falls. We stopped along the drive to get this photo of the Minarets.


If you have never seen Devils Postpile before, you will be amazed by this site. These are 60 foot high columns of volcanic basalt rock that were naturally formed more than 100,000 years ago. I am amazed, not only by the large wall of columnar rock, but by the mass of rock columns that have broken and fallen to the base of the rock wall.


I climbed up a rock opposite of Devils Postpile to get this more distant view of the formation.

And then we continued the 2.5 mile hike to Rainbow Falls...

We have done this hike a couple of times before, and made it part way there about 6 years ago. Unfortunately, at that time,  I was walking with our large dog and did not see a step down with a rock in the pathway. I rolled my ankle and ended up breaking my right foot. That was the end of that hike. I had to be taken off the path on horseback. That sucked. So this was my redemption hike!


Good news. This time I made it to Rainbow Falls without incident. I carried my Gitzo travel tripod with me so that I could take some slow shutter shots. I set the camera to ISO 100 and an aperture of f/22 to get a shutter speed of 1/4 second (with the polarizing filter turned as dark as I could get it). I started with a wide shot...


...and then zoomed in tight to isolate some of the water falling across the rocks.

We mostly visit Mammoth in winter time for skiing, and it was a really great to see this amazing area in the fall. After shooting the Olympics for a month and then coming home to shoot numerous events in the SF Bay area, it was really nice to get a way and relax for a little bit. It was also fun to take photos strictly for the pleasure of taking them. That is my way of relaxing, and it worked.

If you live somewhere with nice fall colors, make sure to get out and capture some nice photos for yourself!

_________________________________________________________________________________

And also, remember that you and your friends can enter your email address at the top right of this blog to get an email any time I write a new blog post or send my monthly newsletter.
_________________________________________________________________________________

If you are interested in purchasing any camera equipment, please click here to go to B&H Photo, as I get a referral from them if you enter this way. It does not change the cost to you in any way, but it helps me keep this blog up and running.
_________________________________________________________________________________