Thursday, April 20, 2023

Using the Canon R6 Mark II: My initial thoughts

Most of you know that I switched to all mirrorless cameras about a year ago, mainly using the Canon R6, Canon R5 and the Canon R3 bodies. Everything has been going great with these three camera bodies, but with the release of the Canon R6 MK II, I decided to sell my Canon R6 and switch to the new body. 

I have been using the Canon R6 MK II for a while now and wanted to give you my initial thoughts.

Why I wanted to upgrade

First of all, let me tell you why I switched to the new camera. I thought that it would be nice to have the following (in order of importance to me):

* Higher resolution (24.2MP vs 20.1MP)

* Even better auto focus (face and eye detection)

* A faster frame rate (40fps vs 20fps)

I also like to be using the latest and greatest cameras since Canon is always upping their game. 

Much like the Canon R6, the image quality is exceptional, capturing great detail, color and clarity. So now I have the same great quality with the increased resolution. This is a good thing, although it is not a massive change going from 20MP to 24MP. In many ways, the newer camera acts and feels like the original R6, but in some ways it is very different. More to come on that later. 

Below are some images I captured on the Canon R6 MK II while on our photo tour in Japan last month.


The overall ergonomics and weight of the camera stay the same, which is a good thing since I have had no issues with this on any of the Canon mirrorless cameras (other than the original Canon R with the touch bar). 

I have been blown away with how good the subject and eye detection has been on the recent Canon mirrorless cameras, and heard that with the R6 MK II, it was even better. When selecting the subject to detect, there is now a menu option for "Auto" which I assumed would save me jumping between "people" and "animals", which I do fairly frequently since I use the camera for local events and photo tours. But so far I have found that choosing my subject type manually (like with the Canon R6) gives me better results. There is also an option for the eye detection which lets me choose "Auto", "Right eye" or "Left eye".  I am not sure why I would ever use this, since I almost always want to focus on the eye that is closest to me, not caring which side that is. Auto does a great job and I just leave that as my default.

The faster frame rate is a nice to have, but not a real selling point for me, since I rarely use the highest frame rate of my Canon R3 (other than to capture fast action in sports). But...if I am going to capture fast action, I will still default to the R3. The typical photographer would never need 40 fps, but I guess it is nice to have that option for sports of wildlife photography. The only drawback of 40fps, is having to go through so many similar images in post production. 

I know that there are many improvements when shooting video with the Canon R6 MK II, but since I am primarily a still shooter, I will leave that to the videographers.
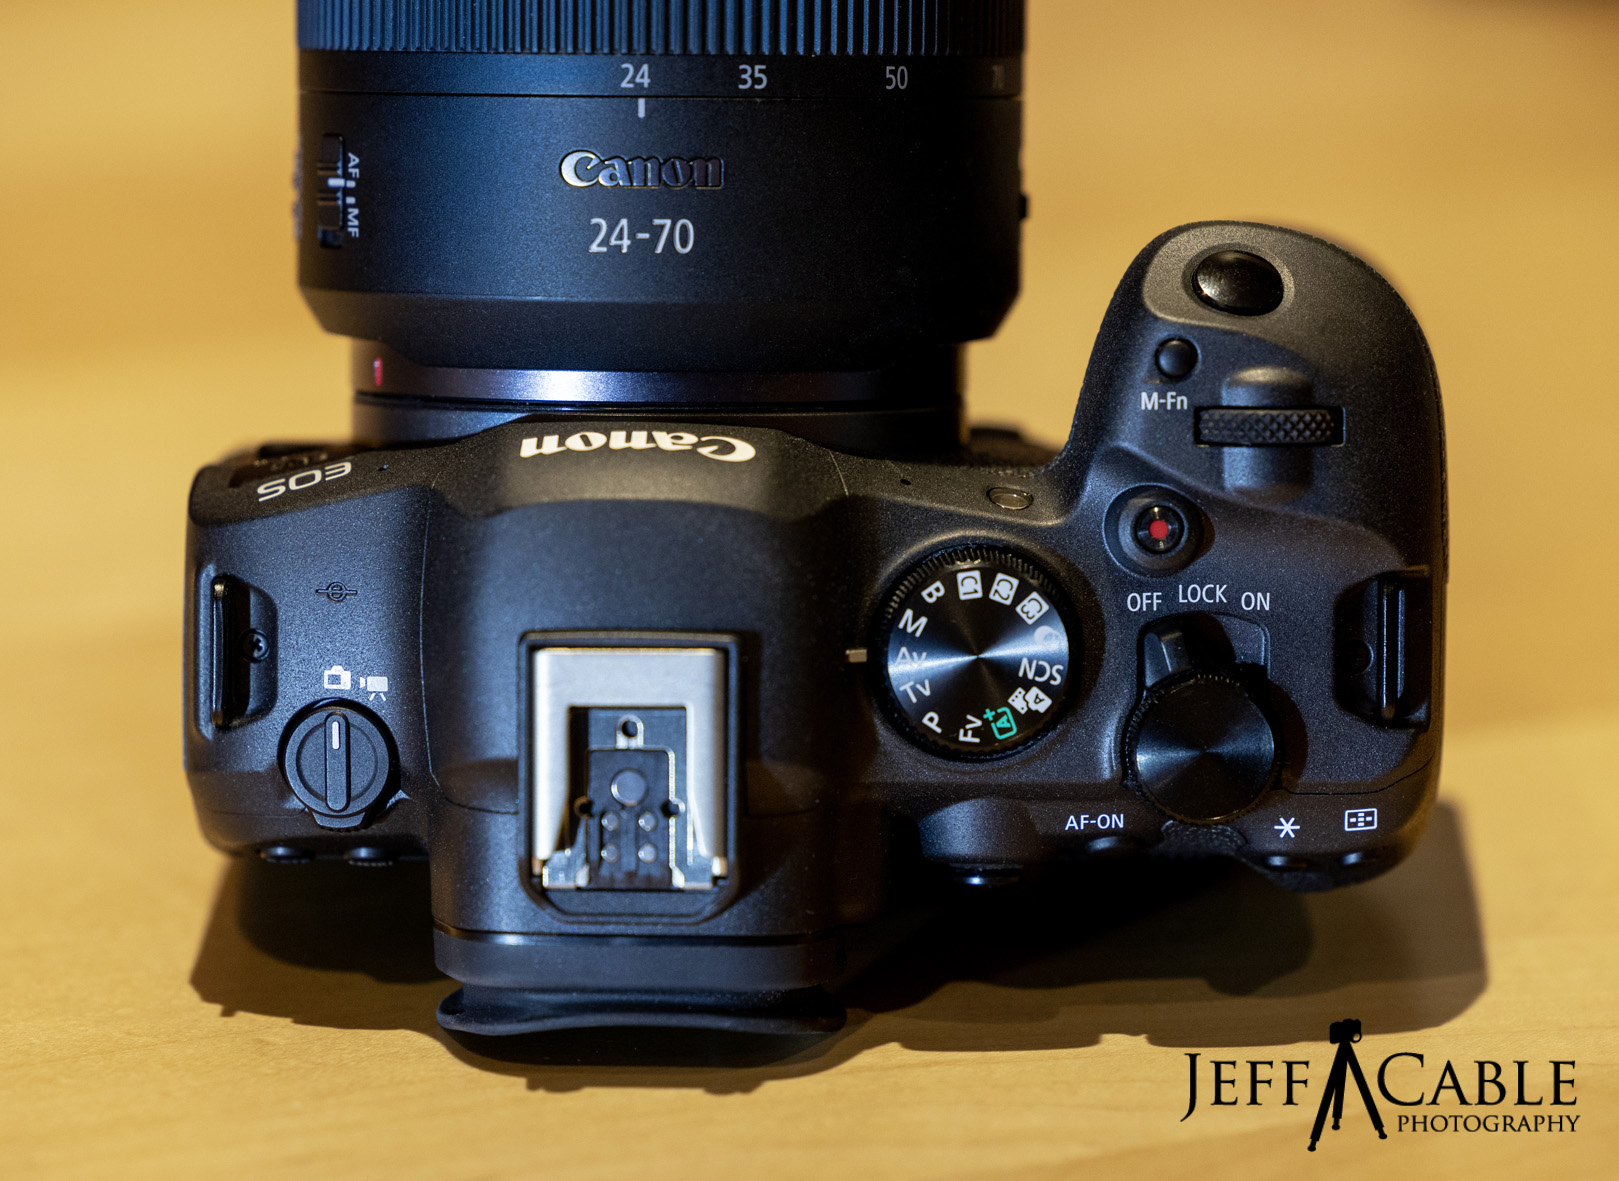
The one change I don't like

Now let me talk about the one "feature" that I do not like on the new Canon R6 MK II. They moved the power switch to the right side of the camera. That may not sound like a big deal, but to us photographers who have gotten used to all the buttons and dials, this is a real pain. Not only did they move the power switch to the right, there is another switch (almost exactly where the power switch used to be) for selecting still image mode or video mode. I have built up many years of muscle memory, and have used the wrong switch countless times in the last month. It is really frustrating. When I am using the Canon R6 MK II in combination with the Canon R3 (where the power is on the back of the camera) it is less confusing. When using the Canon R6 MK II in combination with the Canon R5, I have to consciously remember which camera I am using, to make sure I am turning the camera off and not switching to video mode. 

Was it worth the upgrade?

The big question I ask myself is: Was it really worth upgrading from the Canon R6 to the Canon R6 MK II? And the answer is a little convoluted. I really love the camera and the images look awesome, but this was true from the R6. The increased resolution is nice to have, but not a massive difference. I have yet to use the burst rate of 40fps, so that is not a factor. Lastly, the auto focus is excellent, but again, it was excellent in the original. So it comes down to the cost. I was able to sell my R6 and purchase the new R6 MK II for a net difference of about $400. I think it is worth that to be using the latest and greatest. If you are looking to upgrade from a DSLR camera or an older Canon R, either camera would be a great addition to your camera bag. I think the big difference will come down to budget. If you are willing to pay $500 more for the newest model, then the Canon R6 MK II is your camera. If you are on a tighter budget, the original Canon R6 will cost less and is still is a great choice, while they are still offered.


__________________________________________________________________________

Subscribe to the Jeff Cable Photography Blog by clicking HERE!
__________________________________________________________________________
If you are interested in purchasing ANY equipment, please click here to go to B&H Photo, as I get a referral from them if you enter this way. It does not change the cost to you in any way, but it helps me keep this blog up and running.
__________________________________________________________________________
Check out my upcoming photo tours to amazing places around the world. I have photo tours to Africa, Costa Rica, Cuba, Europe, Asia, India and more. And Canon will loan you any gear you want for FREE for any of my tours. 

__________________________________________________________________________  

Thursday, April 6, 2023

The baboons and monkeys in Tanzania: Always fun to photograph

In the last blog post I talked about the flamingos in Africa. Today's post is all about the baboons and monkeys in Tanzania. We actually saw fewer baboons and monkeys than on our typical safaris in the region, but the sightings were great nonetheless. And I was able to photograph two new species I had never seen before.

These first images are of the baboons.  


Whenever we take guests to Tanzania, the baby animals are a highlight. It doesn't matter what animal we are watching, the youngsters always get the most attention and the most photographs. For me personally, I love capturing the interaction between the baby baboons and the adults. There is SO much personality in the youngsters! They climb all over the adults, on the backs, hang under their bellies, and will hop a ride any chance they can get.


When we are with a large pack of baboon, I try to point out the most active youngsters so that people get nice photos of them. Part of that is waiting to get the animals in the right location and best light. In this case, we had overcast skies (neutral light) and the baboons moved into a clearing. Time to fire away!


As we were driving up the outside of the Ngorongoro Crater, we came across some baboons on the raised side of the road. It was perfect because they ended up being right at our eye level. I saw this one youngster feeding in front of us and liked the concentration and catch light in it's eyes.


Believe it or not, all the rest of these photos were taken on our last day in Tanzania. We were staying at one of my favorite places, spending the bulk of the day relaxing and keying down from almost two weeks of go, go, go. I have seen smaller monkeys in this area but this was my first time seeing the White throated monkey.


Even though I had taken tens of thousands of photos on the trip, and you think I might be shot out at this point, I could not help myself. I really wanted photos of these monkeys!


Just like with the baboons, I was mostly keying in on the youngsters. I took this photo right outside my room. I shot it vertically to show the length of the adult's tail, but also felt that it did not show enough of the monkey's faces.


This is a crop of the above image. Because I was shooting with the Canon R5 (using the Canon RF100-500mm lens) with a lot of resolution, I could crop in and still have a ton of detail. You can see a lot more of both monkey's eyes in this version.  I really like this image...


As always, I am always looking for action and reaction. This monkey was grabbing it's own tail while calling out to the others.


This little one was playing with it's tail while hanging out in a tree. Really cute.


I was just about done photographing the white throated monkeys when I saw this little one looking right at me, in between the leafs of a nearby tree. It was in perfect light. Gotta get that!


Seeing the Colobus monkey was another first for me. I was totally captivated by the long white tails on these monkeys. They stayed pretty high in the trees, making it a pretty difficult shot to get.


This was one of the last photos I took on this last trip to Tanzania, and I really love it because I saw something new and different. That is the best part of going on safari. No matter how many times one goes, there is always something new to photograph.


__________________________________________________________________________

Subscribe to the Jeff Cable Photography Blog by clicking HERE!
__________________________________________________________________________
If you are interested in purchasing ANY equipment, please click here to go to B&H Photo, as I get a referral from them if you enter this way. It does not change the cost to you in any way, but it helps me keep this blog up and running.
__________________________________________________________________________
Check out my upcoming photo tours to amazing places around the world. I have photo tours to Africa, Costa Rica, Cuba, Europe, Asia, India and more. And Canon will loan you any gear you want for FREE for any of my tours. 

__________________________________________________________________________  

Saturday, March 25, 2023

Flamingos in Africa? Absolutely!

When people think of animals in Africa, flamingos are probably not the first thing that comes to mind. But I have made numerous visits to Tanzania and Namibia and literally seen tens of thousands of these amazing birds.  On our recent photo tour to Tanzania, I saw more flamingos than I have ever seen there before. There were many parts of the lake that were turned pink by the saturation of birds along the waters edge. 

I am excited to share this experience with you all.


We had our guides drive us close to the shoreline so that we could isolate certain birds. I was shooting with the Canon R5 and the RF100-500mm lens. I suggested that our guests set their cameras to ISO 400 to get a fast shutter speed (1/1600) to capture the birds as they moved. The flamingo run along the top of the water before they lift off, leaving a great trail behind them. This makes for a great photo!


We all took photos of the birds in flight. I suggested that everyone try to get images when the birds were flying low, out of the bright sky and using the stationary birds as a background. 


We watched these 5 birds as they pranced along the shore right in front of us. The way that they were walking in unison reminded me of ballet dancers. 


After shooting a lot of images of the flamingos, I thought it was time to challenge some of our tour guests. I suggested that they lower their ISO to 50 and roll their aperture to f/14 and try panning along with the birds. It is not easy to get the birds sharp when shooting at 500mm and 1/60 sec, but the results are really nice!


For this photo, I rolled my exposure compensation to +1 and panned along with the fast moving flamingos. This created a high-key shot (extra bright) and further blurred the background. 


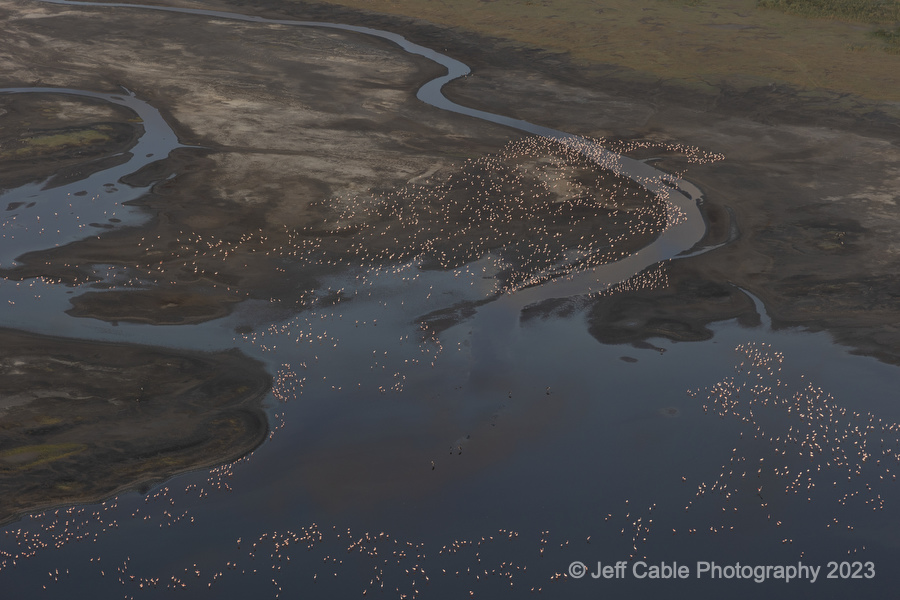
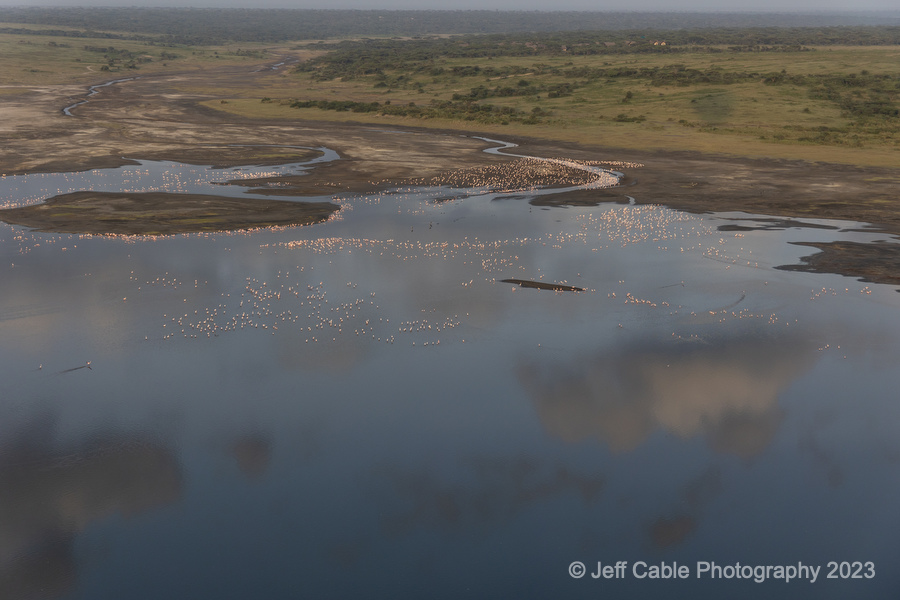
A couple of days later, we took a hot air balloon ride over the Serengeti. I was hoping that we would see some of the lake as we floated across the plains, and our pilot did not disappoint us. He was able to take us over the lake numerous times (riding different air currents) and at altitudes ranging from 800 feet to 5 feet. All those dots are flamingos in the lake from high above.


I was using my Tiffen Circular Polarizing filter, which really helped get nice reflection shots off the water.


As you can see, this was taken at a very low altitude.


There were 5 balloons in the air that morning, which allowed us to get nice images of the other balloons in our photos. 

As our pilot lifted us to a high altitude for the last time, we looked down and saw these lines in the lake. At first we had no idea what we were seeing. Then we realized that these lines were caused by the flamingos as they moved across the water, cutting lines in the algae along the surface. I pointed the camera straight down and caught this image to share with all of you. (You can also see the shadow of our balloon mid way into the frame.) 

It was just one more amazing African experience for myself and the others, and one that I will never forget!


__________________________________________________________________________

Subscribe to the Jeff Cable Photography Blog by clicking HERE!
__________________________________________________________________________
If you are interested in purchasing ANY equipment, please click here to go to B&H Photo, as I get a referral from them if you enter this way. It does not change the cost to you in any way, but it helps me keep this blog up and running.
__________________________________________________________________________
Check out my upcoming photo tours to amazing places around the world. I have photo tours to Africa, Costa Rica, Cuba, Europe, Asia, India and more. And Canon will loan you any gear you want for FREE for any of my tours. 

__________________________________________________________________________  

Thursday, March 16, 2023

Photographing lions on safari in Tanzania, Africa

On our recent safari in Tanzania, we were treated to many lion sitings. It is not uncommon to see these majestic cats in the wild, but the real treat was to see them in so many different situations. 


One of our first lion sitings occurred when we were in the Ngorongoro crater, but they were pretty far from us and you can not drive off-road in the crater to closer. The same day that we left the crater, we drove to my favorite area of Tanzania, an area called Ndutu. In this area, we can drive off-road. This means that if we see a lion in a tree, we can drive right to the tree to get a nice photo. Within minutes of entering Ndutu we saw this lioness resting up in a tree. Our photo tour guests were really excited to get photos of her as she moved from branch to branch.


Also in Ndutu, we watched as some of the lions stopped for a drink. The one above appears to be pregnant, or possibly just have a very full belly.


Here is another female drinking.


My goal is to get our vehicles in the best position to photograph the wildlife. We saw this one lioness walking in our direction. Our guide quickly moved so that we could get a nice photo of her with sunlight on her and the tall grass in the background.


The same lioness that you saw walking in the previous photo decided to plop down and take a rest very near our vehicle. I wanted to get a photo from a low angle, so I used the reciprocating screen of the Canon R5 (with the Canon RF100-500mm lens mounted to the camera) to lower the camera outside of the vehicle as low to the ground as I could and fire off some shots a couple of feet off the ground. 


In the same pride of lions, there was this one male...


The female was not very happy with the male! I was really happy to capture the emotion in the female, but did not expect the male to jump out of the frame. Arghhhh! This would have been so much better if we saw the whole male.


If you have been on safari before, you may know that there is a whole ritual with the mating process. I told all of our guests what to expect and we all had fun capturing the interactions between the male and females. At this particular moment, I think the female startled the male.


And in this shot, I think the second female startled the first female.


They were likely fighting for dominance.


The mating process is always interesting. The entire process happens in about 20 seconds, and it is repeated about every 20 minutes, sometimes for as long as a week. The male lion almost always looks angry and the female typically looks bored. Many times after completion, the female will snap back at the male before turning over on her back. She turns onto her back to help the fertilization process (since the lioness' fallopian tubes are curved).


Towards the end of one of our days, we came across the partial remains of a wildebeest, and heard that a lioness was close by. At one point she popped our of the bushes and I grabbed this photo of her perfectly framed in the brush. I love the way that her golden body is in contrast to the dark background.


She started walking away and our guide made another mad dash for a "straight-on' position. He guessed perfectly and we had a shot of her coming right at us. As she walked towards us, she gave us this big yawn. We loved that!


The following morning we were driving along the waters edge when we spotted this large male lion who was resting by the water. I encouraged our guests to shoot an image of the lion, but to take it wide enough to show all the zebra on high alert in the background. This shows the way that the animals coexist in the wild. (Almost everyone on our trip was using a Canon R5 or Canon R6 with the Canon RF100-500mm lens. This lens is great because, with the same lens, you can shoot tight or wide).  They either owned the gear or borrowed it from my contacts at Canon CPS (for free I should add).


Towards the end of our trip, we were driving in the Serengeti when our guide saw these two male brothers hiding under a small tree. We waited for about 20 minutes to see if they would move.


Waiting while on safari is a very good thing. Not only do things change in an instant, but it also gives us a good chance to capture portraits like this one. 


Both of the brothers got up and started walking towards the copis (rock outcroppings). Figuring that they were heading towards the rocks, we moved our vehicle to follow their path. I loved this scene, with the big male lion surrounded by the endless tall grass of the Serengeti. 


Once the large male made it to the rock area, he turned around to check out our vehicles. I love this shot with the curve of the tail and the interesting background. 

Just before walking behind the rocks and mostly out of sight, he turned and looked right at us. Many people ask me if I am ever scared while on safari and the answer is always "no". These big cats, although incredibly powerful and dangerous, do not see us as food. They are accustomed to the safari vehicles and usually use the shade of the vehicle to cool down. Would I get out of the vehicle? No way! But we always feel safe and love getting great photos of these big cats.

By the way, I just added a bunch of new photo tours to my web site. These include future trips to Africa, Greece, Indochina, Costa Rica... You can find those here.

__________________________________________________________________________

Subscribe to the Jeff Cable Photography Blog by clicking HERE!
__________________________________________________________________________
If you are interested in purchasing ANY equipment, please click here to go to B&H Photo, as I get a referral from them if you enter this way. It does not change the cost to you in any way, but it helps me keep this blog up and running.
__________________________________________________________________________
Check out my upcoming photo tours to amazing places around the world. I have photo tours to Africa, Costa Rica, Cuba, Europe, Asia, India and more. And Canon will loan you any gear you want for FREE for any of my tours. 

__________________________________________________________________________  

Saturday, March 4, 2023

Photo retouching - making a good photo much better!

My last blog post was written and posted from London, during a long layover on my way to Africa. We just completed the amazing photo tour in Tanzania and now I am writing this blog post while on another layover, this time in Ethiopia. 

After shooting more than 300GB of images in the last 12 days, I have started working on the culling (using Photo Mechanic) and retouching (using Adobe Photoshop). As I was working on this process, I thought that I would show you my finished image and the original, to give you an idea of what I do to complete an image. Regardless with what camera you use, or even the photo retouching software you use, these tips should be helpful to you. At least I hope so!

Let's jump right in.


On one of our slower days on safari, we decided to work on the art of capturing birds in flight. We continually chased the Lilac-breasted rollers, waiting for them to take off, and hoping to grab some nice photos. This shot was taken at 1/5000 sec using the Canon R5 camera with the Canon RF100-500mm lens. The subject tracking is SO GOOD, that it really helped me and our photo tour guests capture some killer images. But, if you see the original below, the image needed cropping, and some adjustments to the white balance, tiny, color saturation and contrast. What a difference this makes!


At one point, one of our vehicles got a flat tire. While our guides were changing the tire, we were surrounded by the local Masai people. This was an awesome time to do portraits of them. I love this photo of a local Masai boy, but there was a rock at the bottom of the frame. Using Photoshop's clone tool, I was able to remove the distraction of the rock and make a better portrait.


One of the things that we look for when photographing the large cats in Africa is the yawns and good facial expressions. The lioness looks ferocious in this photo, but it is simply a yawn. I knew as soon as I took it, that it would make a nice photo, but I needed to crop in and makes subtle changes to the exposure, shadows and highlights to really finish it off. You can see how the tighter crop and other adjustments really brings the photo to life.


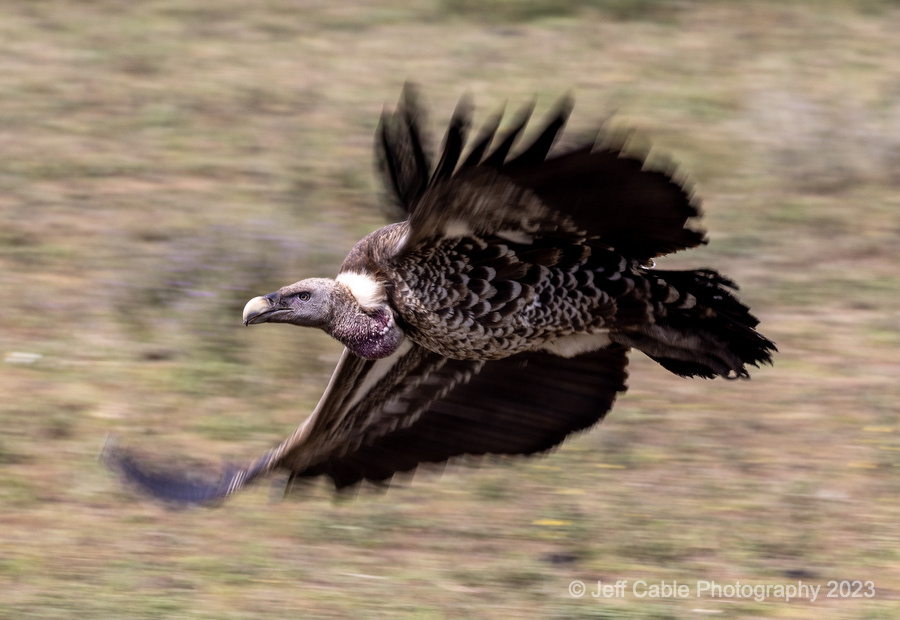
This photo was one of the most difficult of the trip. We were parked off to the side of a kill, photographing the vultures as they continually flew down to feed. After taking countless images of the birds in flight, I figured it was time to try something different (and teach our guests some new tricks). I changed my camera settings (from ISO 1000, f/7.1) to ISO 100 with an aperture of f/11. This now gave me a shutter speed of 1/200 sec. I followed the vultures with my lens as they flew down and motion panned them. I captured this photo and loved the motion in the wings with the face being tack sharp. Using the resolution of the Canon R5 camera, I was able to crop in on the photo to highlight the details of the head and the motion everywhere else, with plenty of resolution to spare. Comparing the retouched image to the original, you will see that I also made adjustments to the exposure to brighten the bird and background.


I took this photo this morning, before packing up and heading to the airport.  This monkey was just outside my room and screaming for a photo. I was captured by the orange eyes, but needed to make minor adjustments to bring out the eyes. I used Photoshop to select the subject and then increased the exposure and made adjustments to the shadows slider to lessen the dark shadows. These changes were less obvious but still needed to complete the shot.


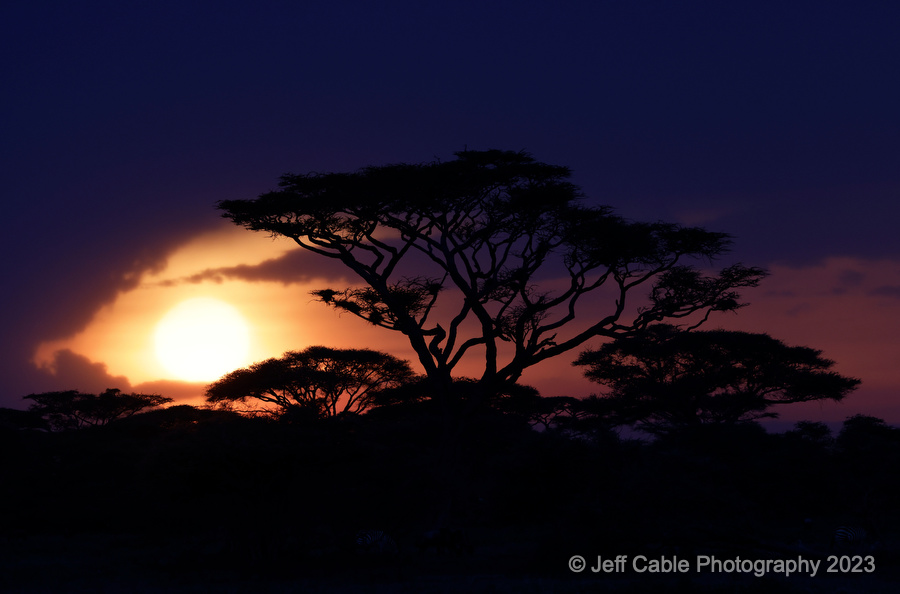
This last shot is one of my favorites from the trip. We were done photographing the wildlife for the day, and heading back to our tent lodge for the night. We saw some color in the sky and I asked my guide to drive to a spot with a good acacia tree in the foreground. At that point the setting sun was behind the clouds and we thought we would just get a little color in the background, but no actual sunset. One of photo tour guests who was in the car with me, said "I think the sun is starting to show." And sure enough, the sun made a full appearance in the perfect spot. We took many photos as the sun appeared and then dropped below the horizon, and I honestly did not think they would yield much. But after seeing the original and then playing with it in Photoshop, it blew me away. I increased the exposure a bit (since I was shooting at -1.7 exposure comp to protect the highlights), brought up the shadows to show the colors in the sky and show some of the animals at the bottom of the frame (even though they are hard to see here). I darkened the highlights to accentuate the colors in the sun, and added saturation to try and match what we saw when taking the photo. Once again, minor tweaks that make a big difference!


I hope that these examples will help you with your photo retouching, and take your good photos to great!

__________________________________________________________________________

Subscribe to the Jeff Cable Photography Blog by clicking HERE!
__________________________________________________________________________
If you are interested in purchasing ANY equipment, please click here to go to B&H Photo, as I get a referral from them if you enter this way. It does not change the cost to you in any way, but it helps me keep this blog up and running.
__________________________________________________________________________
Check out my upcoming photo tours to amazing places around the world. I have photo tours to Africa, Costa Rica, Cuba, Europe, Asia, India and more. And Canon will loan you any gear you want for FREE for any of my tours. 

__________________________________________________________________________