Showing posts with label Review. Show all posts

Wednesday, September 23, 2026

Two new videos from B&H Event Space in New York!

As you may have seen from a previous blog post, I was back in New York City three weeks ago, making my first in-person presentations since the pandemic. It was so great to be back at my favorite camera store to see the updated Event Space, and to visit my friends there.

Neither of these presentations were live-streamed, but I had MANY of you asking if they would be recorded. Sure enough, the good folks at B&H recorded them, and they did me a favor by editing them and posting them faster than normal.  

In the first presentation, I share my images and stories from the Winter Olympics in Milan. The second presentation is all about lens selection, and is packed full of visual examples of why I choose a specific lens for each subject.  

Without further ado...here are the two new videos: 


Photographing the Winter Olympics in Milan


Click on the image above to watch the video


How To Choose the Best Lens for Each Subject Matter


Click on the image above to watch the video

I hope that you enjoy them and learn a few things!

Oh, one more thing! I will be back in NYC in May of 2027 for the next BILD Expo. If you have not been to this show, you have to go. I believe that it is now the largest photo show in the world, and it is amazing. 


I hope to see you there.


 __________________________________________________________

• Subscribe to the Jeff Cable Photography Blog by clicking HERE!

• Check out my upcoming photo tours to amazing places around the world. I have photo tours to Costa Rica, Peru, Galapagos, Africa, Iceland and more.

• If you are interested in purchasing ANY equipment, please click here to go to B&H Photo, as I get a referral from them if you enter this way. It does not change the cost to you in any way, but it helps me keep this blog up and running.

_________________________________________________________________ 

Thursday, September 10, 2026

Is the iPhone Duo a great phone for photographers and photo enthusiasts?

I have been using Apple products for more than 30 years and really love their computers, phones, watches and AirPods, but that does not mean that I automatically upgrade every time they announce new products. That can drain the bank account pretty quickly and not every product is a "must have" for me.

Yesterday morning, I had time while editing images, and tuned in for the big product announcement. Every time I have seen Apple announce new phones, I hear them boast about faster processors and better cameras. Sure, it is nice to have a faster phone, but my phone is already pretty fast. The camera is rarely a reason for me to upgrade, since I plan on using my Canon cameras and lenses for any serious photography. I do use the camera on my phone for those times when I don't have my Canon cameras with me and for those general grab shots we encounter all day long.

With that said, yesterday's announcement was really interesting to me. I had heard rumors about Apple coming out with a foldable phone and this had me thinking about how that would benefit me. Now that I have seen the announcement of the iPhone Duo, I can see many instances where this would benefit professional photographers and photo enthusiasts.


When unfolding the iPhone Duo, the user is presented with a 7.6" screen with very little seem in the middle. The phone basically opens up to the size of an iPad mini (8.7 inches), which would be awesome for sharing our favorite photos with others and watching movies on an airplane (where I spend way too much time).

There are some other features of this phone which I think are really cool, like the ability to FaceTime with both the front and back cameras active, and having multiple apps open side-by-side, but it is the large screen which intrigues me the most. I had a guest on one of my photo tours who had an Android phone which unfolded to a larger screen and I was pretty impressed with that.

I am still using my iPhone 16 Pro and have not decided if I am going to upgrade to the iPhone Duo. I really want to visit an Apple Store, to get one of these in my hands, to see how it feels. I am definitely intrigued!

Now comes the big question...Do you see yourself spending the $2k to have this new tool in your hands?


 __________________________________________________________

• Subscribe to the Jeff Cable Photography Blog by clicking HERE!

• Check out my upcoming photo tours to amazing places around the world. I have photo tours to Costa Rica, Peru, Galapagos, Africa, Iceland and more.

• If you are interested in purchasing ANY equipment, please click here to go to B&H Photo, as I get a referral from them if you enter this way. It does not change the cost to you in any way, but it helps me keep this blog up and running.

_________________________________________________________________ 

Sunday, September 6, 2026

My favorite and most used lenses - and why they are!

When I was presenting at B&H Photo this week, I did one presentation on "The Best Lenses for Different Subjects". During that presentation and my Olympic presentation, I had numerous people ask me what my favorite lenses were, and that lead me to write this blog post.

You will notice that most of my lenses are zooms and not primes. That is because I have always been partial to zooms, and the quality of zoom lenses has increased dramatically over the years, now being on par with prime lenses. I am partial to zoom lenses because I am constantly zooming in and out and reframing my shots before hitting the shutter button.

I am going to list out the lenses I use almost every time I pick up a camera, with explanations of why I rely on those for either the focal length, aperture or both. I am also going to order them by how much I use that particular lens. 

Canon RF 70-200mm f/2.8


This has been my go-to lens for more than 20 years. It all started with the EF version and I have upgraded to newer models along the way, but the 70-200mm focal length and the wide aperture of 2.8 has made this my favorite of all time. I use the Canon RF 70-200mm f/2.8 lens for most of my individual and family portraits. It is tack sharp from 70mm all the way to 200mm and provides amazing bokeh (quality of blur) behind my subjects.

Canon RF 15-35mm f/2.8


When I am photographing receptions and parties, I use three lenses to cover the event. I do use the RF 70-200 lens for all my tight shots, but most of the time I use wider zoom lenses. The Canon RF 15-35mm 2.8 is probably my most used lens at parties, since I am usually walking around the event and close to my subjects. It is wide enough to show them and some of the surrounding scenery, and tack sharp from edge to edge. I find that the wide shots are really popular with my clients, since they show so many of the people who have joined them for their big day. When shooting at 15mm, there is some distortion at the edges of the frame (making those at the edge look wider), but in my opinion, that is acceptable when viewing a very wide shot. Even though I do not photograph a lot of landscapes, this is my favorite lens for landscape photography.


Canon RF 24-70mm f/2.8


The third lens which I rely on for those same events, is the Canon RF 24-70mm 2.8. This lens gives me a fairly wide view around me, but allows me to zoom in a little more and capture portraits of people with little distortion on the edges of the frame. This is also my second most used lens for portraits, in spaces where the Canon RF 70-200mm f/2.8 is too much lens or I want to take a wider shot to show more of the environment.


I originally got the Canon RF-100-300m f/2.8 lens for my sports photography, primarily for the longer reach and the ability to capture 300mm images at f/2.8. I also love that this lens, which is VERY sharp, is wicked fast in focusing. 

As it turns out, I now rely on this lens for so much more than sports. I use this long, fast zoom lens any time I am shooting a wedding or bar mitzvah from the back of a church or temple. It allows me to zoom in nice and close to my subjects from a distance and, at f/2.8, do so in low light without having to increase my ISO to levels above what I want. 

Even though this lens is big and heavier than the rest of my lenses, I have been taking it on more and more of my photo tours where we are focusing on wildlife. For most of those times, I will bring extenders with me (but more on those in a minute).


Most people would think of a fisheye lens as a novelty lens and one not used very often, but I find myself reaching for this lens quite often. It is actually my fourth most-used lens at those same parties I described earlier. I really like capturing super wide shots, especially when I am on a stage, just above the dance floor, shooting down over the crowd. It allows me to capture really nice photos, even in tight spaces, and show so much of the environment. Even though I can correct much of the fisheye distortion in Adobe Photoshop, I usually choose not to do that, as I really like the fisheye look.

This same lens was invaluable at the most recent Olympic Games, when I used the Canon RF 7-14mm fisheye for photographing ice hockey and unique views around the city of Milan.


Even though the Canon RF 24-105mm f/4 lens is not towards the top of this blog post, this particular lens does get a lot of use. I do not use it at events, since I rely on the Canon RF 24-70mm f/2.8 lens for those times, but I LOVE this lens as my "walk around" lens. Whenever I travel (and I do often), I take this lens with me. I find that the focal range from 24mm all the way to 105mm is ideal for most street photography. I know that Canon also makes an RF 24-105mm f/2.8 lens, but I actually prefer the size and weight of the Canon RF 24-105mm f/4 lens for when I am walking around.


This is not a lens I use for photographing events, but I use this lens for most of my other photography, including wildlife, sports and even long lens portraiture when I am traveling. There are numerous things that I love about this lens:

1.  The focal range from 100-500mm is perfect for sports and wildlife photography, when you don't know how close you will be to the subjects.

2. It is relatively small and light (compared to my Canon RF-100-300m f/2.8) and easy to handhold. There are times when I use this lens for more than 10 hours at a time, and it is very manageable for me. I also like that I can lift it quickly to catch fast action, which is not the case with my larger zoom lens. This lens goes on almost every photo tour with me, since I need to keep my carry on size and weight to a minimum. 

3. It is a very sharp lens all the way from 100mm to 500mm.

4. This lens lets me focus so close to my subject that, when combining this fact with the 500mm reach, allows me to photograph even the smallest critters and make it look like I used a macro lens.

I don't love the fact that the Canon RF 100-500mm ends at f/7.1, but for the previous reasons I have given, I put that aside and rely on the lens quite often.


Canon RF 85mm f/1.2 


I consider this lens my "specialty lens" and only break it out when I want to shoot images at a really wide aperture, like f1/.2. The final results are really beautiful with incredible bokeh and narrow depth of field, while keeping my subject tack sharp. I use it sporadically, and love the final results. There are many times when 85mm is too much reach and I may switch this out for an RF 50mm f/1.2 lens in the near future. Regardless of the focal length, I do love having an f/1.2 lens in my bag. 


Canon Extender RF 1.4x and Canon Extender RF 2x
 
For most of my photography career I have not been a big proponent of using extenders, but that has changed since getting the Canon RF-100-300m f/2.8 lens. As I mentioned before, I love this big lens, with the ability to shoot at f/2.8 all the way from 100mm to 300mm, but there are many times when I need more than 300mm reach. For those times, I grab either the Canon Extender RF 1.4x or the Canon Extender RF 2x to give me greater focal length. With the 1.4x on the big lens, I am able to shoot from 140mm to 420mm at f/4, and with the 2x I can shoot from 200mm to 600mm at f/5.6. This has yielded some really beautiful photos in Costa Rica and I look forward to using it in the Pantanal of Brazil in 3 weeks and in Tanzania on Safari in Jan / Feb 2027.


Last, but not least, is my Canon RF 100mm macro lens. This is the least used lens in my arsenal, but not because of a lack of quality or functionality. This lens is used mainly for weddings, when I am capturing images of the rings and other small details, and also for my trip to Costa Rica when we are photographing the small tree frogs and insects. As I mentioned with the Canon RF 100-500mm lens, I am now using that lens for a majority of my close-up photography in Costa Rica, which lessens the need to bring this macro lens with me. A little less weight in my bag. 


There you go...now you know my most used lenses and how I use them. I hope that this will help you decide what might work best for you in each photo scenario that you might encounter.

I mentioned that many of these lenses are used on my photography tours. Check out the photo tours page on my website to see the exciting locations where I will be teaching in the future. Remember, you can try any of these lenses at no cost (thanks to Canon) when you join me on a trip.


 __________________________________________________________

• Subscribe to the Jeff Cable Photography Blog by clicking HERE!

• Check out my upcoming photo tours to amazing places around the world. I have photo tours to Costa Rica, Peru, Galapagos, Africa, Iceland and more.

• If you are interested in purchasing ANY equipment, please click here to go to B&H Photo, as I get a referral from them if you enter this way. It does not change the cost to you in any way, but it helps me keep this blog up and running.

_________________________________________________________________ 


Tuesday, July 21, 2026

Canon's firmware update (1.3) adds a BIG NEW addition to the R1 and R5 Mark II cameras!

Before the Summer Olympics in Paris, when Canon first let me play with the pre-production R1 and R5 Mark II, I was fascinated by certain features. The one that interested me the most was the "Pre-continuous shooting" where the camera could go back half a second and capture images even if I was late hitting the shutter button. I really felt that this was a game changing feature for sports and wildlife photography. BUT as cool as this feature was, there was one thing definitely missing!

I sat through an instruction class on the new cameras and they explained how to use the new features. I took the cameras out for a spin and even captured a lightning strike with the Pre-continuos shooting turned on. I loved it! I also knew that I would not want to shoot with Pre-continuos turned on all the time since it added A LOT more photos onto the memory card. The first thing I wanted to do was to define one of the buttons on the camera to toggle this feature on and off. I was shocked that it could not be done. 

Myself and a couple of the other sports photographers who were at the pre-production training all asked for this ability. Without this, we would have to go into the menus of the camera and toggle the feature on and off. In many situations, this meant that we would likely miss the key shot while we were fiddling with the menus. We figured that it would be a simple firmware update to add this. But more than a year had passed and nothing, UNTIL the latest firmware release.

About a month ago, Canon announced firmware version 1.3.1 for the R5 Mark II and 1.3.0 for the Canon R1. The release notes look like this (for the R5 MKII):

  1. Adds [American Football] in [Action Priority] to optimize human subject detection for individuals wearing helmets and shoulder pads.
    *For an overview and instructions on using [Action Priority], please refer to the Instruction Manual or the AF Settings Guide.
  2. Improves tracking and detection performance for [Register people priority] in challenging conditions—including profile views, blurred or partially obscured faces, small subjects in the frame, and children—even when the feature is set to [Off].
    *Performing a firmware update will delete registered data stored in the camera. If necessary, save the data in advance using [Save/load registered data on card], and reload it after the firmware update. For details, please refer to the Instruction Manual.
  3. Adds the ability to set [AF for close-up demos] during movie recording in [Movie manual exp.], [Movie auto exposure], and other Creative Zone modes to allow for its use in combination with exposure and AF area settings.
  4. Adds [Wi‑Fi freq. band] to [Communication Settings], allowing the user to select the 5 GHz or 2.4 G Hz band when transferring from Bluetooth to Wi-Fi.
  5. Adds [No. of connections] to [FTP transfer settings], allowing the user to select the number of transfer threads for [FTP transfer].
  6. Adds the ability to store up to four [Color temp] values in [White balance setting] and to assign [Switch color temperature] to [Customize buttons for shooting].
  7. Adds the ability to set [False Color Settings] to [On] when [HDR/C.Log View Assist] is selected.
  8. Adds the ability to assign [Pre‑continuous Shooting] to [Customize buttons for shooting].
  9. Adds the ability to transfer AF-related settings between cameras of the same model by adding [Save to card] and [Load from card] to [Register/recall AF‑related settings].
  10. Adds the ability to display the electronic level during movie recording.
  11. Adds the option for grid display during movie recording.
  12. Adds the ability to display playback screens and menu screens when outputting to two screens via [HDMI Display During Connection].
  13. Adds the ability to switch the group settings of a receiver camera from the sender camera when using the EOS Multi-Remote app.
  14. Adds support for DPRAW shooting.
  15. Adds support for the Software Development Assistance Kit (EDSDK/CCAPI).
  16. Fixes an issue that may cause Err49 to be displayed repeatedly during communication with an SFTP server.
  17. Fixes an issue that may impact the camera's shooting ability if the auto power- off function is activated during interval timer shooting.
  18. Fixes an issue that may cause the camera to restart when the shutter button is pressed while deleting images.
  19. Fixes an issue that may cause the camera to not be recognized when connected to a smartphone via USB.
  20. Improves other system stability.
I read the first part of the list, and was excited to see that they added American Football to the subject detection, and improved the focus tracking. As I read further down the list, I started seeing things that were less exciting to me UNTIL I saw #8. They finally added the ability to assign Pre-continuous shooting to a button. I could not wait to try this out!

While leading two photo tours to the rain forest of Costa Rica last month, I had a chance to put this new firmware to the test, mainly playing with feature #8 (on this list).

After some trial and error I decided to put the Pre-continuos shooting on the light button at the top of each camera. I chose that button for 3 reasons:

1. I rarely ever use the button.

2. It is conveniently located near my index finger for quickly toggling the feature on and off. 

3. Both the Canon R5 Mark II and Canon R1 have that button in the same spot. This helps for muscle memory, being able to toggle the feature on and off from the same location of both cameras.

After updating your camera to the latest firmware, you can go to the "customize buttons for shooting" menu and you will see "Pre-cont. shooting" as an option.


As I mentioned, I chose to set mine to the light button since I rarely ever use it.


This worked so well in Costa Rica that I started changing other people's cameras to this same setup.

Here are some examples of where I used Pre-continuous shooting to get photos I would normally not have been able to capture.


While on our dolphin tour in Costa Rica, I used Pre-continuous shooting to get the dolphins jumping out of the water. I would hold my shutter button halfway down and wait to see if the dolphins would jump clear of the water and then shoot if I saw a great moment. 


Also in Costa Rica, last year I used the Pre-continuous shooting on this Fiery-billed aracari. We saw this bird sitting in a tree, and waited for it to fly. As soon as I saw it take off, I pressed the shutter button to capture every frame I could get of this bird in flight.


In Alaska, we were watching this juvenile Bald eagle that was sitting on a rock. Myself and another photo tour guest switched into Pre-continuous shooting mode and waited for the take off. Without that feature, I would have likely missed this image. 


This is probably the best example of Pre-continuous shooting. On my last trip to the Galapagos, myself and my guests were photographing the Water iguanas. They periodically "sneeze" out the salt that they have licked from the nearby rocks. Trying to capture this would be darn near impossible without Pre-continuous shooting. But with the feature turned on, we could wait for the "sneeze" and then hit the shutter button, capturing this rarely seen event over and over!

The feature is incredibly powerful and now more accessible then ever. Thank you Canon -  a little late, but I am thankful you made the update!

Updating your camera is a very easy thing to do, and totally worth it, for this one feature alone!


 __________________________________________________________

• Subscribe to the Jeff Cable Photography Blog by clicking HERE!

• Check out my upcoming photo tours to amazing places around the world. I have photo tours to Costa Rica, Peru, Galapagos, Africa, Iceland and more.

• If you are interested in purchasing ANY equipment, please click here to go to B&H Photo, as I get a referral from them if you enter this way. It does not change the cost to you in any way, but it helps me keep this blog up and running.

_________________________________________________________________ 

Tuesday, October 21, 2025

How to take one photo and create AMAZING art!!

I was scrolling through Instagram and came across this really cool company and had to stop and take a full look at what they were doing. The company is called Wirestyle and what they do is really amazing! They literally take a regular photo and turn it into a piece of art using nails and a single line of string.

I talked to the founder of the company (in Germany) to get more information about what they do, and to determine which images look best using their technique. After careful consideration, and their advice, I decided that this elephant photo from Botswana would look the best.

The first thing I did was convert the image to black and white (using Adobe Photoshop) and then I uploaded that image to Wirestyle. 

They sent me a confirmation that they received the image, and they also sent me this rendering showing how it would look once completed.


Two weeks later I received a delivery from DHL all the way from Germany, with my artwork inside. You can click HERE or on the image above to watch the video of me opening the well-packed box.


This is what the artwork looks like from a distance...

...but when you look closer, you see all of the nails and the single piece of string. 


The varying amounts of string are what create the dark and light parts of the image. It is really amazing to see up close.

Each piece of art comes with a time lapse video of it's creation.


You can click HERE or on the image above to see that video.

The packaging is more than sufficient to get the artwork delivered without any damage. I will say that the frame is not substantial and looks a little "cheap". Since the frame is a simple screw-together metal frame, I recommend replacing it with something nicer. I am going to do that for sure. I may also enclose mine in glass so that I don't have to worry about dust forming on the string.

If you would like to have one of your photos created using this string art technique, go to www.wirestyle.com and let them know that you found out about them from me. Also, if you would like to get one of my elephant photos in this string art, email me and let me know.

If watched the unveiling video, you may have noticed the other elephant image on my wall. This was created by a good friend of mine in the Chicago area. Jason has a unique technique where he takes his images (and mine) and prints on a special "rice paper" and then wets and dries the paper into a 3 dimensional image. 


This is equally cool and I have numerous images from Jason proudly hung in my house.

Hopefully you can see the way that the elephants are raised on the paper. It is truly beautiful.

If you are interested in these one-of-a-kind pieces, you can click HERE.

If you are a photographer like me, you probably get tired of seeing your own work, so it is really fun to see the same images created in new ways. Both the Wirestyle art and the images that Jason creates are totally unique. I love that they are conversation pieces hung up at the house. People are drawn to the unique creations and want to know more about them.

Let me know what you think!

__________________________________________________________

• Subscribe to the Jeff Cable Photography Blog by clicking HERE!

• Check out my upcoming photo tours to amazing places around the world. I have photo tours to Costa Rica, Peru, Galapagos, Alaska and more.

• You can purchase Jeff Cable Photography images from my new fine art site at: https://fineart.jeffcable.com/

• If you are interested in purchasing ANY equipment, please click here to go to B&H Photo, as I get a referral from them if you enter this way. It does not change the cost to you in any way, but it helps me keep this blog up and running.
_________________________________________________________________


Monday, June 30, 2025

The difference between the Canon R1, Canon R5 Mark II and the older Canon R3

A fellow photographer friend recently sent me a message and asked me how much the Canon R1 differed from the Canon R3. He also wanted to know the difference between the newer R1 and Canon R5 Mark II. After a year of using the Canon R1 (both pre-production and the final product), Canon R5 Mark II, and receiving numerous questions like this, I thought it would be good to share my thoughts with all of you.

Let me start with the big differences between the Canon R1 and Canon R3 (in order of importance to me).

Both the Canon R3 and Canon R1 are top-of-the-line cameras from Canon and have that feel when you pick them up. At first grip, it is hard to feel or see much difference between the two camera models. One thing I love about Canon cameras is that when you get used to using one of them, the similarities are so close that a person can go between one model and another without much of a learning curve.

It is like driving a car. You can get into almost any vehicle and drive, regardless of the engine performance and handling. But that performance and handling can make a huge difference if you want to do something more than just drive from point A to point B. The Canon R1 lets you drive harder and better than you could with R3. When you get into the guts of the Canon R1, there are numerous improvements that really make the camera stand out vs the preceding model.

Focus

As I have mentioned numerous times in the past, the focus system of the Canon R1 is noticeably faster and "stickier" than the Canon R3. This was VERY noticeable when I was photographing the fast-moving Olympic athletes in Paris and the R1 tracked them so well. My take rate of tack sharp images was so much better than with any other camera.  

Pre-Capture

This is one feature that I have used many times and find it absolutely indispensable when photographing unpredictable wildlife, birds about to take flight, and sports which I am less familiar with. I don't use pre-capture all the time, but love having the feature in the camera when those moments arrive. And I should mention that this ability to go back a half second and grab frames I might have otherwise missed, has yielded me many great photos I would not have captured with the Canon R3. 

Dual CFexpress Slots

One of the things that irritated me (yes - it really bugged me a lot!) about the Canon R3 is that Canon chose to include one CFexpress card slot and one SD card slot in the camera. If you read my blog a lot, you know that I always shoot RAW images to BOTH card slots (to make darned sure that I have my images even if a memory card were to fail). I really hated the fact that the Canon R3 limited by capture abilities, when shooting at fast frame rates, to the speed of the much slower SD cards. Arghhhh! I actually missed numerous photos at the Summer Olympics in Tokyo because of this. Thankfully, Canon opted for two of the faster CFexpress card slots in the Canon R1 so I can blast off shots almost endlessly, if needed, and not be slowed down by the older and slower SD cards.

Eye Control

Just to be clear, I am not talking about the eye detection of the new mirrorless cameras, where the camera can lock in on the subject's eyes or face. Eye control on the Canon R1 and Canon R5 Mark II is the feature that allows the camera to determine which subject I am looking at and move the focus point to that subject. I know that the Canon R3 had this feature as well, but I find that with the much improved technology in the Canon R1, it now makes this useable for the first time. I tried this on the Canon R3 and found it unresponsive and distracting. The same feature in the Canon R1 is incredibly accurate and helpful in almost all scenarios. 

Burst Rate

The Canon R1 can capture images at a faster burst rate (40fps) than the R3 (30fps), but this is not a critical factor for me since 40fps is rarely used in my case.

Higher Resolution Viewfinder and LCD

The Canon R1 has almost double the resolution in the viewfinder as compared to the Canon R3. Although I find this nice, I never really had a problem with the viewfinder of the R3.

Now let me address the difference between the Canon R1 and the Canon R5 Mark II (in order of importance to me).

Both of these cameras offer exceptional focus speed and accuracy, and they share the pre-capture and pupil detection features. But there are some key differences which offer advantages to each model. Although both cameras are exceptional in my opinion, I use them interchangeably depending on what I am photographing. My choice is almost always predicated on what resolution I desire and the physical size and weight of the camera. 

Resolution

Even though the Canon R5 Mark II is the less expensive camera, it actually has a higher resolution sensor (45 megapixels) as compared to the Canon R1 (24 megapixels), but that does not mean that it is my camera of choice for all my photography.  I love having the higher resolution when photographing wildlife so that I have more ability to crop and have a high resolution image, and often choose the Canon R5 Mark II for my photo tours for this reason.

As I mentioned, the increased resolution does not mean that the Canon R5 Mark II is the best camera for me at all times, When I am photographing sports and personal events (bar mitzvah, weddings, corporate events...), I prefer not to have the highest resolution, as most images I am delivering are not going to be enlarged to a billboard size print. They are often being printed at 4x6, 5x7, or 8x10 or going into an album. In these cases 24MP is plenty. 

Physical Size

One of the obvious differences between the Canon R1 and Canon R5 Mark II is the physical size and weight of the cameras when holding them in your hand. 

Sometimes bigger is better. I really love using the Canon R1 for portraits and events since I am often turning the camera and shooting portrait (tall) vs. landscape (wide) and I love having all the redundant buttons on the camera grip. I also prefer the larger batteries for these types of situations, because when I am working an event, I am moving too fast to worry about battery life.

Sometimes smaller is better. This is why I often choose the Canon R5 Mark II for my photo tours, since it is easier to travel with the smaller and lighter Canon R5 Mark II and Canon R6 Mark II combination. Not only is the camera smaller and lighter in weight, as compared to the Canon R1, but it also uses the smaller batteries and shares the same small battery charger with the R6.

Eye Control

Both the Canon R1 and Canon R5 Mark II have the eye control, but I can tell you that this feature is MUCH better on the R1. This is probably due to the much larger eye piece and amount of detection on the Canon R1. 

Card slots

As I mentioned before, I am not a big fan of mixed memory card slots, especially when one of the card slots is a slower SD slot. Canon created the Canon R5 Mark II with a mix of a CFexpress slot and a SD slot (much like the older Canon R3). With that said, it is nice to travel with a single memory card reader which has both CFexpress and SD slots. This saves me a little more space when on the road.

Wrapping this all up

All of these cameras are excellent bodies for any photographer, capturing images at fast burst rates and with excellent focus abilities, but as you can see, they each have their pluses and minuses. If you are struggling with a purchase decision, I hope this helps you make a good choice.


__________________________________________________________

• Subscribe to the Jeff Cable Photography Blog by clicking HERE!

• Check out my upcoming photo tours to amazing places around the world. I have photo tours to Costa Rica, Peru, Galapagos, Alaska and more.

• You can purchase Jeff Cable Photography images from my new fine art site at: https://fineart.jeffcable.com/

• If you are interested in purchasing ANY equipment, please click here to go to B&H Photo, as I get a referral from them if you enter this way. It does not change the cost to you in any way, but it helps me keep this blog up and running.
_________________________________________________________________

Tuesday, May 13, 2025

Backing up 65GB of images to my NAS drive from a different country!

One of the most challenging things I deal with is the secure storage of my images. Well...I call them my images, but they are also the images for my clients, and I hate having them in only one place. This keeps me up at night.

In the past week I was crazy busy with photo shoots for a government client, another institution, and 2 personal events. After all of this, I had just enough time to get all 10,000 images onto my MacBook Pro before heading to the airport on Sunday morning. Just in case something happened to my laptop in transport, I duplicated all those RAW files onto a SSD back in California before heading out.

I then spent the 9 hours of travel going through all the images and purging the duplicates and rejects, and ranking the good ones. I renamed all the files, retouched my favorites and got each gallery ready to post to my clients. I posted one event from the airport in Houston and the remainder from here in Costa Rica.

BUT at this point I had all the curated images only on my laptop and that makes me nervous. In the past, I would back them up on one of my Crucial 4TB SSDs and keep that SSD in a different bag from my laptop as I traveled, but was not ideal. I also tried uploading to my NAS drive directly through the web app but every time there was a disconnect from the Internet, or I had to close my laptop to move it, the synch would have to start over and that was impossible.

A couple of months ago I was watching an online presentation from QNAP and they mentioned something about Dropbox integration and this peaked my interest. I was thinking "Can I create a Dropbox folder and have it automatically uploaded to my QNAP 8-Bay NAS drives back in California?"

I reached out to the support people at QNAP and they were nice enough to help me set this up and, even though I am jumping ahead of things, it works amazing!! 


Using the Hybrid Backup Sync application from QNAP, I was able to create a link to my Dropbox account.

I then told the HBS app which folder to monitor.


Before leaving for this trip, I created a test folder with a handful of images to see if it worked, and within seconds of me uploading the files to my Dropbox folder, they were on the NAS drive. When landing here in Costa Rica, I took the two folders (with approximately 30GB of images each) and moved them the "Upload to QNAP Server" Dropbox folder I had created.

I let the computer run all night while I attempted to catch up on some much needed sleep. When I woke up in the morning, I saw that there were only a few more files remaining to upload to Dropbox. After a quick shower I checked again and the process was complete.


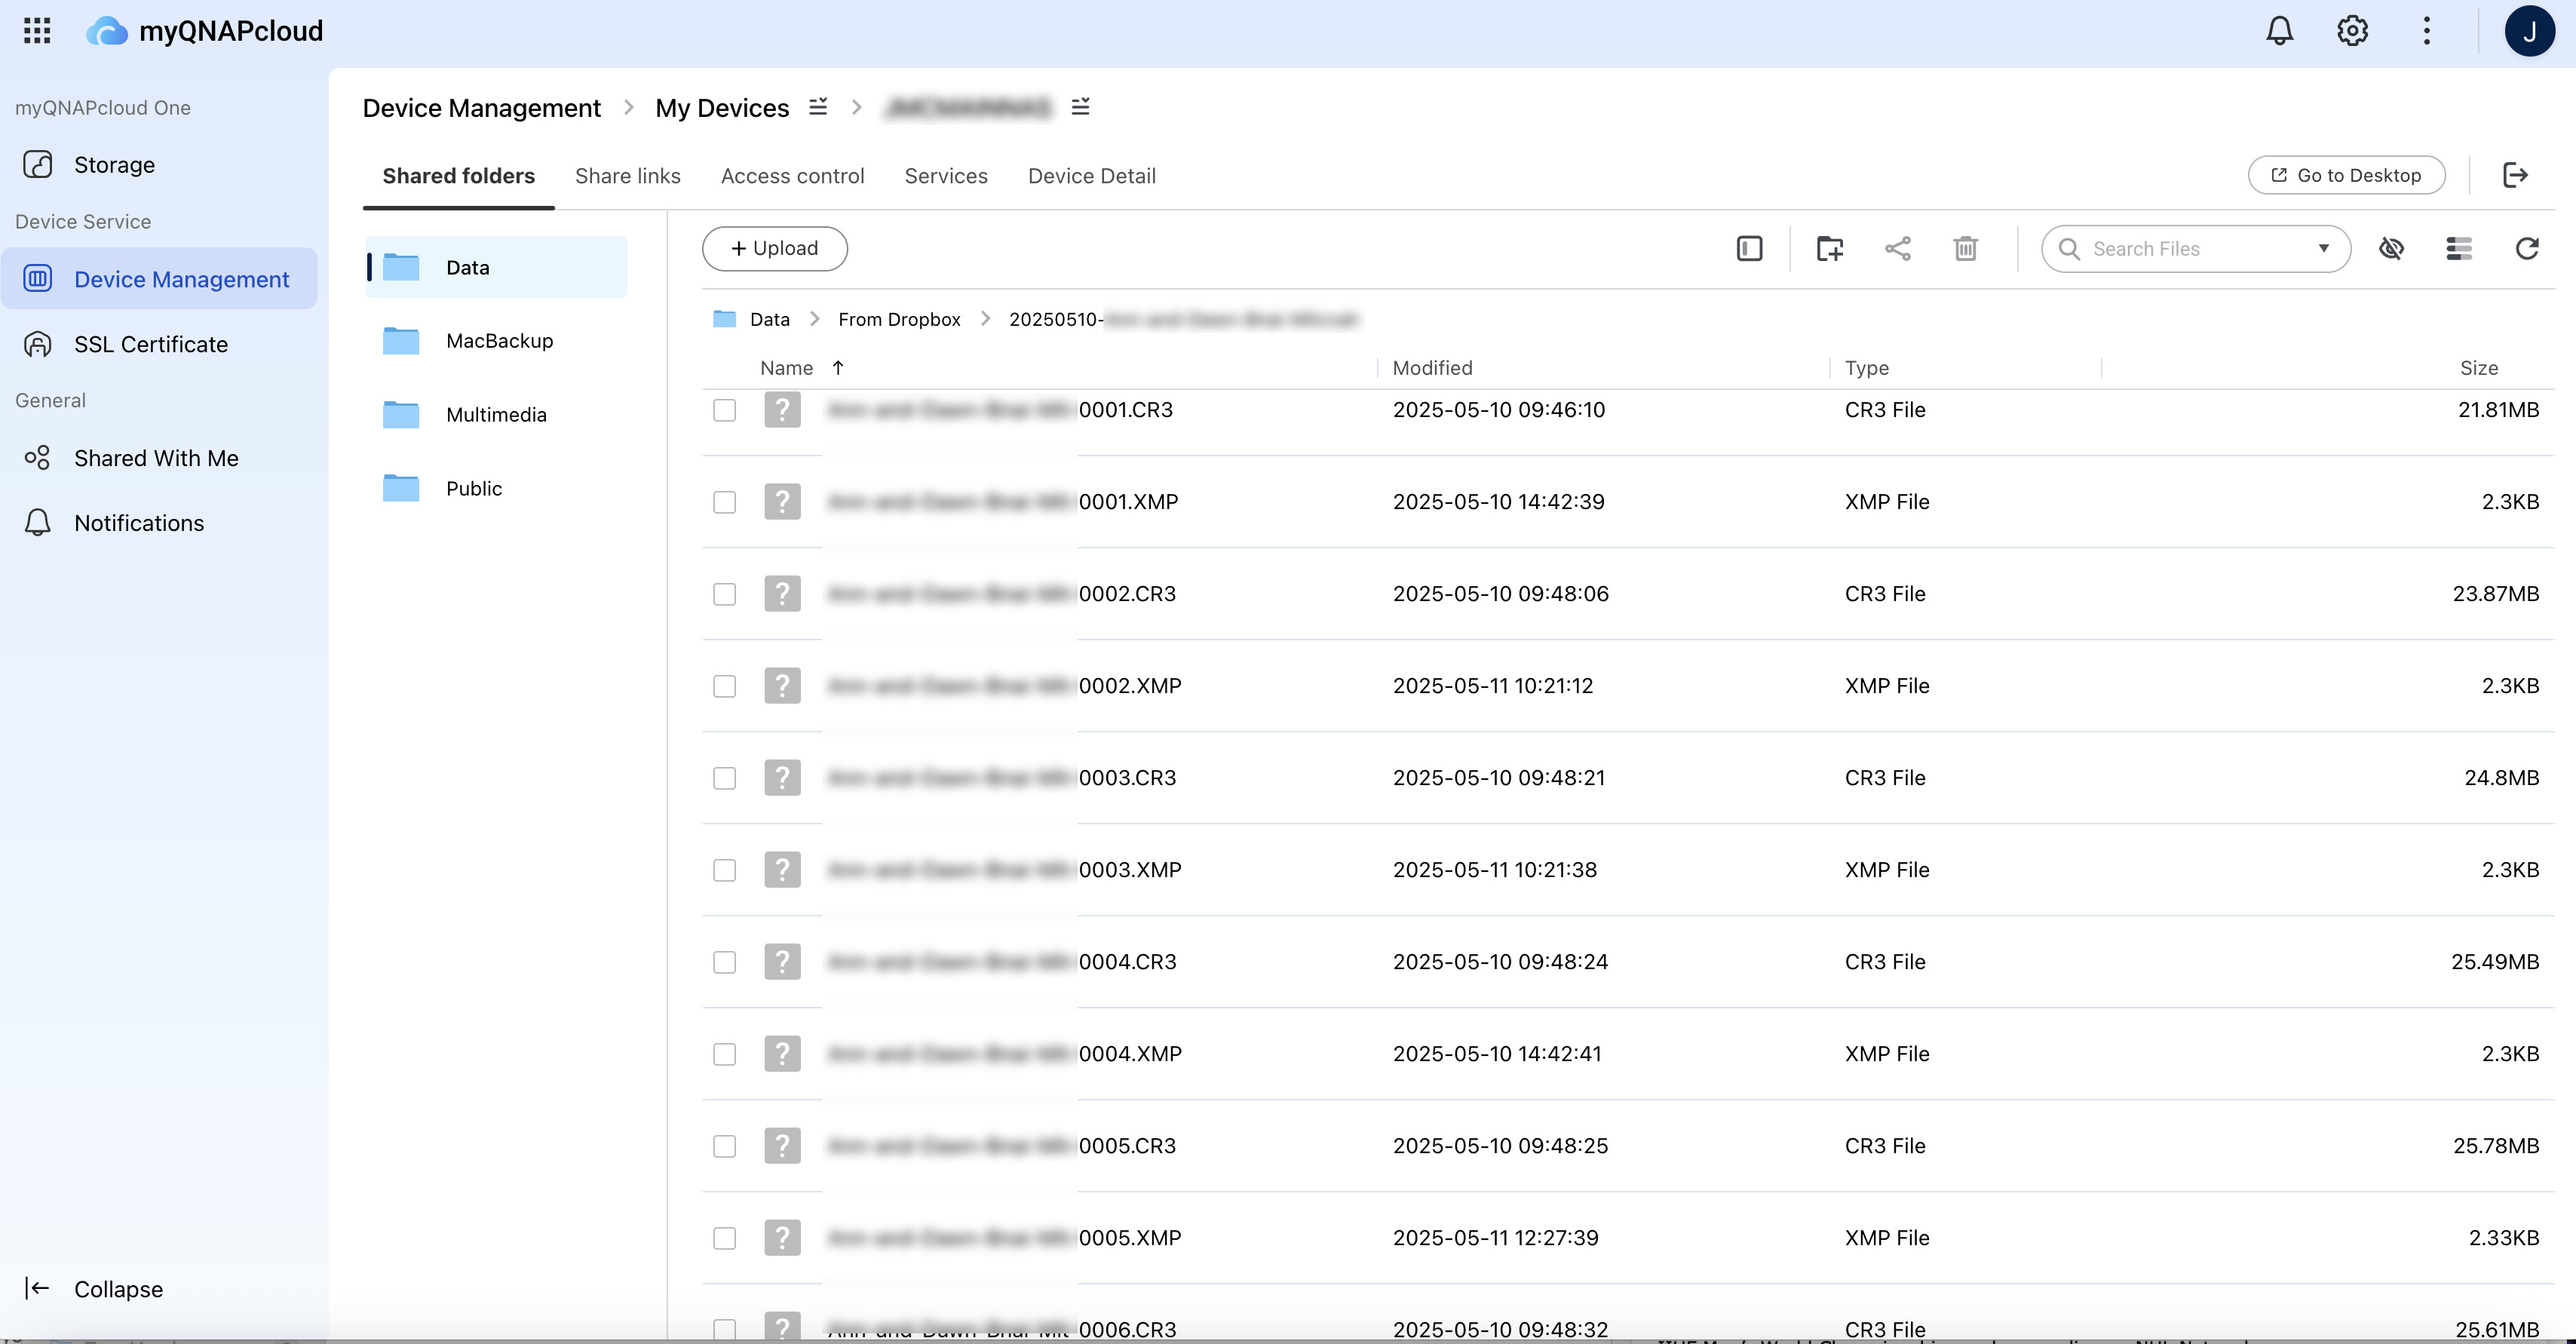
At this point, I was happy to have them in the cloud but wanted to check and see if they really had made it to my NAS drive. I used the MyQNAPCloud web link to log into my server from this remote location.


I was happy to see that both of the new folders had transferred over..


I then opened the folders to make sure that the synch had happened correctly and that everything is in place, and as expected, all 65GB of images are safe and sound! I guess this means that the images are in 4 places right now. They are on my MacBook Pro, Dropbox (for now), my server and my backup server. Sweet!

I am really excited about this newfound data transfer method and look forward to using it for future trips and even from here in Costa Rica this week for all my favorite photos. And thanks to the support people at QNAP for helping me get this set up.


__________________________________________________________

• Subscribe to the Jeff Cable Photography Blog by clicking HERE!

• Check out my upcoming photo tours to amazing places around the world. I have photo tours to Costa Rica, Peru, Galapagos, Alaska and more.

• You can purchase Jeff Cable Photography images from my new fine art site at: https://fineart.jeffcable.com/

• If you are interested in purchasing ANY equipment, please click here to go to B&H Photo, as I get a referral from them if you enter this way. It does not change the cost to you in any way, but it helps me keep this blog up and running.
_________________________________________________________________


Tuesday, February 4, 2025

All new tripods and monopods for me!

In all the years that I have been a photographer, it is not often that I change the brand of products I am using. You know how it is when you get used to something and it works well...it is hard to make a switch. But after many years of using Gitzo tripods and monopods, I am making the switch to Benro. 

It is not that Gitzo products are not excellent, but they are really expensive, and with so many other high-quality offerings out there, it has gotten harder for me to recommend them when they are so much more expensive than other comparable products. 

(Photo credit: Emma Cable)

I tried to reach out to the people at Gitzo to find out why they were priced so much higher than the others, but never heard back from them. So I started to evaluate other companies that made higher-end tripods and monopods. I did some research online and also reached out to some of my photographer friends in the industry who I trusted the most. (Thanks to Moose Peterson for recommending Benro so passionately.) 

Numerous companies responded to me and sent me products to evaluate. My living room looked like B&H photo with tripods set up all over the place. I methodically went through and tested each tripod and monopod to test the following:

* Rigidity and Sturdiness
* Strength
* Weight
* Size
* Balance

I also took into account the prices for each item and the overall selection that each company had to offer. After a lot of testing, the one company that stood out was Benro. 

When testing the products, I consistently selected the Benro tripods (without looking at the brand name to know which brand I was using). I feel that the quality of their products is at the same level as Gitzo (which is saying a lot) but with a price point that is more reasonable for the average photographer or photo enthusiast. 

Right now I am using three of their tripods:


I am also using the Benro SupaDupa Monopod which I really like. This monopod extends to a really long length. 

All of these products that I have chosen are made with Carbon Fiber, and feel solid as a rock. The overall quality is excellent, the movement of the hinges and legs feels smooth and solid, and they feel like they are built to last.

I know that Benro also makes tripod heads but I am sticking with the Acratech ball heads, because I still feel that they are the best on the market. I know that they are expensive, but I love that the high-quality build of the Acratech heads and I also love their Swift Clamp for my camera straps. 

I should mention that, even though I am sticking with the Acratech ballheads, I am using the Benro gimbal heads. They have two models which I am using right now. The first is the more substantial carbon fiber GH5CMini, and the other gimbal head I tested is their collapsable gimbal head (seen above) for travel. Both are really nice!

In talking to the people at Benro, I am really excited about their innovations and future products, with so much cool stuff coming down the pipe. 

I am proud to be a Benro Ambassador and super excited to use their products for my events in the Bay Area, on my photo tours, and at the upcoming Olympics. I look forward to seeing my image and name on their ambassador web page soon.


__________________________________________________________

• Subscribe to the Jeff Cable Photography Blog by clicking HERE!

• You can now purchase Jeff Cable Photography images from my new fine art site at: https://fineart.jeffcable.com/

• If you are interested in purchasing ANY equipment, please click here to go to B&H Photo, as I get a referral from them if you enter this way. It does not change the cost to you in any way, but it helps me keep this blog up and running.

• Check out my upcoming photo tours to amazing places around the world. I have photo tours to Costa Rica, Peru, Galapagos, Alaska and more. 

 _________________________________________________________________