Tuesday, June 27, 2023

New 3-day San Francisco photo tour!

I have been teaching photo tours all over the world for many years now, but have never taught in my home town. I have photographed in San Francisco so many times, and every time I do, I think about hosting a photo tour in this amazing city.  

Well, the time has come for me to share my favorite photo locations in San Francisco with my guests! 

I picked the month of October, since the weather is usually at its best during this month. The tour will begin on October 9th and run through October 11th, and we will be photographing day and night. Here is the tentative itinerary for the trip.

**************************************************************

Day 1:


Golden Gate Bridge (numerous locations)

Palace of Fine Arts

Baker Beach

Lands End

San Francisco Bay


Night: Golden Gate Bridge from the Marin Headlands


Day 2:


Painted Ladies

Lombard Street

Fishermans Wharf

Coit Tower


Night: Wide shots of the San Francisco skyline and bay


Day 3:


China Town

City Hall

Haight Ashbury

Golden Gate Park

Bay Bridge


Night: Sunset shots over the city


**************************************************************

All of this is subject to change, depending on the weather and other factors, but suffice it to say that we will see all the best that San Francisco has to offer. 

Here are some images of locations I will be taking you to:


Of course, you can't photograph San Francisco without capturing the Golden Gate Bridge.


There are many vantage points which give you very different photos of this iconic structure.


The Cable Cars (and learning how to motion pan them - like this photo)


The Palace of Fine Arts


The Painted Ladies


Downtown


Chinatown


Some really great lessor known areas.
 

Views of Alcatraz


As I mentioned, we will be taking photos during the day and into the evening. 


I even have the option for my guests doing an optional aerial tour of San Francisco. I have a good friend who is a pilot and does aerial tours of the city. I have flown with him numerous times, capturing images during the day... 


...and after sunset. 


I can help arrange the optional aerial tour for any of my guests.

The cost of the tour includes:

* Hotel 
* All meals
* Photo instruction (of course)
* Luxury transportation and a full time driver (so we don't need to worry about parking)
* Security (good to have in many locations and at night)
* Loaner camera gear from Canon

The cost is: $3950.

I put this on my web site a while back and have already had 4 people sign up. We have room for 6 more people. If you are interested, please contact me to grab one of the remaining spots.

I have also added new photo tours to some of my favorite places, like Costa Rica, Africa, Japan, Indochina and more for 2024 and 2025. You can check those out HERE.

__________________________________________________________

Subscribe to the Jeff Cable Photography Blog by clicking HERE!
_________________________________________________________________
If you are interested in purchasing ANY equipment, please click here to go to B&H Photo, as I get a referral from them if you enter this way. It does not change the cost to you in any way, but it helps me keep this blog up and running.
_________________________________________________________________
Check out my upcoming photo tours to amazing places around the world. I have photo tours to Africa Costa Rica and more. And Canon will loan you any gear you want for FREE for any of my tours. 

_________________________________________________________________  

Thursday, June 15, 2023

Printing big and BIGGER with my Canon printers!

In the last blog post, I talked about the importance of color calibration. I also said that I would follow up that blog post to cover the final step in the process...printing. 

For the last 8 years I have been relying on the Canon Pro-1000 printer. This printer has been an absolute work-horse for me, printing the bulk of my 4x6, 5x7, 8x10 prints for clients, and really anything up to 16x20. Then, about 6 months ago I added the larger Canon Pro-4100 printer to my arsenal so that I can print REALLY large images.

Actually - I have three Canon printers if you want to include my multifunction printer (to the left), which I generally only use for printing documents and scanning. The Canon Pro-1000 printer is right next to my computer for easy loading of smaller photo paper.


This is the Canon Pro-4100 printer taking up a lot of space in the office, but worth it. I posted this photo of my granddaughter and I (taken by my daughter-in-law) on social media last week because it is one of my favorites. I had to print that one big!

But I am getting ahead of myself here. Before I talk about the printers, I need to further explain the importance of color calibration as part of the printing process. Regardless of whether you are printing on a large format printer or a small one, the color calibration is really needed because nobody wants to spend the money on the ink and paper only to find out that the colors and brightness are off. Having the Spyder X2 connected to my computer means that, not only are my colors going to be correct both on screen and from the printer, but also that the brightness of the monitor will be set so I can properly set the exposure levels before the images is sent to the printer. With this combination, I have complete confidence knowing that what I output will be accurate, without having to reprint over and over.

Unlike many photographers, I do not use Adobe Lightroom very often, but instead choose to do all my retouching directly in Adobe Photoshop (using Photo Mechanic for all my culling and organization). Once I have done all the retouching in Photoshop, I then choose which printer I am going to output to. Most of the time this determination is made strictly on the size of the final print. If the print is going to be smaller than 16x20, then I still default to the Canon Pro-1000. Anything larger and I use the new Canon Pro-4100, which can print all the way up to 44" wide by 100 feet. 

Some people have asked me why I decided to get the Canon Pro-4100. Honestly I got this beast for the following reasons:

1. I have always wanted to be able to print my images really large, to frame and put in the house.

2. I periodically have clients who want large prints and I like being able to create them quickly.

3. I had a corporate client who wanted images printed for an office building, and it seemed more cost effective to print them here than to order a large quantity from my color lab.

One of the features I love the most about the Canon Pro-1000 is the paper loading system. Unlike many other printers, this one uses a vacuum system to pull the paper in. My previous printer (from another company) would bring paper in crooked all the time, creating a lot of waste and frustration. In all my years using the Pro-1000, I have never once had the paper go in off angle. The Canon Pro-4100 uses paper rolls, and has also been perfect in the loading and printing department. Even the process of replacing a roll is incredibly easy. I just put the roll of paper onto the bar and the printer does the rest.

As for the quality of the prints, they are always remarkable. The colors are perfect and the resolution is museum grade. There is nothing like seeing your favorite images printed in the highest quality and large!

For both printers, my favorite media is the Lustre paper and I use this 90% of the time.  


These are some of the photos that I printed for the office building. I generally lay them down on the ground for a couple of days to get the curl out of the paper (since they are coming off of a roll). 


Ever since getting the new printer, I have been having fun framing favorite images and putting them up at the house. When I get tired of them. I switch them out for new ones.

If you are interested in getting any of my photos in a large print, just send me an email and tell me which image (any from my web site or blog) and I can print that for you at a reasonable price. Then you can enjoy these large photos as much as I am. 😀

__________________________________________________________

Subscribe to the Jeff Cable Photography Blog by clicking HERE!
_________________________________________________________________
If you are interested in purchasing ANY equipment, please click here to go to B&H Photo, as I get a referral from them if you enter this way. It does not change the cost to you in any way, but it helps me keep this blog up and running.
_________________________________________________________________
Check out my upcoming photo tours to amazing places around the world. I have photo tours to Africa Costa Rica and more. And Canon will loan you any gear you want for FREE for any of my tours. 

_________________________________________________________________  

Wednesday, June 7, 2023

The importance of color calibration - especially when printing images!

This blog post is one I have been meaning to write for at least 6 months, and I just never got around to it. It involves an important topic for all of you out there who want to create the best photos possible. We all invest in great cameras, lenses and other accessories, but many fail to finish the process in the proper way. 

As I have always said, almost every image needs some finishing, whether it is slight tweaks to the exposure, shadows and highlights, white balance, or removing distractions in the photo. This can be done in PhotoShop, Lightroom or other editing programs, but there is a step that should be done before this happens. This step is color calibration.

I take the time to frame a shot, choose the best ISO, aperture and shutter speed and am excited to get back to my computer to see what I captured. But how do I know that my computer monitor is showing me the proper brightness and colors? Without color calibration, I can not trust what I am seeing on my computer. 

Think about it...if my monitor is not calibrated and is over saturating the reds, then I would be removing some of the red in the retouching process. Then when I go to print the image, the red color would be under saturated and the image would not look it's best.


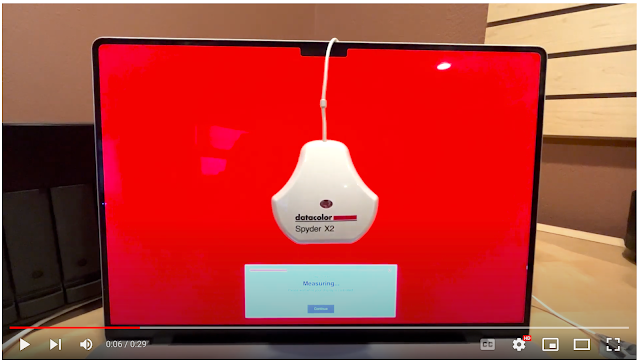
For the last 10 years, I have been using the Datacolor Spyder calibrators to assure accuracy in my images. A couple of months ago, Datacolor sent me a prerelease of the new Spyder X2 calibrator to try prior to it's launch. I found that this new calibrator makes the process so easy and fast. 


The software is designed to make the process easy for any user, not needing to be a color expert (which I am not).  Each step of the way I was walked through the choices, and then I hang the calibrator in front of my display and let it do it's thing.


The calibrator even measures the ambient light in your room, and helps you set the proper brightness for your monitor prior to doing it's thing. 

You can watch as the Spyder software generates many different shades of each color, with the device measuring that each step of the way. Once the calibration is complete (which only takes a minute or so), you can see the difference between the uncalibrated monitor and the calibrated monitor.


You can see the calibration happening here:

And you can see the difference by clicking the video above or by clicking here.

The Spyder comes in two different versions, the Spyder X2 Elite and the Spyder X2 Ultra. If you have an HDR monitor or a newer monitor that has "high-brightness" you will want the Ultra ($30 more), otherwise the Elite will do just fine for you. Either way, the Spyder X2 will cost you less than $300. and it will make a big difference to your images.

I find that the Apple MacBook Pro laptops hold their calibration pretty well, but I choose to run the Spyder software on my computers every three months to make sure they stay calibrated.

For many years I have been printing my images (4x6, 5x7, 8x10 and up to 13x19) on the Canon Pro-1000 printer, and as of 6 months ago I got a Canon Pro-4100 large format printer. When I am using higher cost paper and ink for these printers, I want to know that my images are color corrected prior to printing them. More on the new printer in my next blog post!

You can get more information on the Spyder products using the following links:

Datacolor Spyder calibrators: https://www.datacolor.com/spyder/spyder-monitor-calibrators/

Spyder X2: https://www.datacolor.com/spyder/products/

__________________________________________________________

Subscribe to the Jeff Cable Photography Blog by clicking HERE!
_________________________________________________________________
If you are interested in purchasing ANY equipment, please click here to go to B&H Photo, as I get a referral from them if you enter this way. It does not change the cost to you in any way, but it helps me keep this blog up and running.
_________________________________________________________________
Check out my upcoming photo tours to amazing places around the world. I have photo tours to Africa Costa Rica and more. And Canon will loan you any gear you want for FREE for any of my tours. 

_________________________________________________________________  


Wednesday, May 31, 2023

Canon gear on sale now - Up to $700 off!

I just got word about new Canon rebates with some really great deals. One that jumps out immediately is the Canon R6 camera which was selling for $2299 is now available for $1599! They also have the same rebate on the Canon R6 kit with the RF24-105mm f/4 lens, which sold for $3399 and is now available for $2699. 


Check out all the deals by clinking on the image above or HERE.

Happy shopping everyone!


__________________________________________________________________________

Subscribe to the Jeff Cable Photography Blog by clicking HERE!
__________________________________________________________________________
If you are interested in purchasing ANY equipment, please click here to go to B&H Photo, as I get a referral from them if you enter this way. It does not change the cost to you in any way, but it helps me keep this blog up and running.
__________________________________________________________________________
Check out my upcoming photo tours to amazing places around the world. I have photo tours to Africa Costa Rica and more. And Canon will loan you any gear you want for FREE for any of my tours. 

__________________________________________________________________________  


Monday, May 29, 2023

Memorial Day Photos: San Francisco National Cemetery

Today is Memorial Day and I thought it would be appropriate to pay my respect to those who have made it possible for us to have our freedom. I looked back and found some of my older images from the National Cemetery in San Francisco (from a blog post I did ten years ago) and also have added some new photos that I took yesterday. 

The first two photos were taken back in 2013. It was the first time that I visited the cemetery after the volunteers has placed flags in front of all 32,000 tombstones. 


For this image, I used a fish-eye lens to capture the flags at the entry of the cemetery.


On my previous visit I was there on Memorial Day and had a chance to photograph some of the military who were in attendance.


Yesterday the cemetery was mostly empty. Since I had just finished shooting an event, I had many of my cameras and lenses to choose from. I decided to use my Canon R3 with the Canon RF 70-200mm lens. I got down low to capture the flags and show the repeating pattern of the endless headstones.


I also looked for graves that had been visited. I shot from a standing position...


...and also got down low to highlight the tribute. 


I did not just take photos. I also walked around and fixed some of the flowers and flags that had fallen over and took time to read many of the names of the fallen.


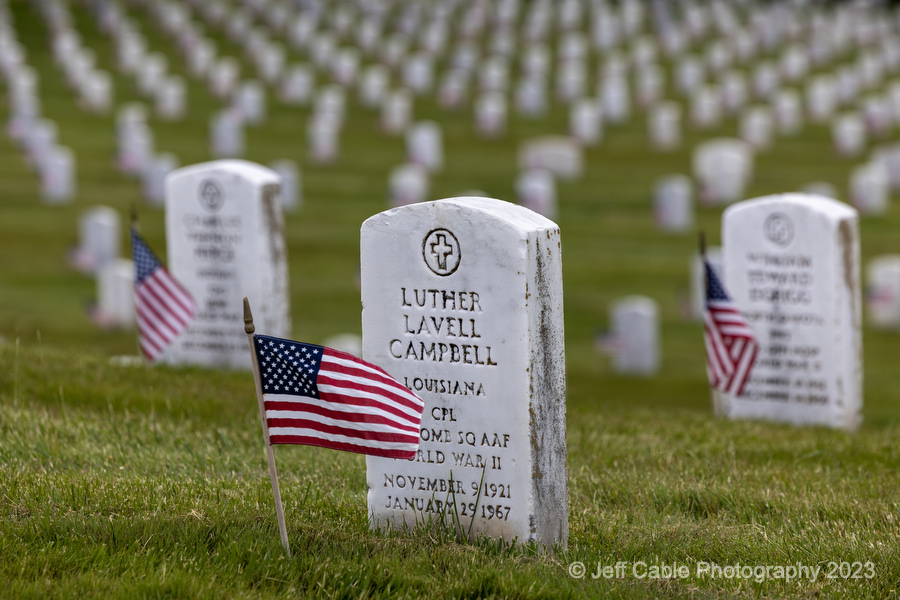
As I walked around, I was looking for repeating patterns in the background. I took this photo at f/3.5 to have the first stone in perfect focus, but let all the stones in the background go out of focus. This photo highlights the name and information.


For this photo, I waited for the wind to blow the flag in the foreground, and focused on that. I took this photo at f/5 to have both the flag and the stone in focus.


There are some military who are buried with flat headstones at grass level (like you can see in the first photo). I got down low to the grass to highlight only the repeating pattern of the flags. 


After spending an hour or so in the cemetery, I was about to leave when I saw these geese walking through the grounds. I saw these two that were walking towards the flags and waited to take photos until they got close.  It almost looks like they are paying their respects.


I got back in my car and was driving out when I saw this goose walking. I lowered my passenger window and framed my shot, and just as I did, it took off. I like that this is a different view within these hallowed grounds, with a little bit of life amongst the fallen. 

__________________________________________________________________________

Subscribe to the Jeff Cable Photography Blog by clicking HERE!
__________________________________________________________________________
If you are interested in purchasing ANY equipment, please click here to go to B&H Photo, as I get a referral from them if you enter this way. It does not change the cost to you in any way, but it helps me keep this blog up and running.
__________________________________________________________________________
Check out my upcoming photo tours to amazing places around the world. I have photo tours to Africa, Costa Rica, Cuba, Europe, Asia, India and more. And Canon will loan you any gear you want for FREE for any of my tours. 

__________________________________________________________________________  

Tuesday, May 16, 2023

Japan Photo Tour - Part 2 - Kyoto, Osaka and more

As you saw in the last blog post, we started our Japan photo tour in Tokyo and then made our way to Nikko, We had overcast weather for most of the first part of our trip. Unfortunately, we visited Mt Fuji, but the weather was so bad that we never got a glimpse of the majestic site. But the overcast skies and rain drops did not keep us from visiting some great sites and getting really nice photos.


Instead of taking wide shots, I showed our guests how isolating subjects up close would make for better images in this weather. This photo was taken with the Canon R6 MK II and the RF 24-105mm lens, under the cover of an overhang (to keep us out of the rain). With the low and flat light, I took this opportunity to slow the shutter speed to 1/15th sec to get some motion in the water coming from the dragon's mouth. I framed this shot to include the dragon (as my main subject), but also include the cherry blossoms and pagoda in the background. 


Our next stop was Kyoto, and it was the first time that we had no rain in the forecast. We arrived in Kyoto in the evening and had a nice dinner. As we were walking back from the restaurant, I saw that the Kyoto Tower was lit up in these great colors. I suggested that we do night shots, using the tower as our subject and the wet, reflective streets in the foreground. We walked to a nearby temple and used that as our shooting location. I really loved this location and was hoping to shoot this same image at blue hour the following night. My plans were made, but the tower was lit in white, devoid of this great color. It turns out that the first night was a special lighting to honor breast cancer awareness. 


Kyoto is known for all the amazing temples, and we really enjoyed photographing these. On this morning we visited the Golden Pavilion. I was really happy to see the nice clouds in the sky and great reflections in the water. Really nice shooting conditions! I used the Canon R6 MK IIRF 24-105mm lens with a Tiffen circular polarizing filter to accentuate the contrast in the clouds and the reflection.


We spent hours walking the grounds of the Golden Pavilion, enjoying the nice weather and capturing the beauty of Japan. 


The next day we went to an area just outside of Osaka, which had endless cherry blossom trees. As we walked around the trees, it was hard to stop photographing their colors. 


At one point we started shooting up into the sky. I saw the sun coming through the blossoms and used this as an opportunity to teach the starburst effect (using a low aperture and placing the sun in the right spot). Fun stuff!


I saw these young ladies dressed in traditional clothing and had to get their photo. They had just purchased some sweet treats and happily showed them to me.


I had heard about this next stop and was excited to photograph the tall bamboo trees and the Torii Gates and the Fushimi Inaru Shrine.


Due to the cherry blossoms being in full bloom, the area was packed with visitors, tourists and locals included. These walkways were VERY crowded but I really wanted a clean shot without people the frame. As I walked up the pathway, I thought that this was not going to be possible. But then I noticed that even though there were two open rows of these gates, people were only going up the right side. People assumed that the opposite side was for people exiting the area, but that was not the case. Once I figured this out, I went back down and walked up the left side to get this clean shot.


More cherry blossoms...


We saw this woman posing for photos, and many of us chose to shoot our own images of her from different angles. I decided to use this tree as a "frame" above her. 


One of our last stops was to the Himeji Castle, which was built in the 1300s. Once again, we had great weather. Our group split up, allowing everyone to walk the property to find their own favorite photo locations. I saw this hedge with vibrant red leaves and thought that it would make for a perfect foreground to the castle. For this photo, I got down low to the leaves...

...and i this photo, I raised the camera a little higher to show more of the trees and a little less of the red leaves. This really shows how shooting at a slightly different height can change the composition of your image.

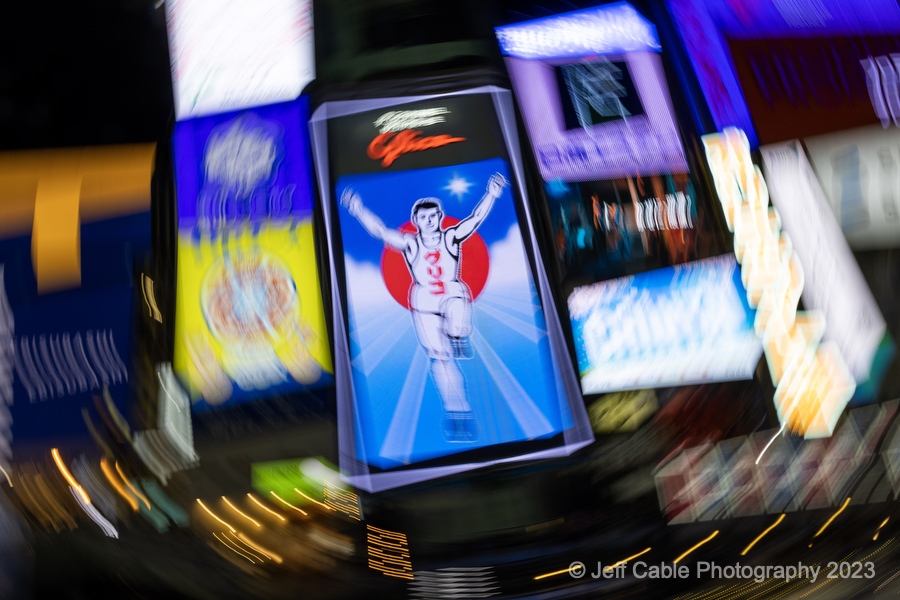
Our last night in Japan was spent in Osaka, where we went to visit the Glico running man. This is one of the most well known landmarks in Osaka and has been popular for the last 80 years. While waiting for the sunlight to diminish and the billboards to light up, we all broke out our phones to capture video and time-lapses from this location. I saw one of our guests (Dave) standing still amongst the fast moving crowd and had to capture this. I slowed the shutter speed of the camera to 1/6 sec and held it as steady as I could above my head.


I did not really understand why this was a tourist attraction, but took the photo anyways. There were literally thousands of people taking photos of this billboard.

In order to capture this billboard differently than everyone else there, I slowed the shutter down and twisted the camera to get this spinning effect. It is different and I like the uniqueness of the shot.

And I forgot to post this cool time-lapse video from the Shibuya Crossing in Tokyo on the last blog post. This is the busiest intersection in the world.

Click HERE or on the image above to see the time-lapse.

Overall it was an amazing chance for all of us to experience the beauty of Japan and I really look forward to getting back there next year. Hopefully I will get a chance to see Mt. Fuji next time around! 

If you would like to go with us, please click HERE to get more information.

__________________________________________________________________________

Subscribe to the Jeff Cable Photography Blog by clicking HERE!
__________________________________________________________________________
If you are interested in purchasing ANY equipment, please click here to go to B&H Photo, as I get a referral from them if you enter this way. It does not change the cost to you in any way, but it helps me keep this blog up and running.
__________________________________________________________________________
Check out my upcoming photo tours to amazing places around the world. I have photo tours to Africa, Costa Rica, Cuba, Europe, Asia, India and more. And Canon will loan you any gear you want for FREE for any of my tours. 

__________________________________________________________________________